An article in the author’s Astronomy Digest – http://www.ianmorison.com
This imaging exercise is a ‘text’ version of a talk given to the Society for Popular Astronomy on the 30th July 2022.
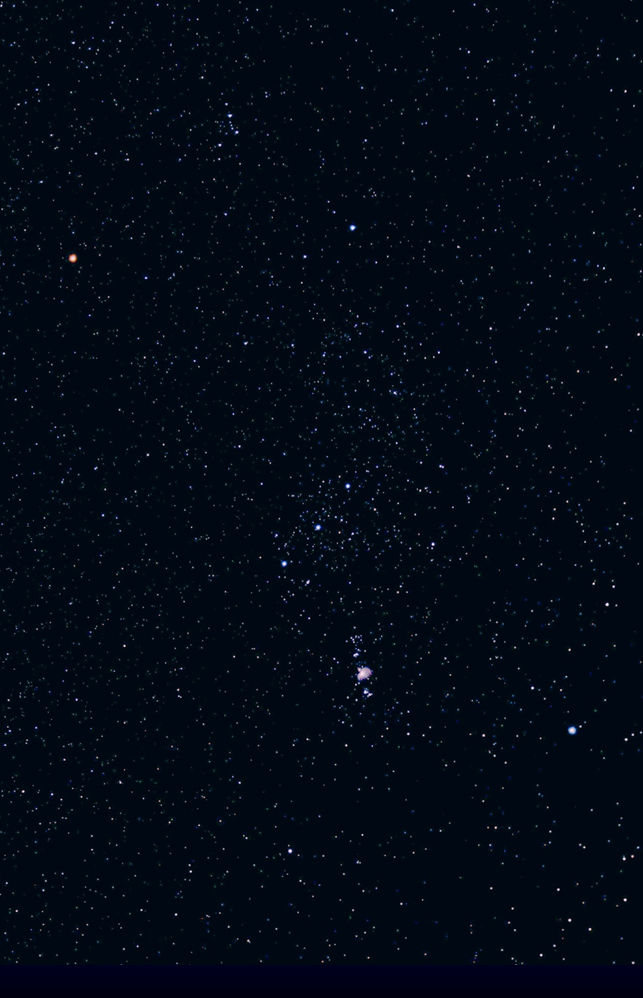
Objective: Image the constellation Orion using an APS-C DSLR mounted on a tripod and using the free programs Sequator and Siril to process the captured data.
Capturing the image data
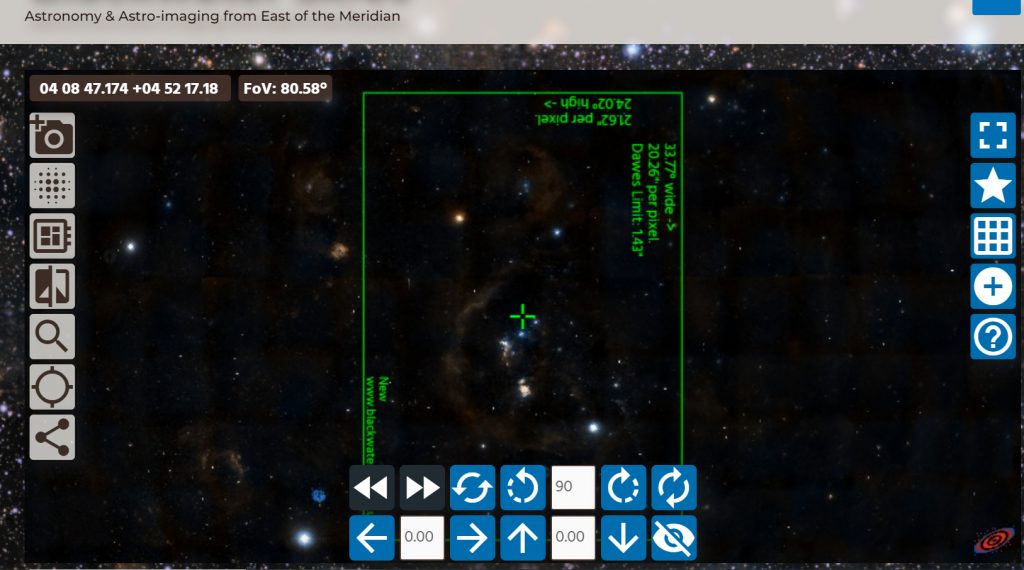
The first requirement is to select a suitable focal length to encompass the Orion constellation. For this one can use the free web based program called Blackwater Skies:
https://www.blackwaterskies.co.uk/imaging-toolbox/
At the top left of the screen, one selects the camera: many are covered, but if yours is not in the list use Nikon D7200 for Nikon or Canon EOS 1000D for Canon.
Choice of Focal Length
In the box below insert a focal length. A typical Zoom lenses will cover 18-55 mm in focal length. Put in these values and you should find that 18 mm is a bit wide and 55 mm too tight. 35 mm seems about right. [You may have a 35 mm prime lens which would be better to use than a zoom lens as the aperture could be larger so capturing more light and so taking less time to capture sufficient images.]
Lens Aperture
To give better star images, especially towards the corners, it is best to drop the aperture by one stop below the maximum – so perhaps f/5.6 for a Zoom lens or f/2.8 or f/4 for a prime lens. [The aperture of the Nikon Zoom lens at 35 mm is just f/4.8 whereas their 35 mm prime lens has an aperture of f/1.8 so one could use f/2.8 capturing 4 times more light.]
Exposure length
When taking a constellation image one does not want the stars to trail so this will determine the maximum exposure time. When film cameras – or now full frame DSLRs – are used there is what is called the ‘500 Rule’ to determine an appropriate exposure, but for APS-C cameras one should use the ‘350 Rule’.
The 350 Rule to determine exposure length
In its simplest form, one simply divides 350 by the focal length that has been chosen as, for this case, 35 giving an exposure of 10 seconds.
T = 350 / Focal Length
However, stars move more slowly across the sky the nearer one is imaging towards the North Celestial Pole so at higher declinations one can use longer exposures. The improved formula is thus:
T = 350 / (Focal Length * Cos(Declination))
An Example
Cassiopeia is as Declination + 60, so Cos(Dec) is 0.5. If imaging the Cassiopeia constellation, the exposure time is given by
T = 350 / (35 * 0.5) = 20 seconds.

Imaging Orion
However, to image the Orion constellation which straddles the celestial equator lying at declination zero, Cos(Dec) is 1 and so 10 seconds is the maximum exposure.
Choosing a suitable ISO
Increasing the ISO of the camera increases the amplification when the image is read out from the sensor. This increase the number of stars visible but, as the ISO is increased, the individual frames (as they are called) will become noisier. There is no one ‘best’ value. In order that the aligning and stacking software (Sequator) can align and stack the set of short exposure frames to give the result of a longer exposure, sufficient stars must be visible in a single frame – perhaps 100. So trial exposures can be made. Often an ISO of 800 is suitable. Using a larger aperture prime lens a lower ISO could probably be used.
Preventing the ‘dewing’ of the lens
In humid conditions, a lens may well dew up quite quickly. To avoid this, a simple remedy is to cut a ‘tube’ from the foot of an old sock and stretch this around the lens putting in a ‘hand warmer’ to keep it warm.
Long Exposure Noise Reduction
By default, when taking a long exposure image, most cameras will employ ‘Long Exposure Noise Reduction’ when the camera follows each exposure – called a light frame – with a second exposure – called a dark frame – of equal length. The two frames are then differenced which will have the effect of removing any hot pixels. This is good except for two things: it adds a little extra noise to the light frame and it obviously halves the time capturing photons from the sky. On a cool winter night I suspect it is best to disable this in the camera’s menus, but on a hot summer’ night perhaps it is best to employ it. [The stacking program, Sequator, will attempt to remove hot pixels that are present.]
Taking the frames
One must avoid camera shake as the shutter is depressed. One can either include a 2 second delay between depressing the shutter and the taking of each frame or use an intervalometer to take the sequence of frames. Some cameras include this facility otherwise one can purchase an intervalomoter for around £15 from Amazon – it must be the appropriate one for your camera – and set this up to take the frames.
Jpeg or raw capture?
Many authorities will tell you that the capturing of raw files will give far better results. This is because raw images have a bit depth of 16 bits per colour whilst Jpegs have only an 8 bit depth per colour so raw images provide a far greater dynamic range. Whilst this may well be true when single images are made, it is not so true when many images are to be stacked as when capturing a constellation image. If many 8 bit frames are stacked, noise will ‘dither’ the captured values and the result is that the effective number of bits per colour is increased so the difference is marginal. It is also said that Jpegs introduce artefacts but I suspect averaging many frames will smooth these out. When deriving a Jpeg in camera from the raw data some ‘stretching’ (see below) of the image is applied and I have found that nebulosity tends to show up better than when raw data is captured and processed. [ See my article in the digest: Could Jpegs be better than raw? ….]
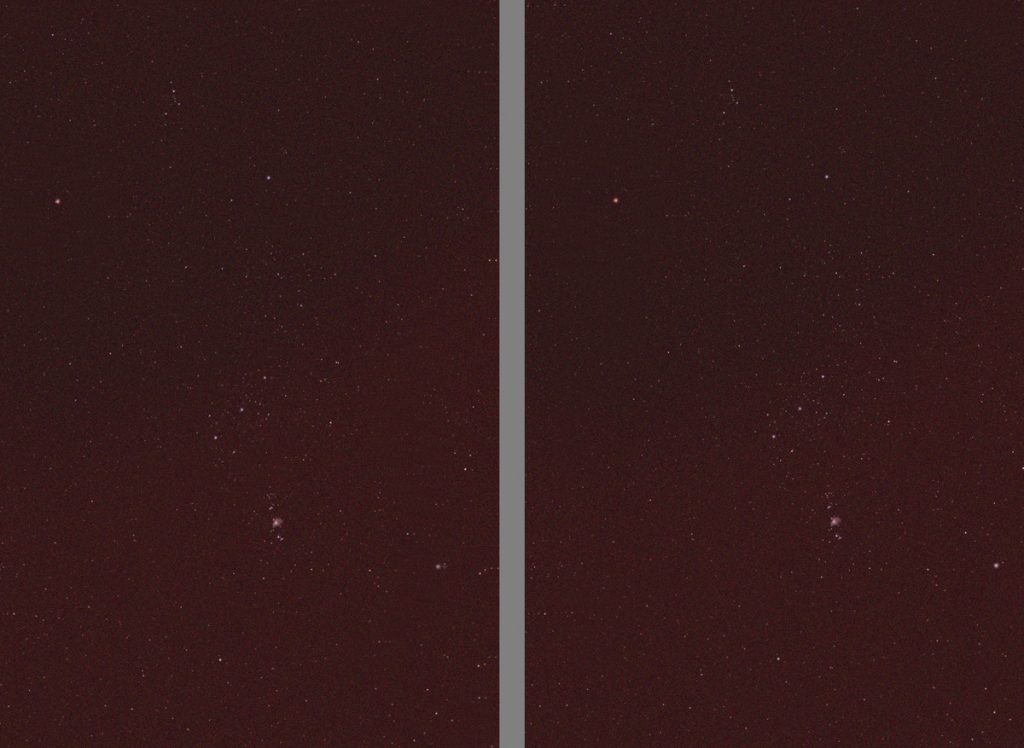
Looking at the individual frames
Individual frames will be noisy as a high ISO may be needed – but less so if a prime lens is used. Also, as seen below, when one is imaging using a fixed tripod, the constellation will move across the frame. This can be a good thing as, whereas the star images will integrate up and so become brighter, hot pixels will not and any ‘dust bunnies’ will become less apparent.
Processing the Frames
The first requirement is to align and stack the captured frames. A simple to use, free, program to achieve this is Sequator.
The program asks one to load the captured ‘star’ frames by double clicking on ‘Star Images’.
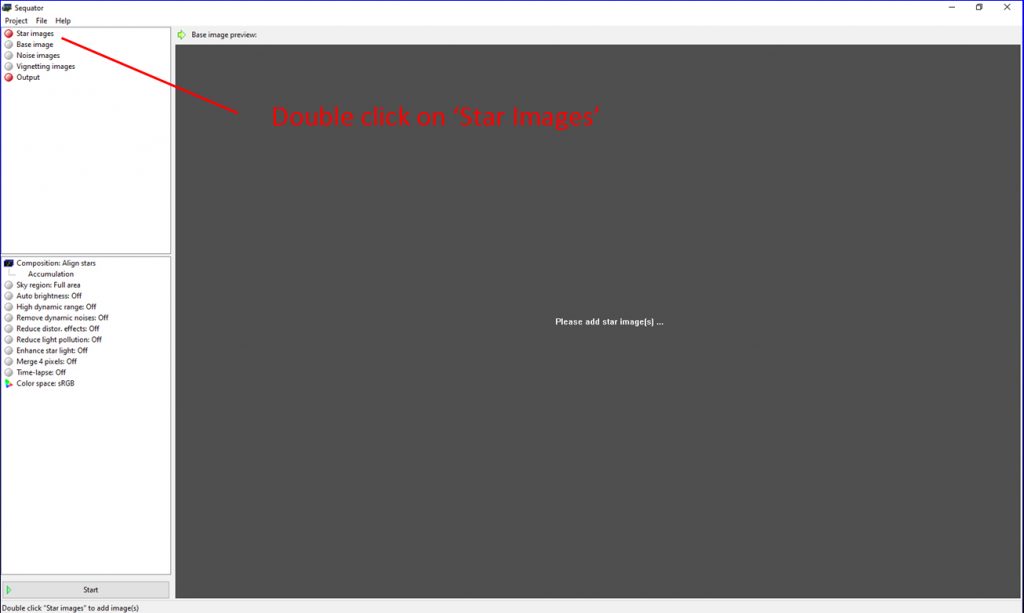
Then choose a name for the output file. In the options below select ‘High Dynamic Range’ and ‘Remove Dynamic Noises’. The latter will aim to reduce the effects of ‘hot pixels’ if ‘Long Exposure Noise Reduction’ has not been employed.
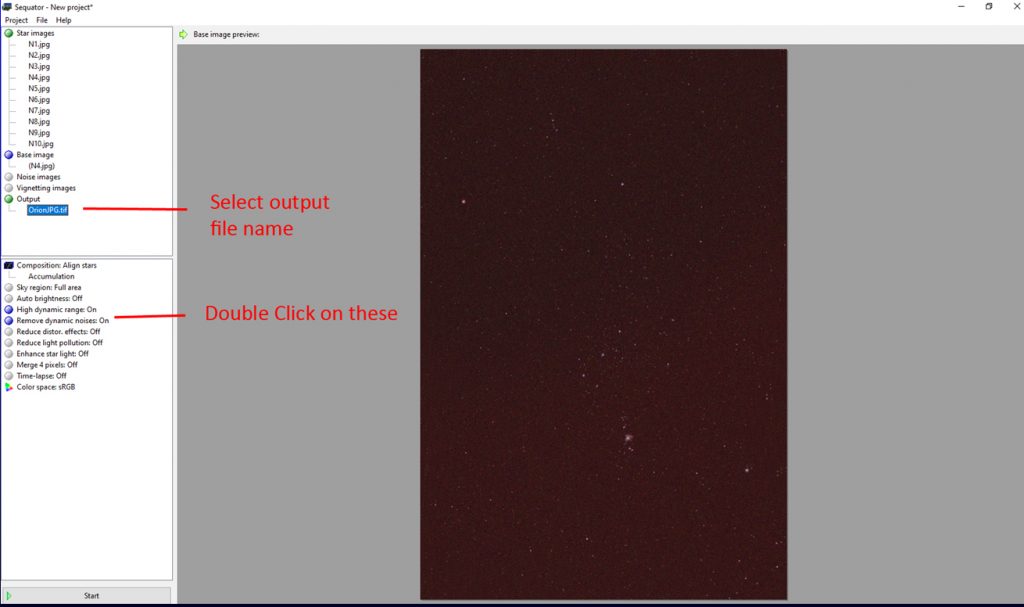
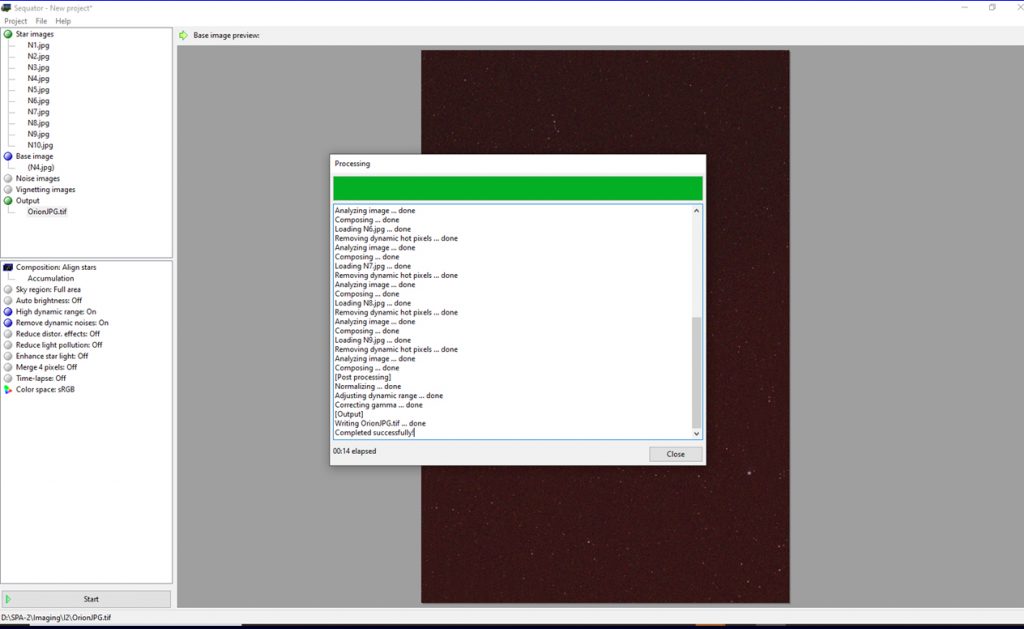
One then clicks on ‘Start’ and the program will align and stack the images with the stacked output saved in the chosen location.
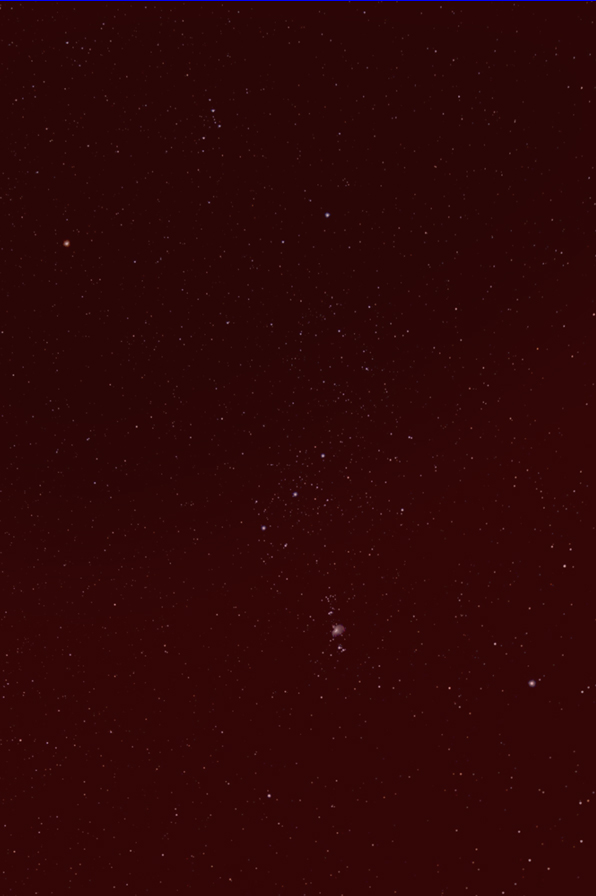
In the example given in the talk, you will see that there is some light pollution, reddish in colour, that increases towards the lower right of the image.
Post Processing the image.
For this the free program Siril will be used.

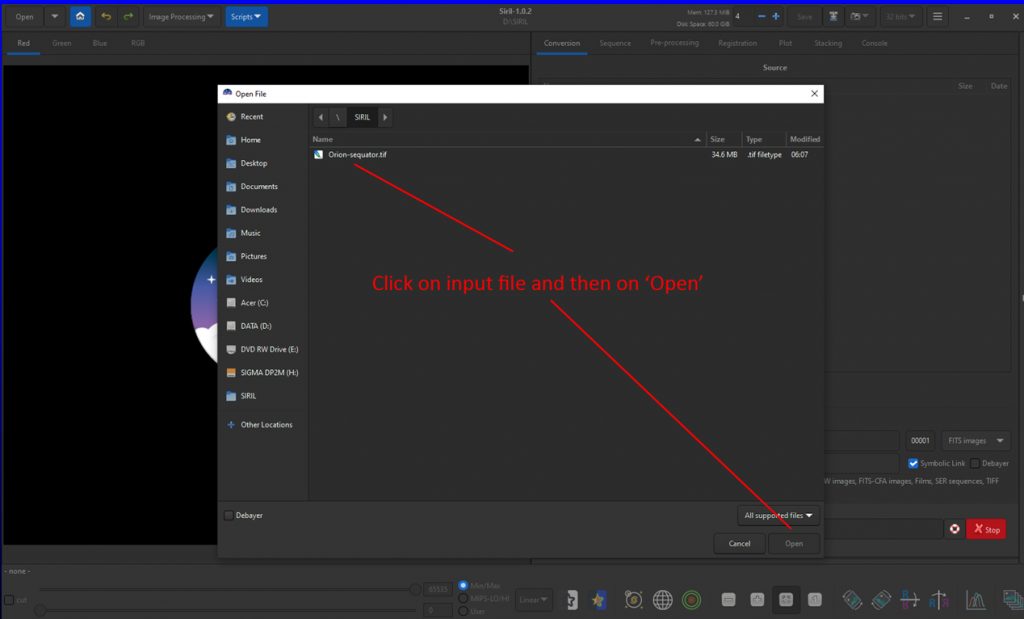
First the folder in which the image produced by Sequator must be opened then click on ‘Open’ to load the image.
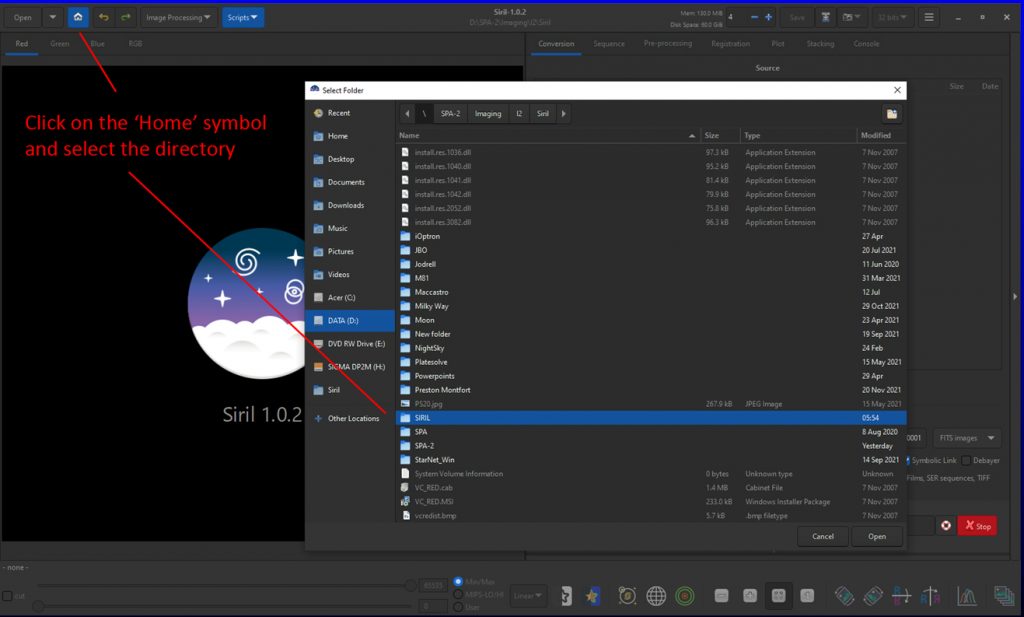
When the image is opened one of the monochrome channels may be visible. If so, click on RGB to see the full colour image.
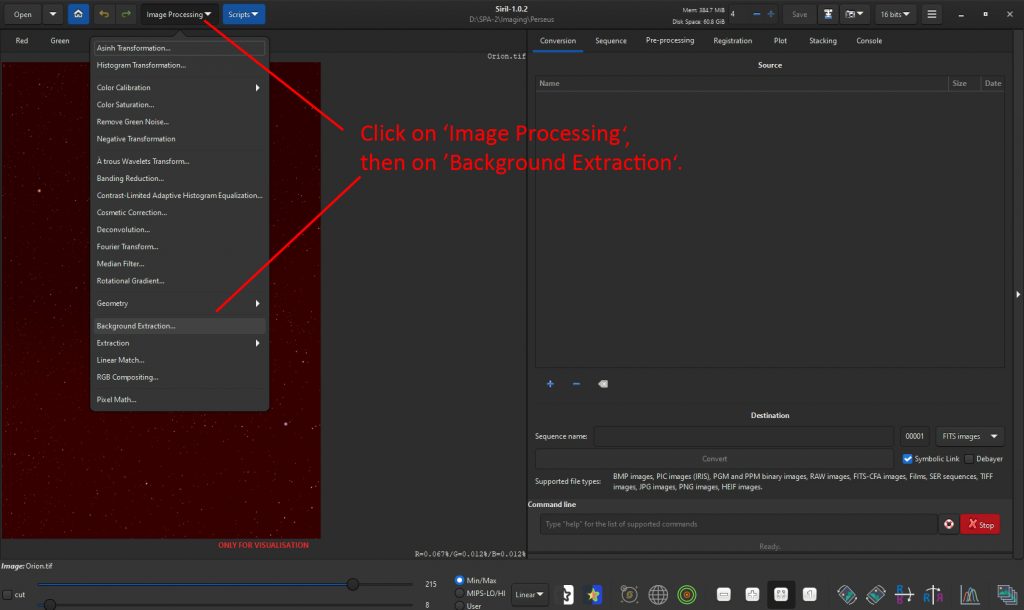
The first thing is to remove the light pollution.
In the image processing menu, click on ‘Background Extraction’. In the window that opens set the samples per line, perhaps 7-12, and click on ‘generate’.
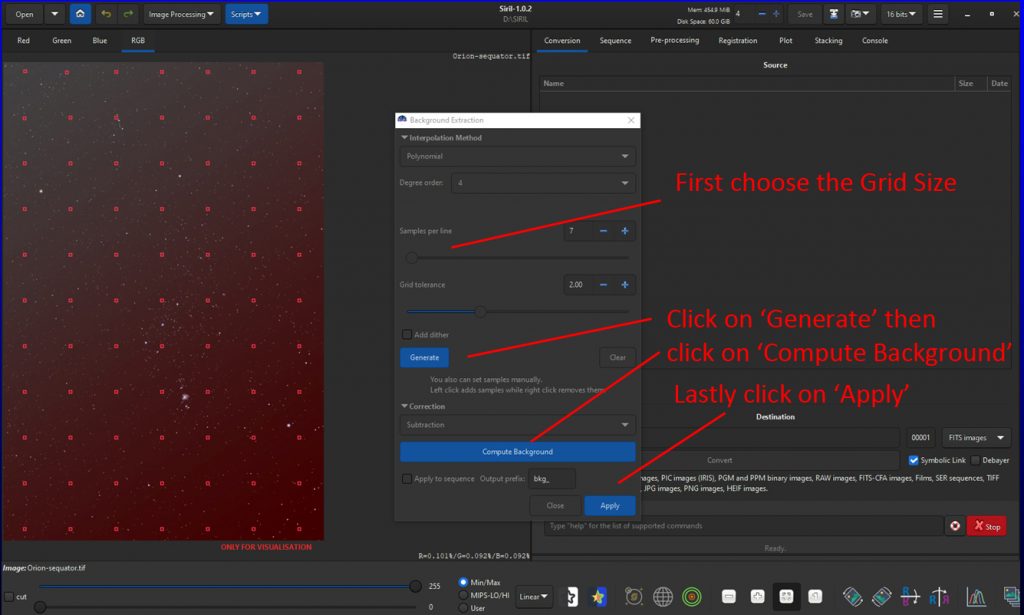
The program will avoid nebulae regions in an image. The light pollution will be removed when ‘Apply’ is clicked on..
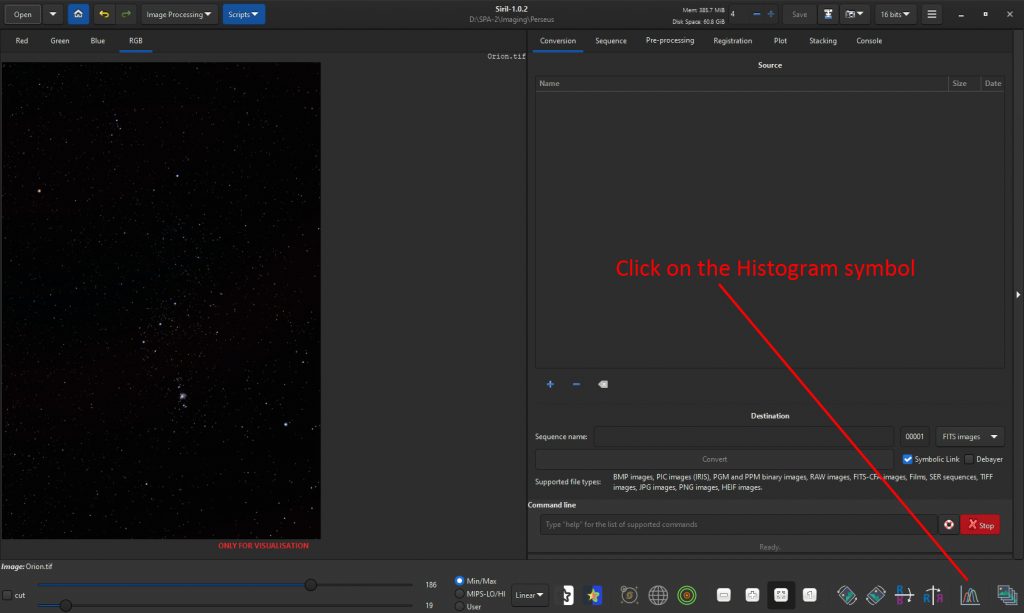
Stretching the image 1:
By lifting up the fainter parts of the image, fainter stars will become visible but the background brightness level may become more obvious. One way to stretch the image is to use the ‘Histogram’ tool at the lower right of the screen as indicated in the image below.
By moving the central slider to left brightens the fainter parts of the image and by moving the left hand slider to the right towards the peak in the histogram reduced the background brightness.
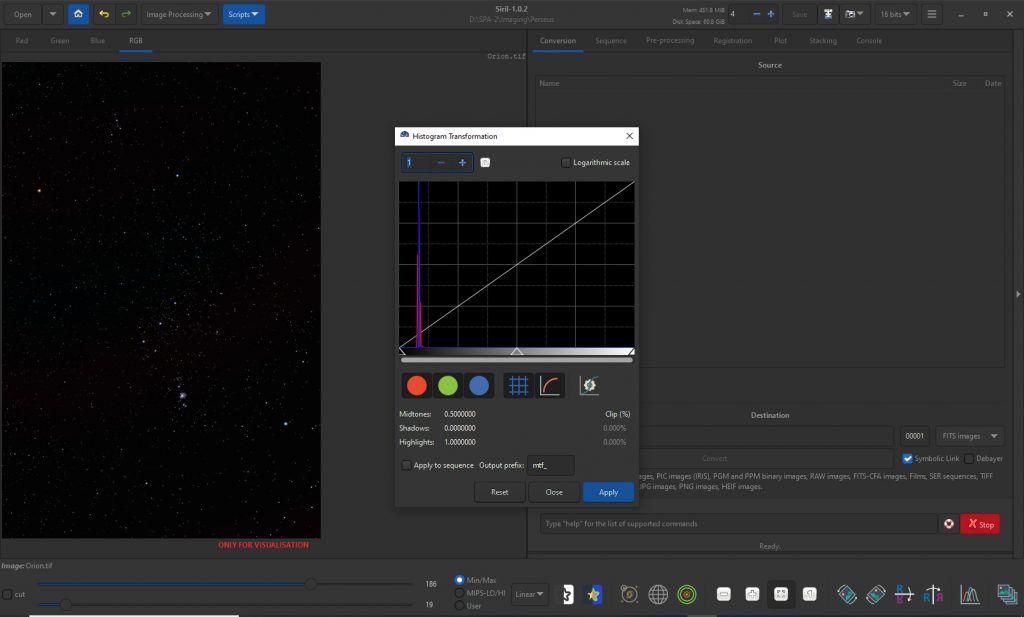
This may repeated to suit the image.

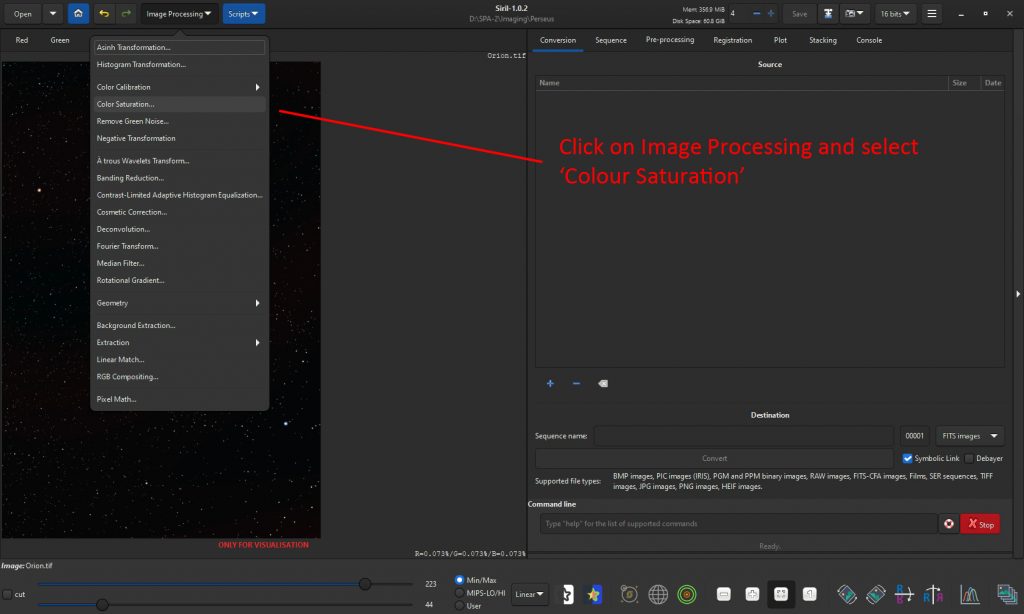
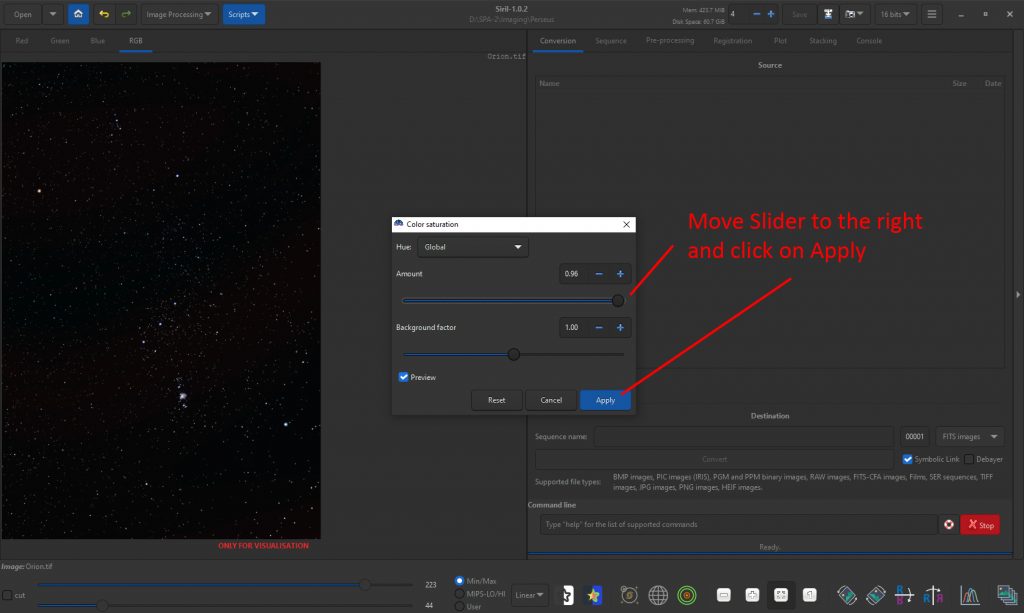
Increasing the saturation in the image
This will bring out the star colours – particularly that of Betelgeuse. In the ‘Image Processing’ drop down menu, select ‘Color Saturation’ (American Spelling!) and move the’ Amount’ slider over to the right to increase the saturation.
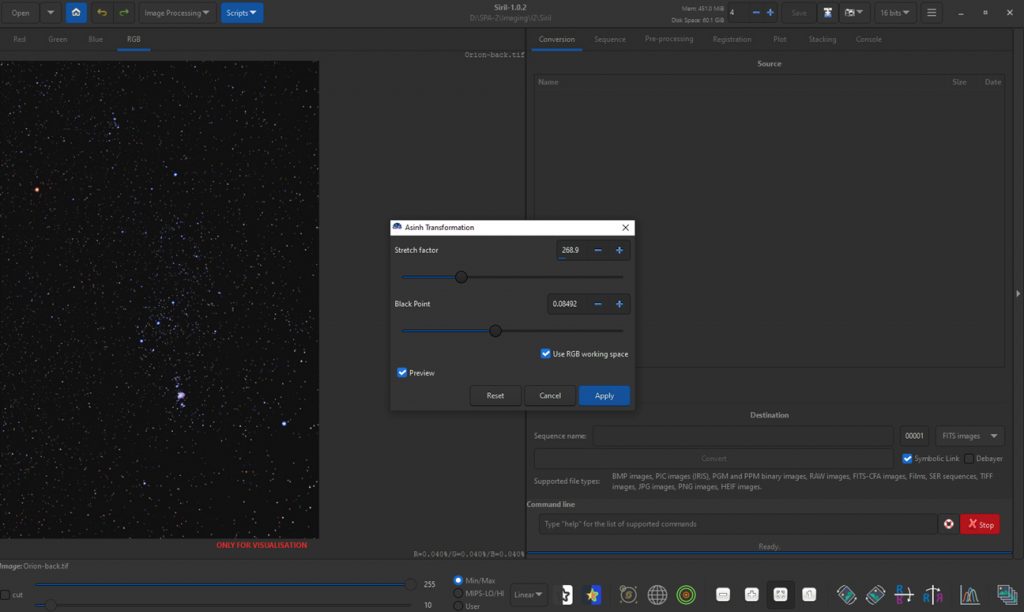
Stretching the Image 2:
In the image processing menu, click on ‘Asinh Transformation’.
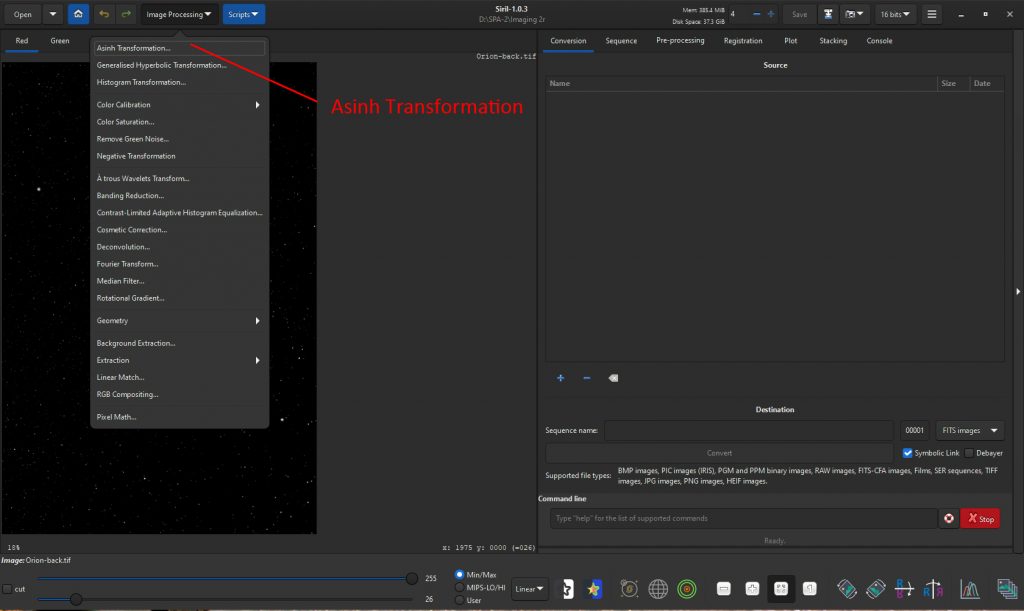
In the window that opens, adjust the ‘Stretch Factor’ and ‘Black Level’ as desired. This stretching technique enhances the star colours so no additional saturation increase is required. The result is shown at the end of the article.
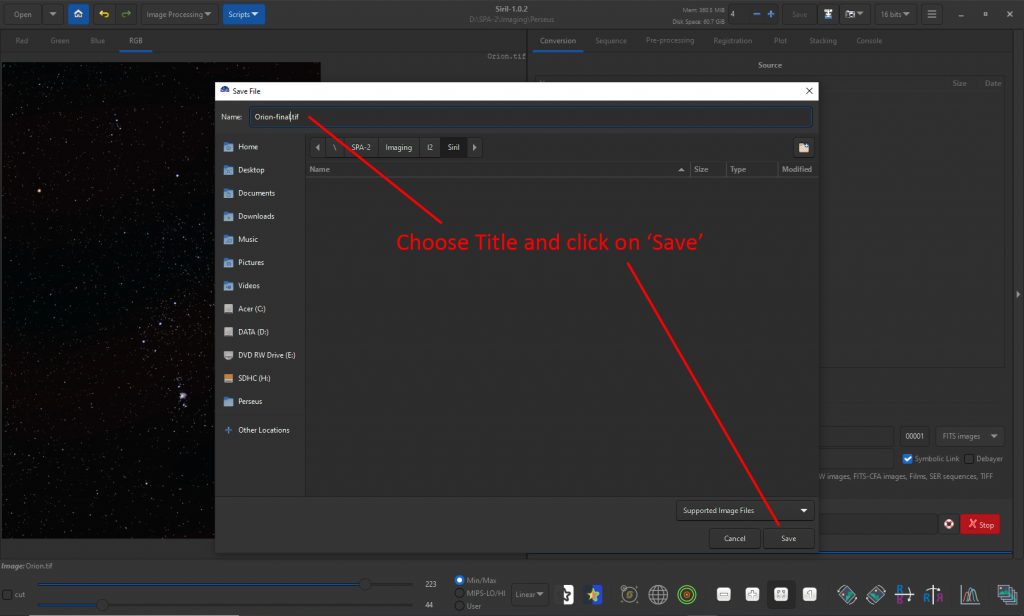
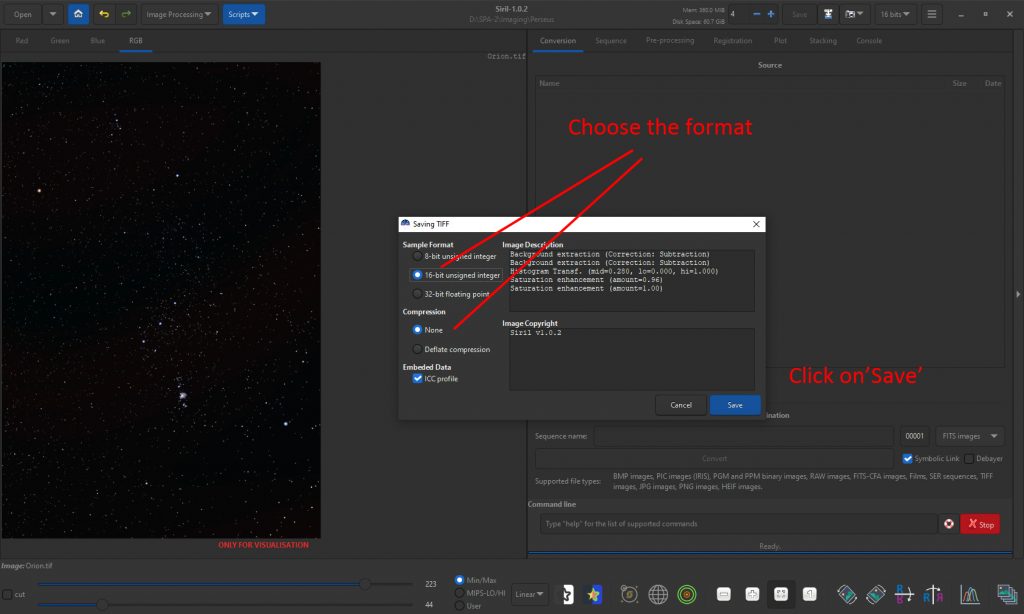
Saving the result
Click on the save ikon and in the opened window select the output file name. Choose the format so that this will be saved as a 16 bit Tiff file. [Or Jpeg should you prefer.]

The result: