
This is just one of many illustrated articles found in the author’s Astronomy Digest.
‘Goto’ scopes are becoming almost the norm these days but can sometimes be a disappointment to their new owners due to the problems of aligning them before use. Celestron have overcome this problem by producing a range of mounts which use a new development called ‘Starsence’ which automatically aligns the telescope mount. This was first used in a small number of ‘Sky Prodigy’ telescopes but now the ‘Starsence’ unit can be bought separately for ~£300 and added to the majority of the Celestron mounts.
In the telescope review that follows the method by which it aligns the mount is described along with a detailed discussion of its use with one of the first telescopes to which is was applied. It will also give you a very good idea of what can be seen with just 130mm of aperture.
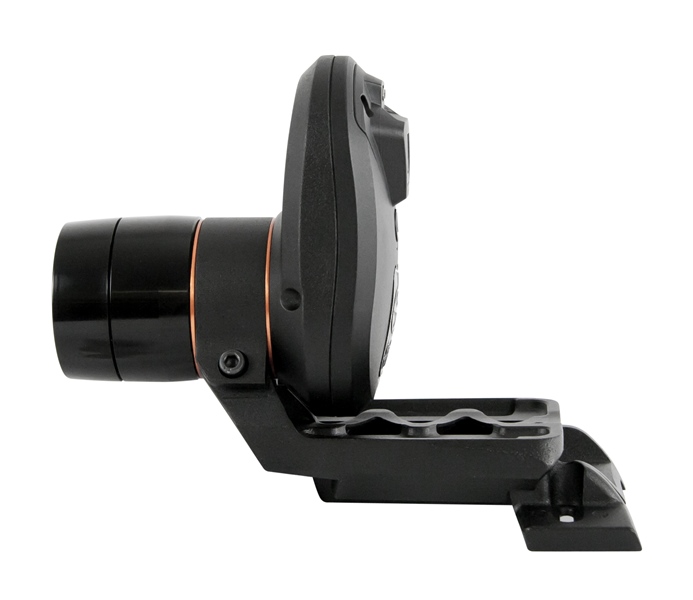
The Celestron Sky Prodigy 130
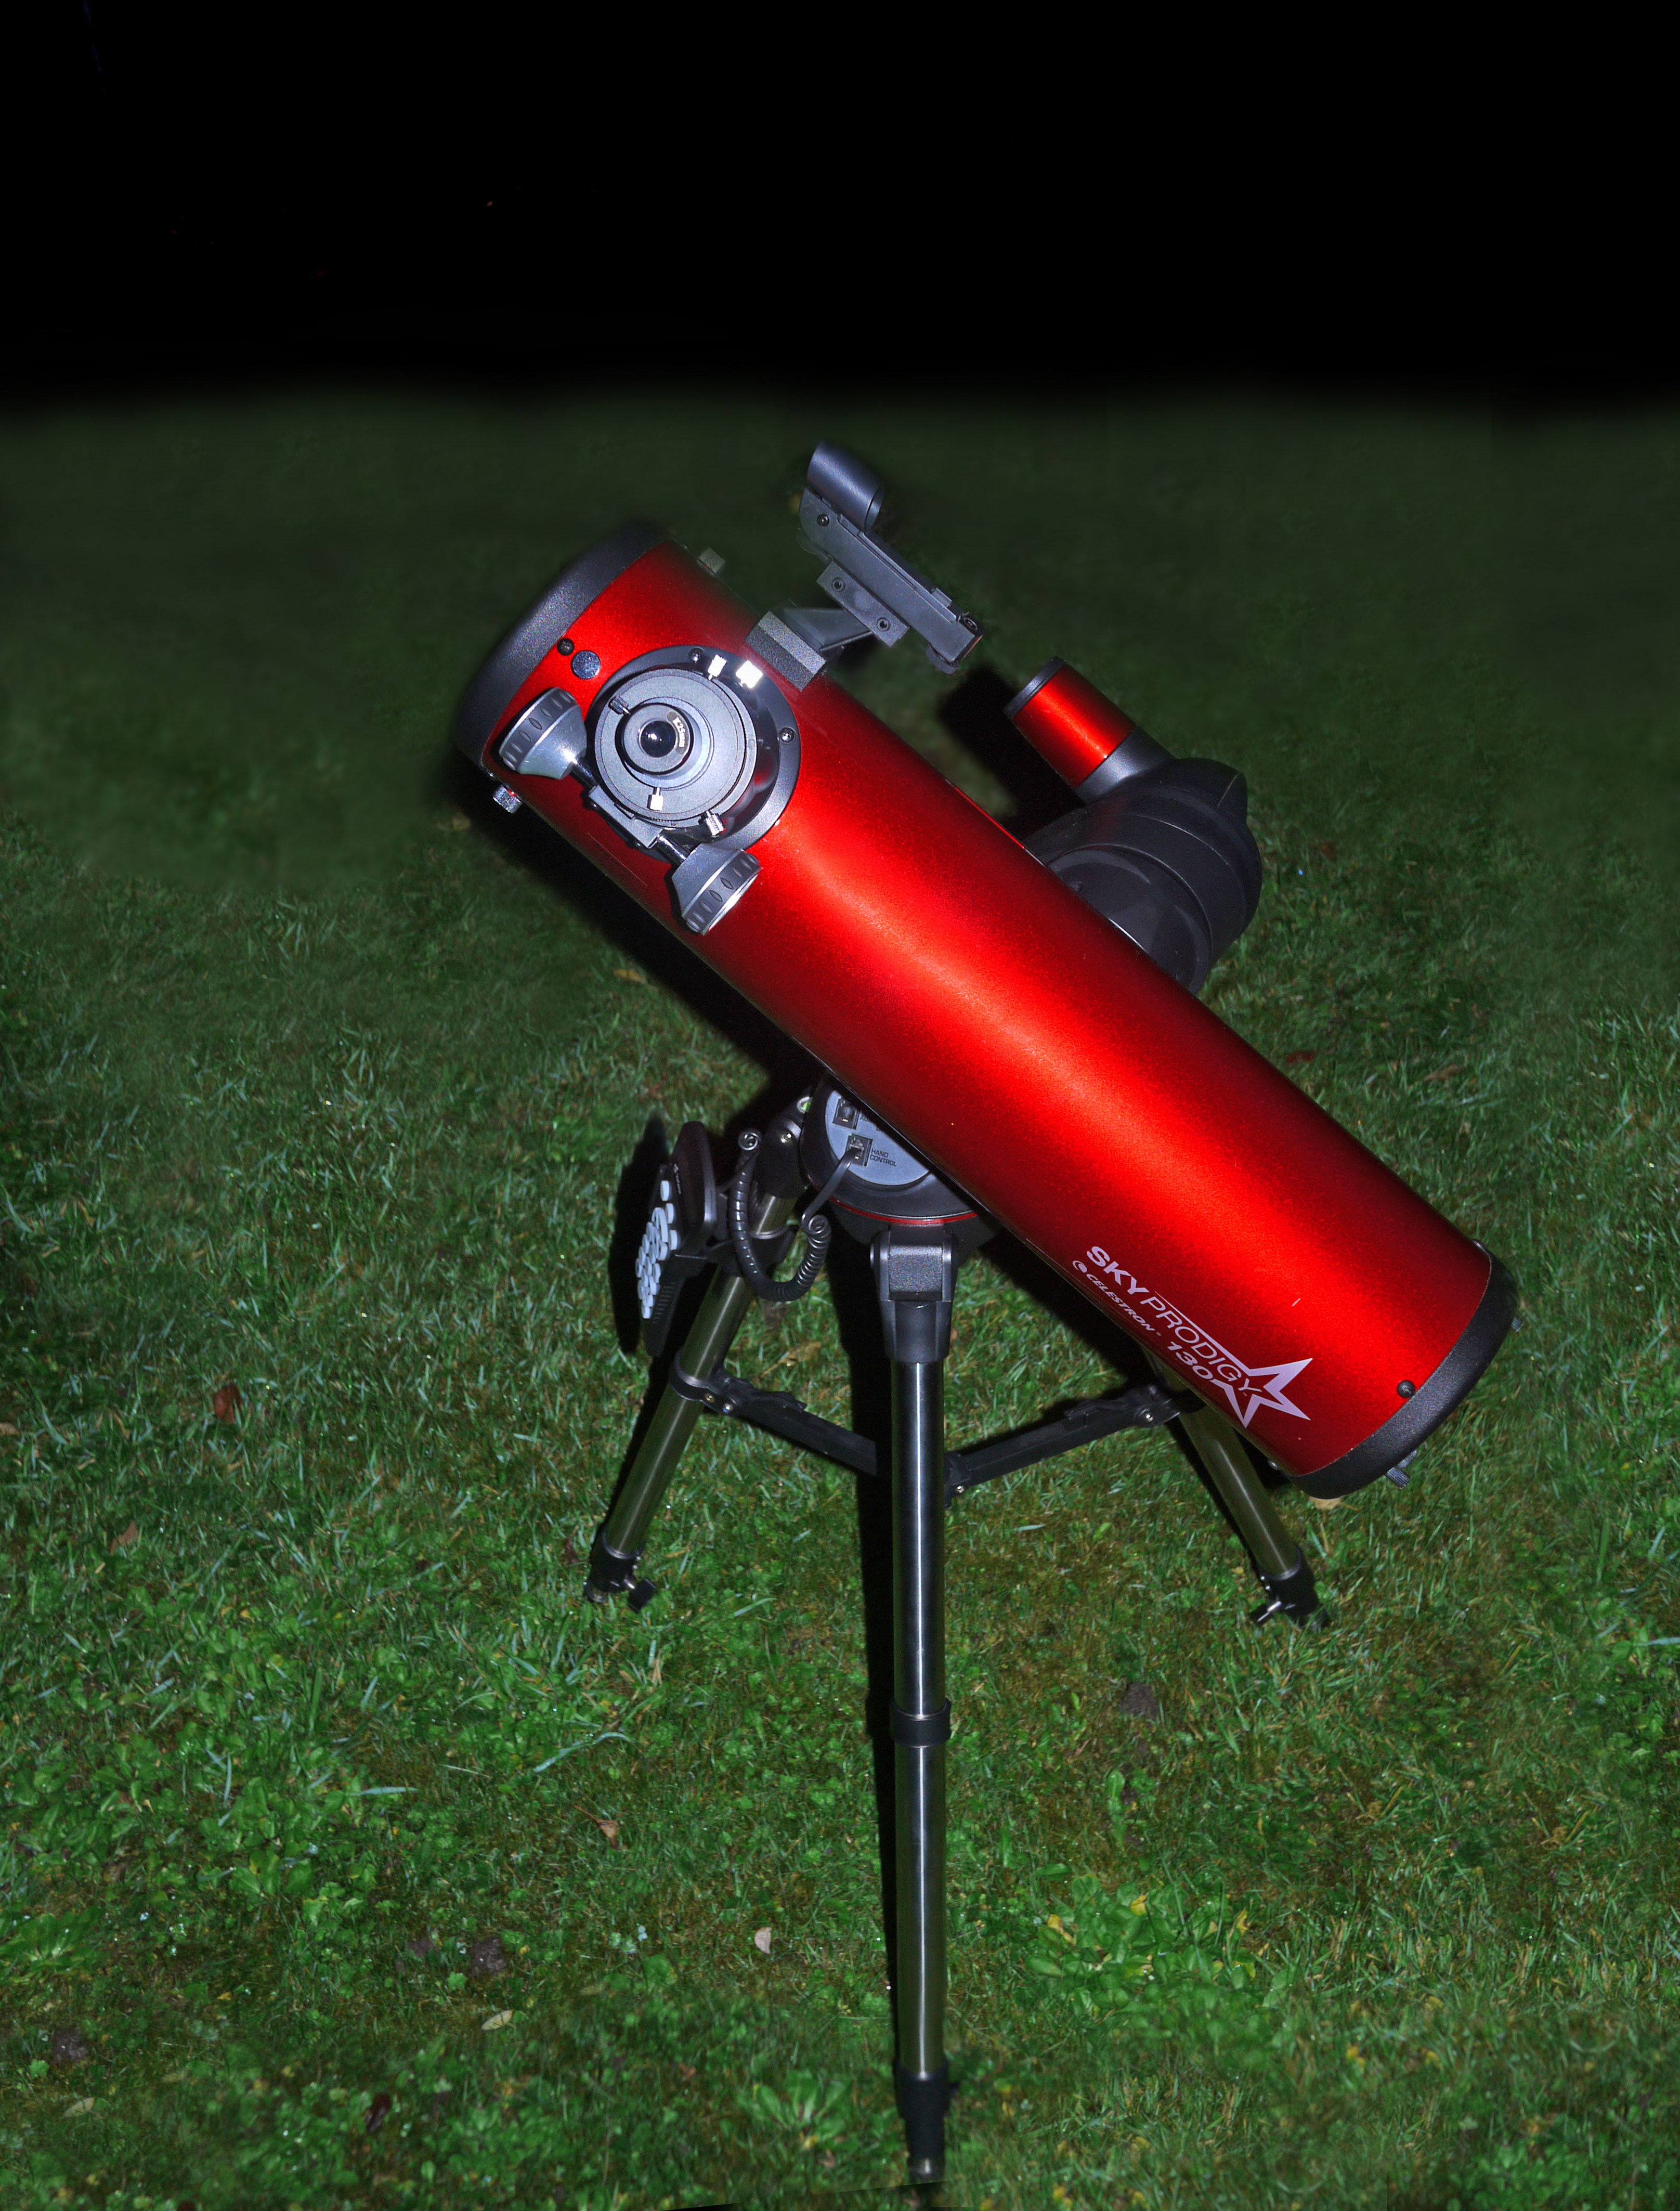
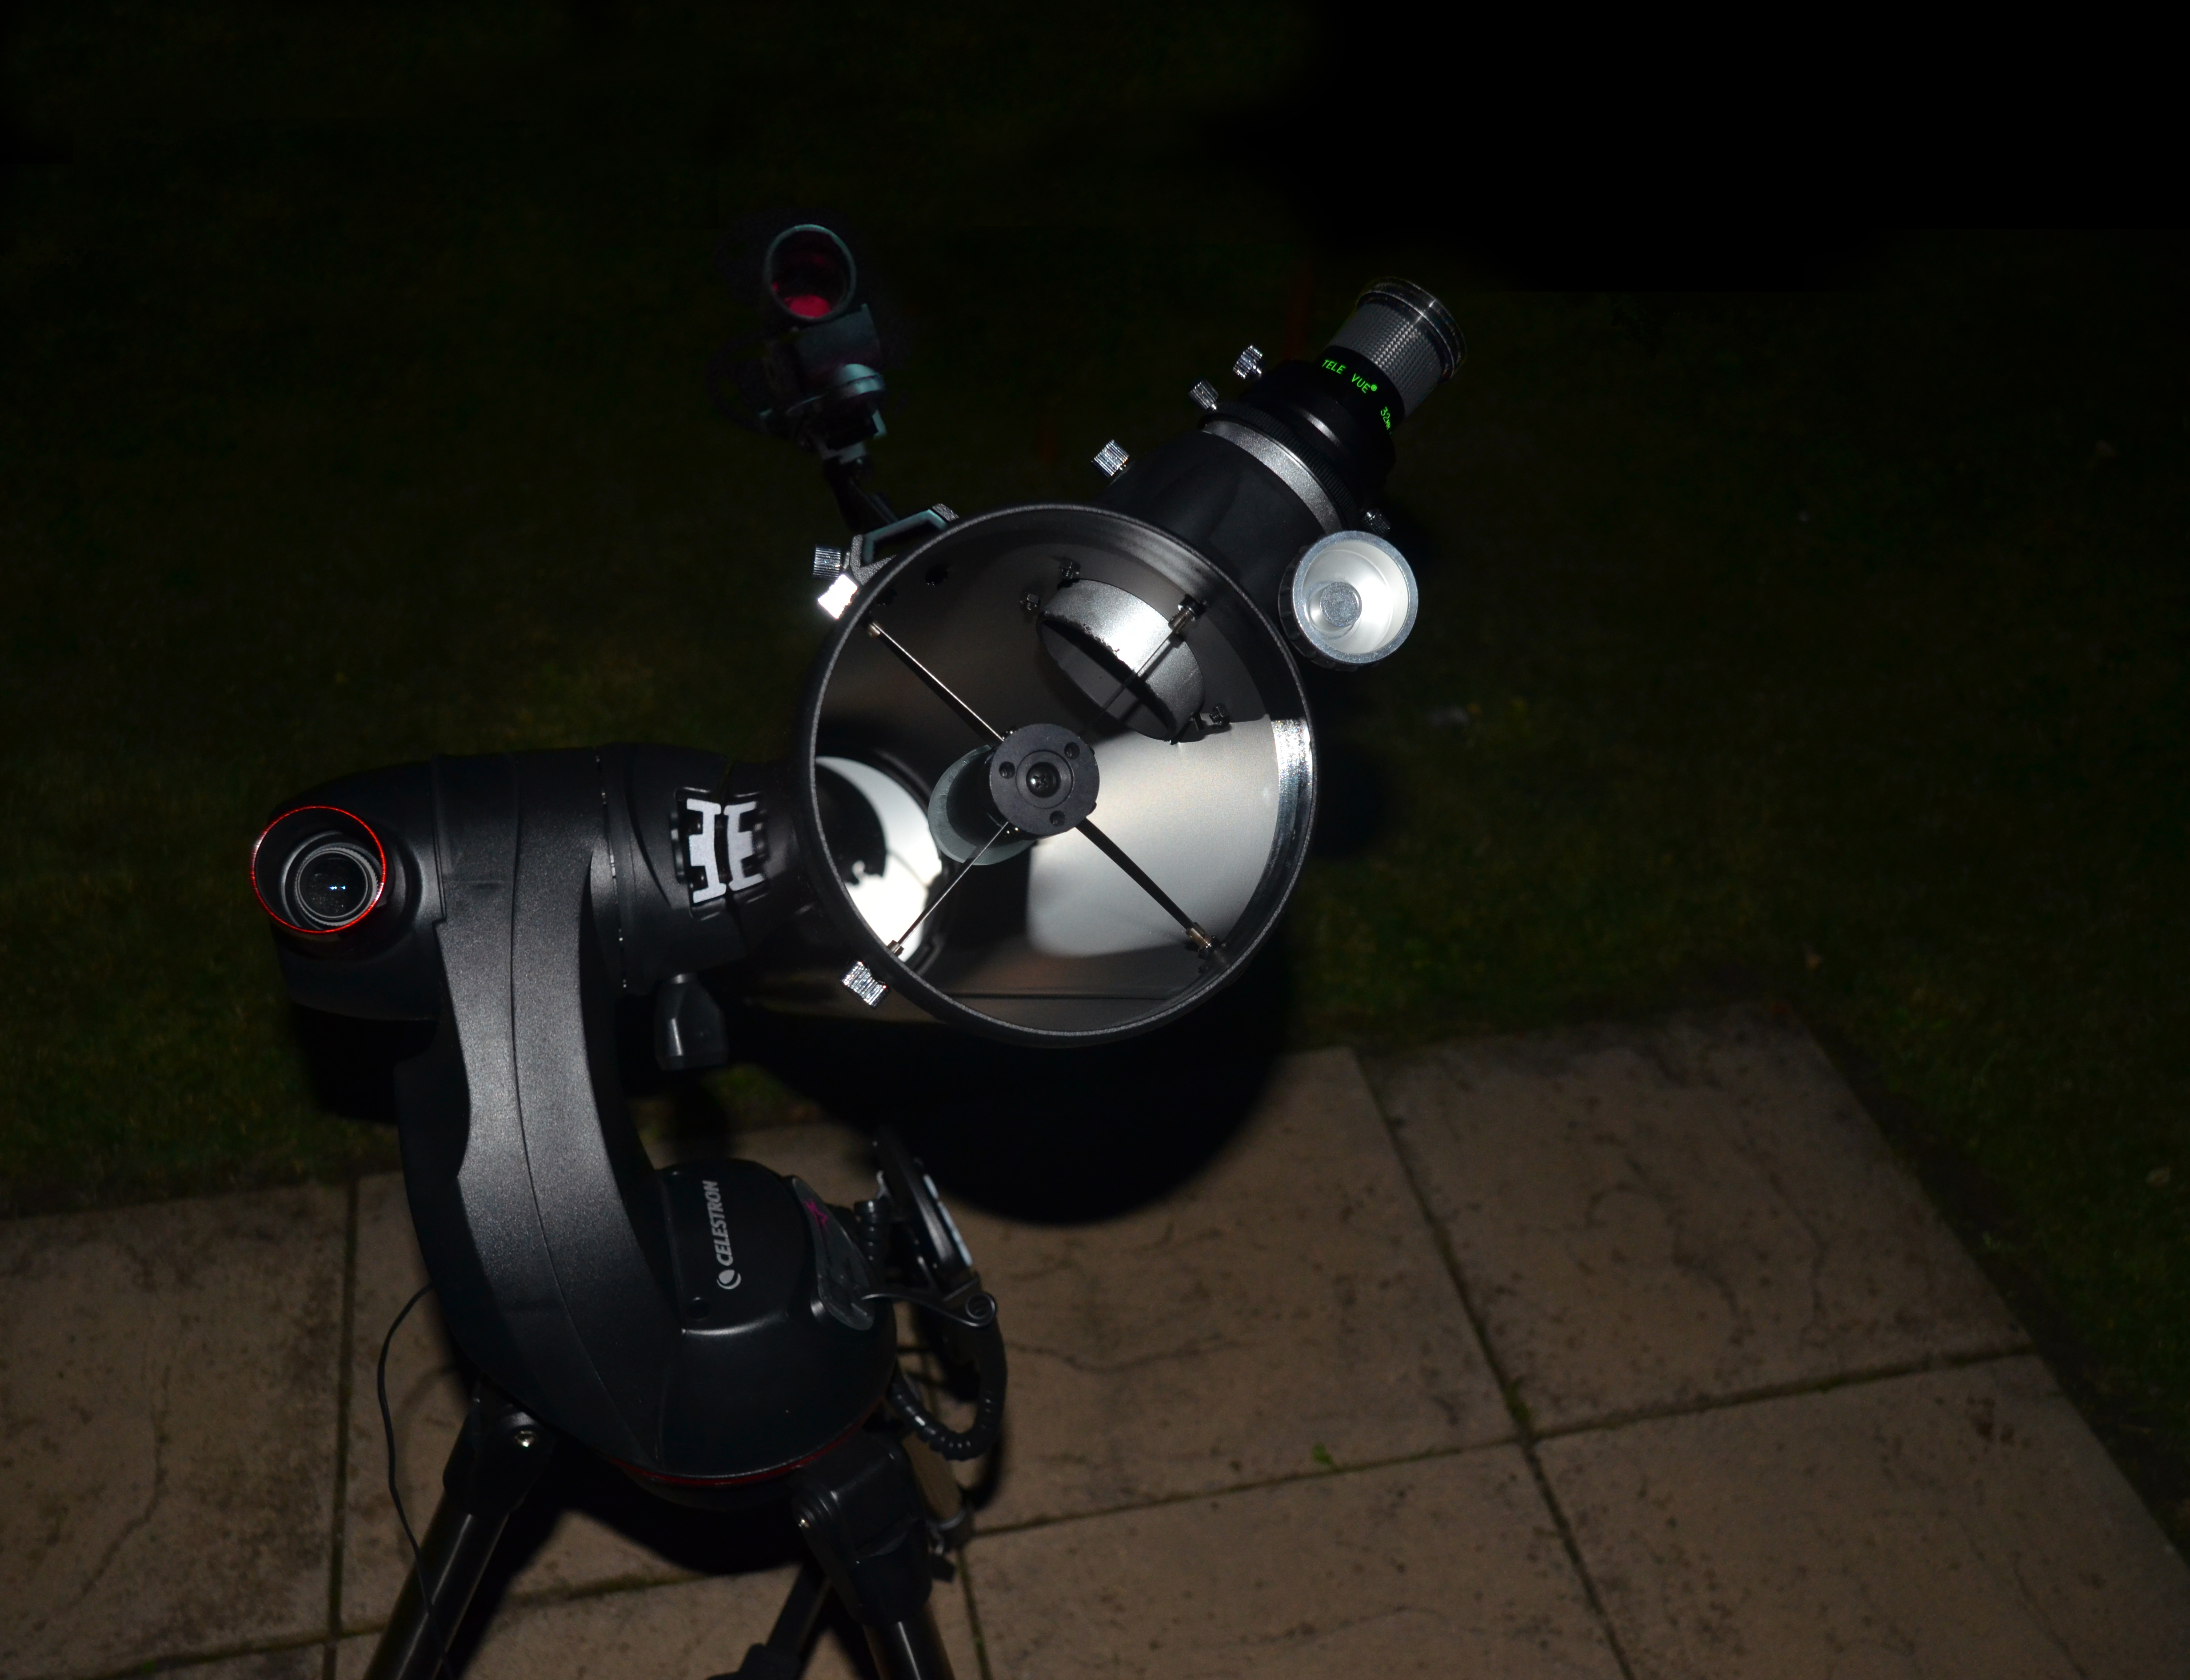
Mounted on the opposite side to the telescope on the alt/az mount is a small scope and CCD camera aligned on the telescope axis. Having powered up the mount (a battery pack for 8 D-cells is provided) one simply presses the ‘align’ button on the hand controller and the mount, in ‘StarSense’ mode, moves automatically to three areas of sky, images them and locates their position on the celestial sphere by matching the stars it sees with its database. The whole process takes just 3 minutes before the display says ‘Align successful’. One can then immediately start seeking out celestial objects to observe. It needs a reasonable arc of clear sky to achieve this by itself but, if you are observing from a site with a restricted view of the sky, then a second alignment mode will allow you to manually point the scope to three areas of sky that are visible to you.
Once aligned, the user can immediately choose objects to observe from the ‘Solar System’, ‘Stars’ or ‘Deep Sky’ catalogues obtained by pressing the appropriate key on the keypad. Within the stars menu are found ‘Named Stars’, ‘Binary Stars’, ‘Variable Stars’ and ‘Asterisms’. Whilst, within the ‘Deep Sky’ menu, one finds ‘Galaxies’, ‘Globular Clusters’, a list of ‘Named Objects’ – very useful as it includes, for example, the Perseus Double Cluster otherwise hard to find in catalogues, ‘Nebulae’, ‘Open Clusters’, ‘Globular Clusters’ and ‘Planetary Nebulae’ along, of course, with the ‘Messier Catalogue’. A selection of the brighter NGC objects round off the observing targets – totalling over 4000 in number.
Observing the Moon or planets takes just a little more effort. To tell where and when these will be visible in the sky, the computer requires a knowledge of the location, date and time, so when first selecting ‘Solar System’ in an observing session, the computer prompts you to check the Lat/Long of your observing site and the date and time, editing these if necessary. Nicely, the computer does retain the time when powered down so, once set, these will rarely need adjusting. One then simply selects the solar system object one wishes to observe – but only from those that will be above your horizon. There is one further alignment method, linked to the solar system, which is very useful when, for example, Jupiter or Venus can be seen in a twilight sky but it is not dark enough for the Starsense mode to be used. One uses the red dot finder to manually slew to the planet, centre it in the eyepiece, and align on it. This then enables the computer to track it across the sky.
The Sky Prodigy range includes a 70mm refractor, a rather sweet 90 mm Maksutov and the 130mm Newtonian that is reviewed here. This 650 mm focal length, f5, Newtonian is really rather good. The spider vanes are thin, reducing their diffraction effects to a minimum and it is equipped with a focuser that can accept 1.25’ or 2’ eyepieces so that one could use a 30-40 mm 2’ eyepiece for wide field views. This is very impressive for a scope of this size. The size of the secondary mirror in a Newtonian is always a compromise and the designer of the SLT has chosen to maximise its performance on planets by making it as small as possible. This reduces the diffraction effects which reduce the micro-contrast of an image, particularly important when trying to observe low contrast regions on a planetary surface. The downside of this is that, away from the centre of the field of view, the star brightness’s will be reduced somewhat, but I cannot say that the effect was obviously noticeable. As supplied, the optical tube was in perfect collimation with out of focus star images showing the ‘shadow’ of the secondary mirror precisely central within the image. Adjustment knobs and locking nuts are accessible at the rear if adjustment is necessary and there is a central spot on the mirror to assist aligning the secondary. Full marks!
Two eyepieces are supplied, 25 and 9 mm, 3 element, Kellners. Though not giving such a wide field of view as equivalent Plossl eyepieces, with ~40 rather than ~50 degrees apparent fields, they performed very well. The 25 mm gives a magnification of x26 with a true field of view of ~1.4 degrees whilst the 9 mm gives a magnification of x72 and a field of view of ~0.6 degrees that will nicely encompass the Moon. These would be very well complimented with a 2x Barlow lens which will give additional effective focal lengths of 12.5 and 4.5mm. The x144 magnification then obtainable is really needed when observing the planets. Ask your kindly supplier if he will include one! A very nice addition would be a 2-inch, 30 or 35mm, wide-angle eyepiece – great for viewing objects such as the Pleiades Cluster or sweeping along the Milky Way.
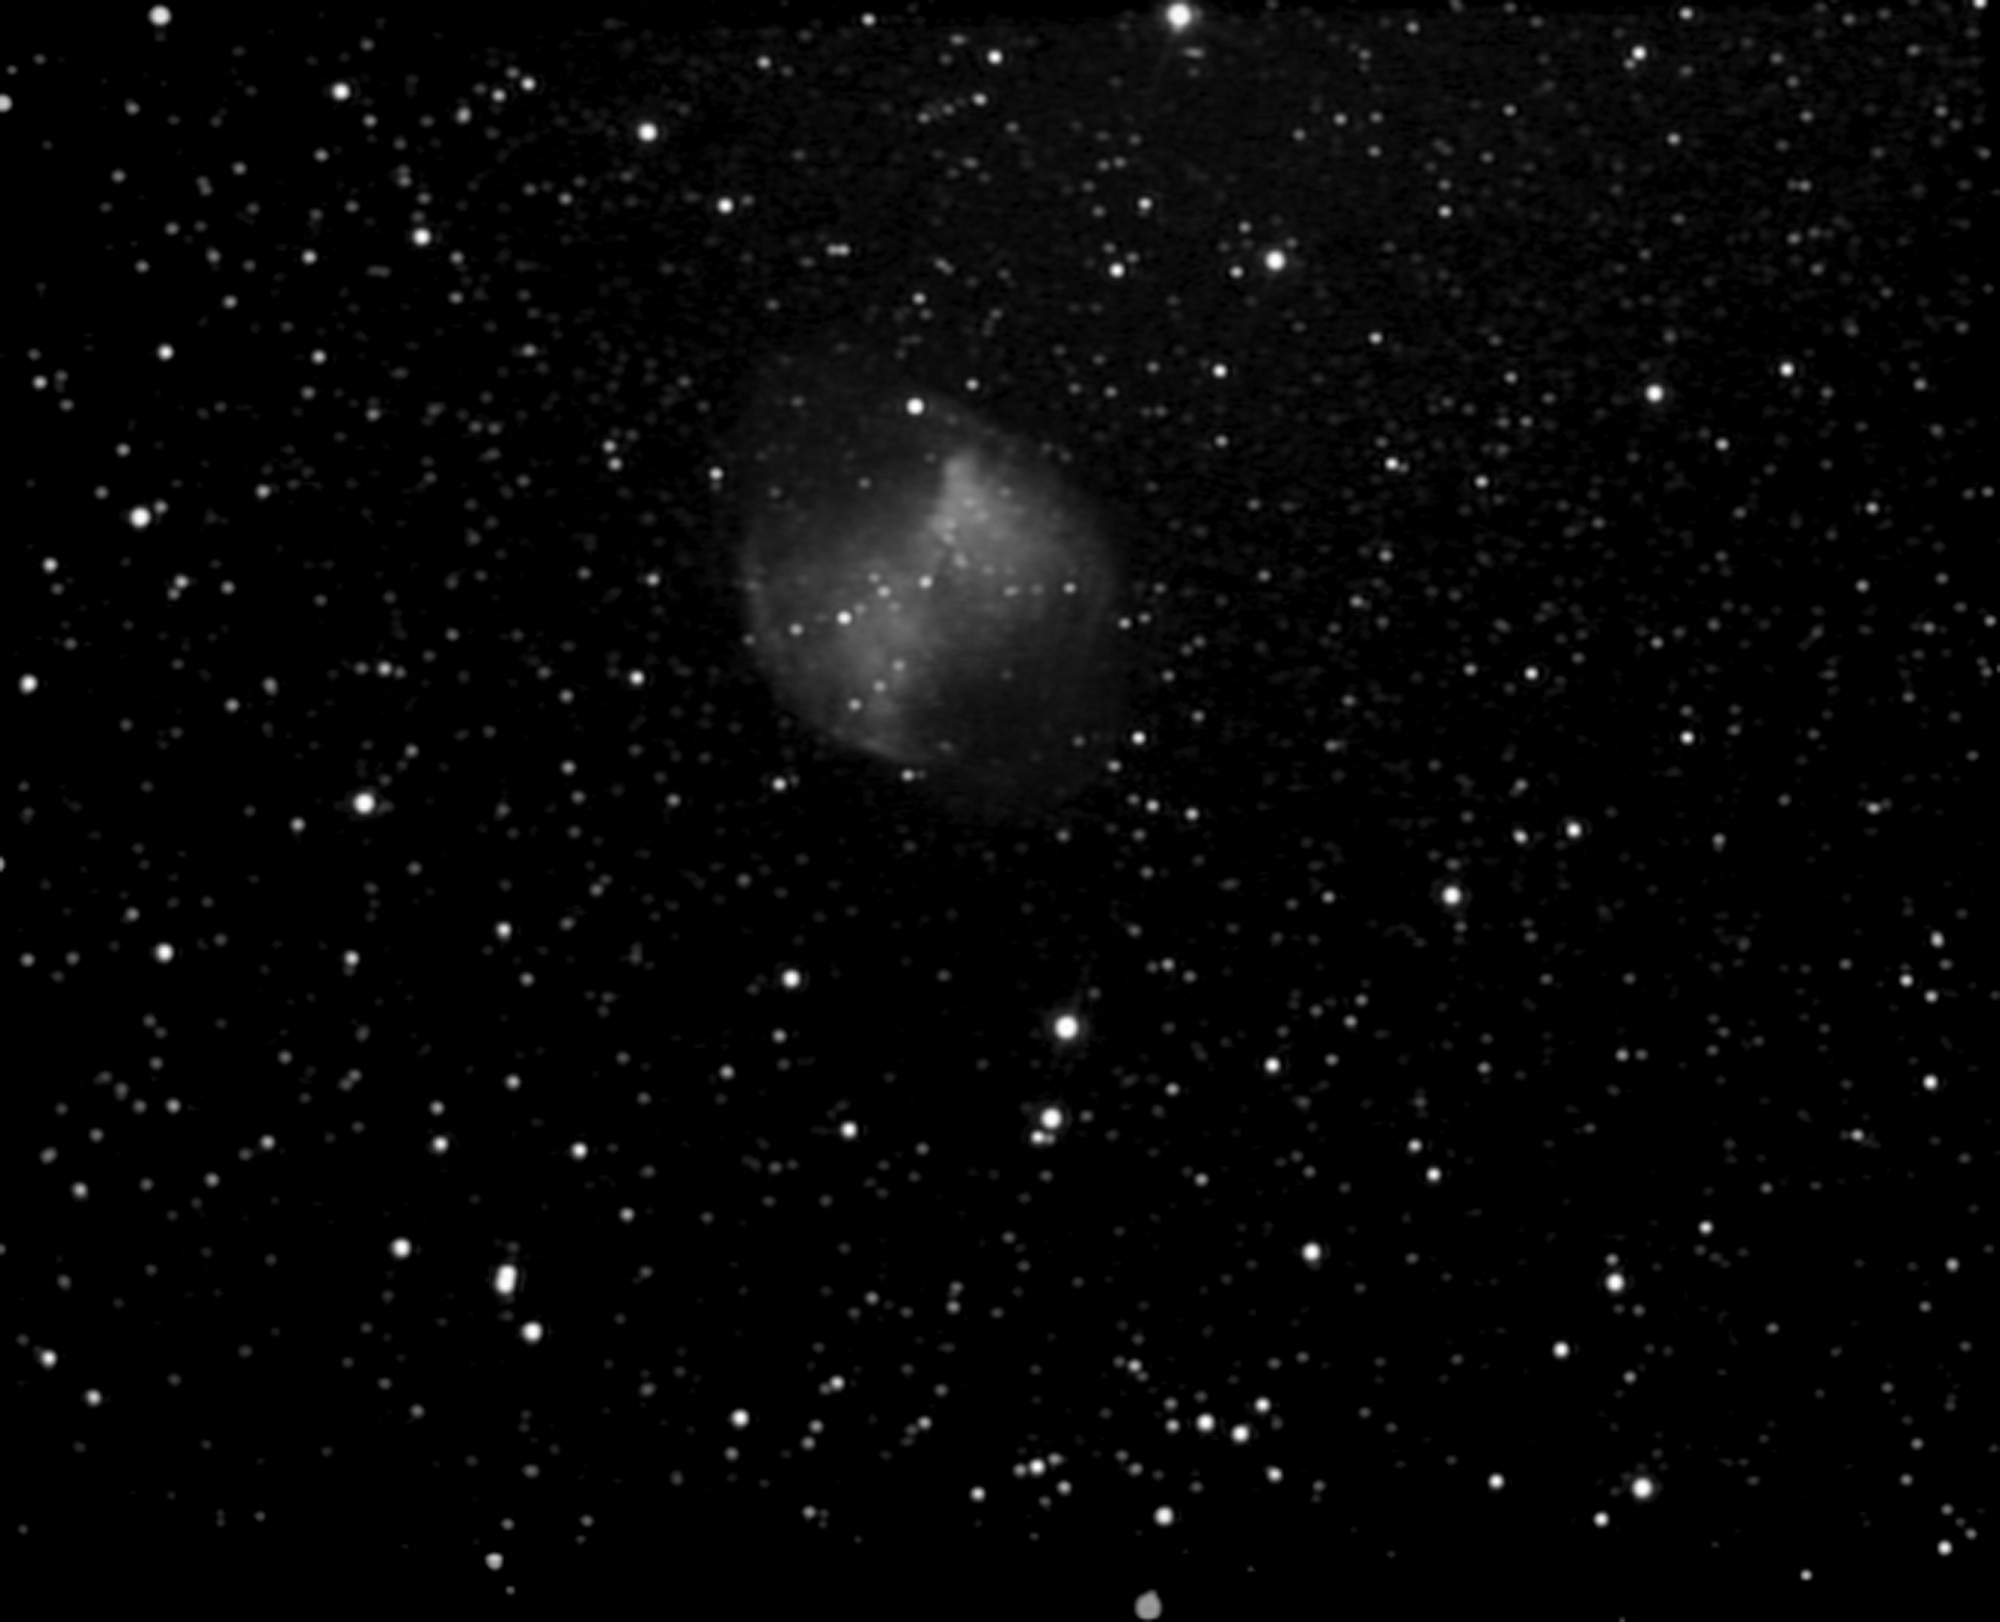
First light for the Sky Prodigy was when I stayed as a guest of the Crayford Astronomical Society at the Kelling Heath Equinox Star Party. Under dark skies with the Milky Way arching overhead the scope was set up and the align button pressed. Three minutes later, having pirouetted around the sky, ‘Align successful’ came up on the display and observing began. The Dumbell Nebula, M27, came to mind and the scope slewed round to it and came very gently to a halt. It was immediately visible as a slightly elongated smudge just off the centre of the field of view of the 25mm eyepiece. Having centred it using a slow slew rate, the 9mm eyepiece was used and the higher magnification helped it to stand out better. The galaxies M81 and M82 and the Double Cluster in Perseus were found equally easily, but the real highlight of the night was a glimpse, using averted vision, of the galaxy M101. I am absolutely certain that a speck of light was visible within it − the supernova first seen a few weeks earlier!
A thorough night of visual observing followed a few day’s later from my home location within the confines of a town. I concentrated largely on the objects that I know and have observed through many telescopes. High overhead, in Lyra and Vulpecula I observed the Ring and Dumbell Nebulae and then found the Coathanger in Vulpecula and the globular Cluster M13 in Hercules. One significant point: the height of the well positioned focuser made the scope easy to use whilst sitting on a chair for really comfortable observing. Moving round towards the south and east, I spotted the globular cluster M15 in Pegasus and then M31, the Andromeda Galaxy in Andromeda. Finally I ended up, so I thought, with the Double Cluster in Perseus. All appeared exactly as I expected then to when viewed through a 130mm scope. But, as I was about to put the scope away for a few hours, I spotted Jupiter through a gap between the houses, but had to move the scope to a far corner of the garden to observe it. So, this time I used the red dot finder for the first time and did a ‘Solar System Align’ on Jupiter. The image through the 9mm was very pleasing, even though it was still relatively low in the sky, but I did allow myself the use of a x2 Barlow. The bands were easily seen with a hint of structure seen within them when the seeing allowed.
Following a few hours sleep, I rose well before dawn and first observed Jupiter now higher in the sky – a very pleasing view. The Pleiades Cluster was next. The 25mm could not encompass the whole, but showed the central region well. Then, using the 9mm eyepiece I homed in on my favourite part of the Pleiades that lies between the stars Alcyone and Maia. Halfway between the two there is a close pair of stars with that nearest to Maia obviously red in colour whilst, just besides Alcyone, there is a lovely triplet of stars making a perfect equilateral triangle. Orion was now well up in the south-south-west and so M42, the Orion Nebula, was my final target. The 25 mm showed the overall nebula, somewhat lost in the urban sky, but the 9mm showed the central region very well with the dark region of the ‘fish’s head’ intruding into the bright region surrounding the central Trapezium of stars. The region was nicely seen with the 9mm, but better when used with a 2x Barlow showing the 4 brighter trapezium stars cleanly and clearly resolved. As dawn broke, it was time for an early morning cup of tea!
The next night I planned to attempt some imaging to help give an objective view of the telescopes performance and also test the mount’s tracking ability. I used three different cameras, described in the text, and shown below.
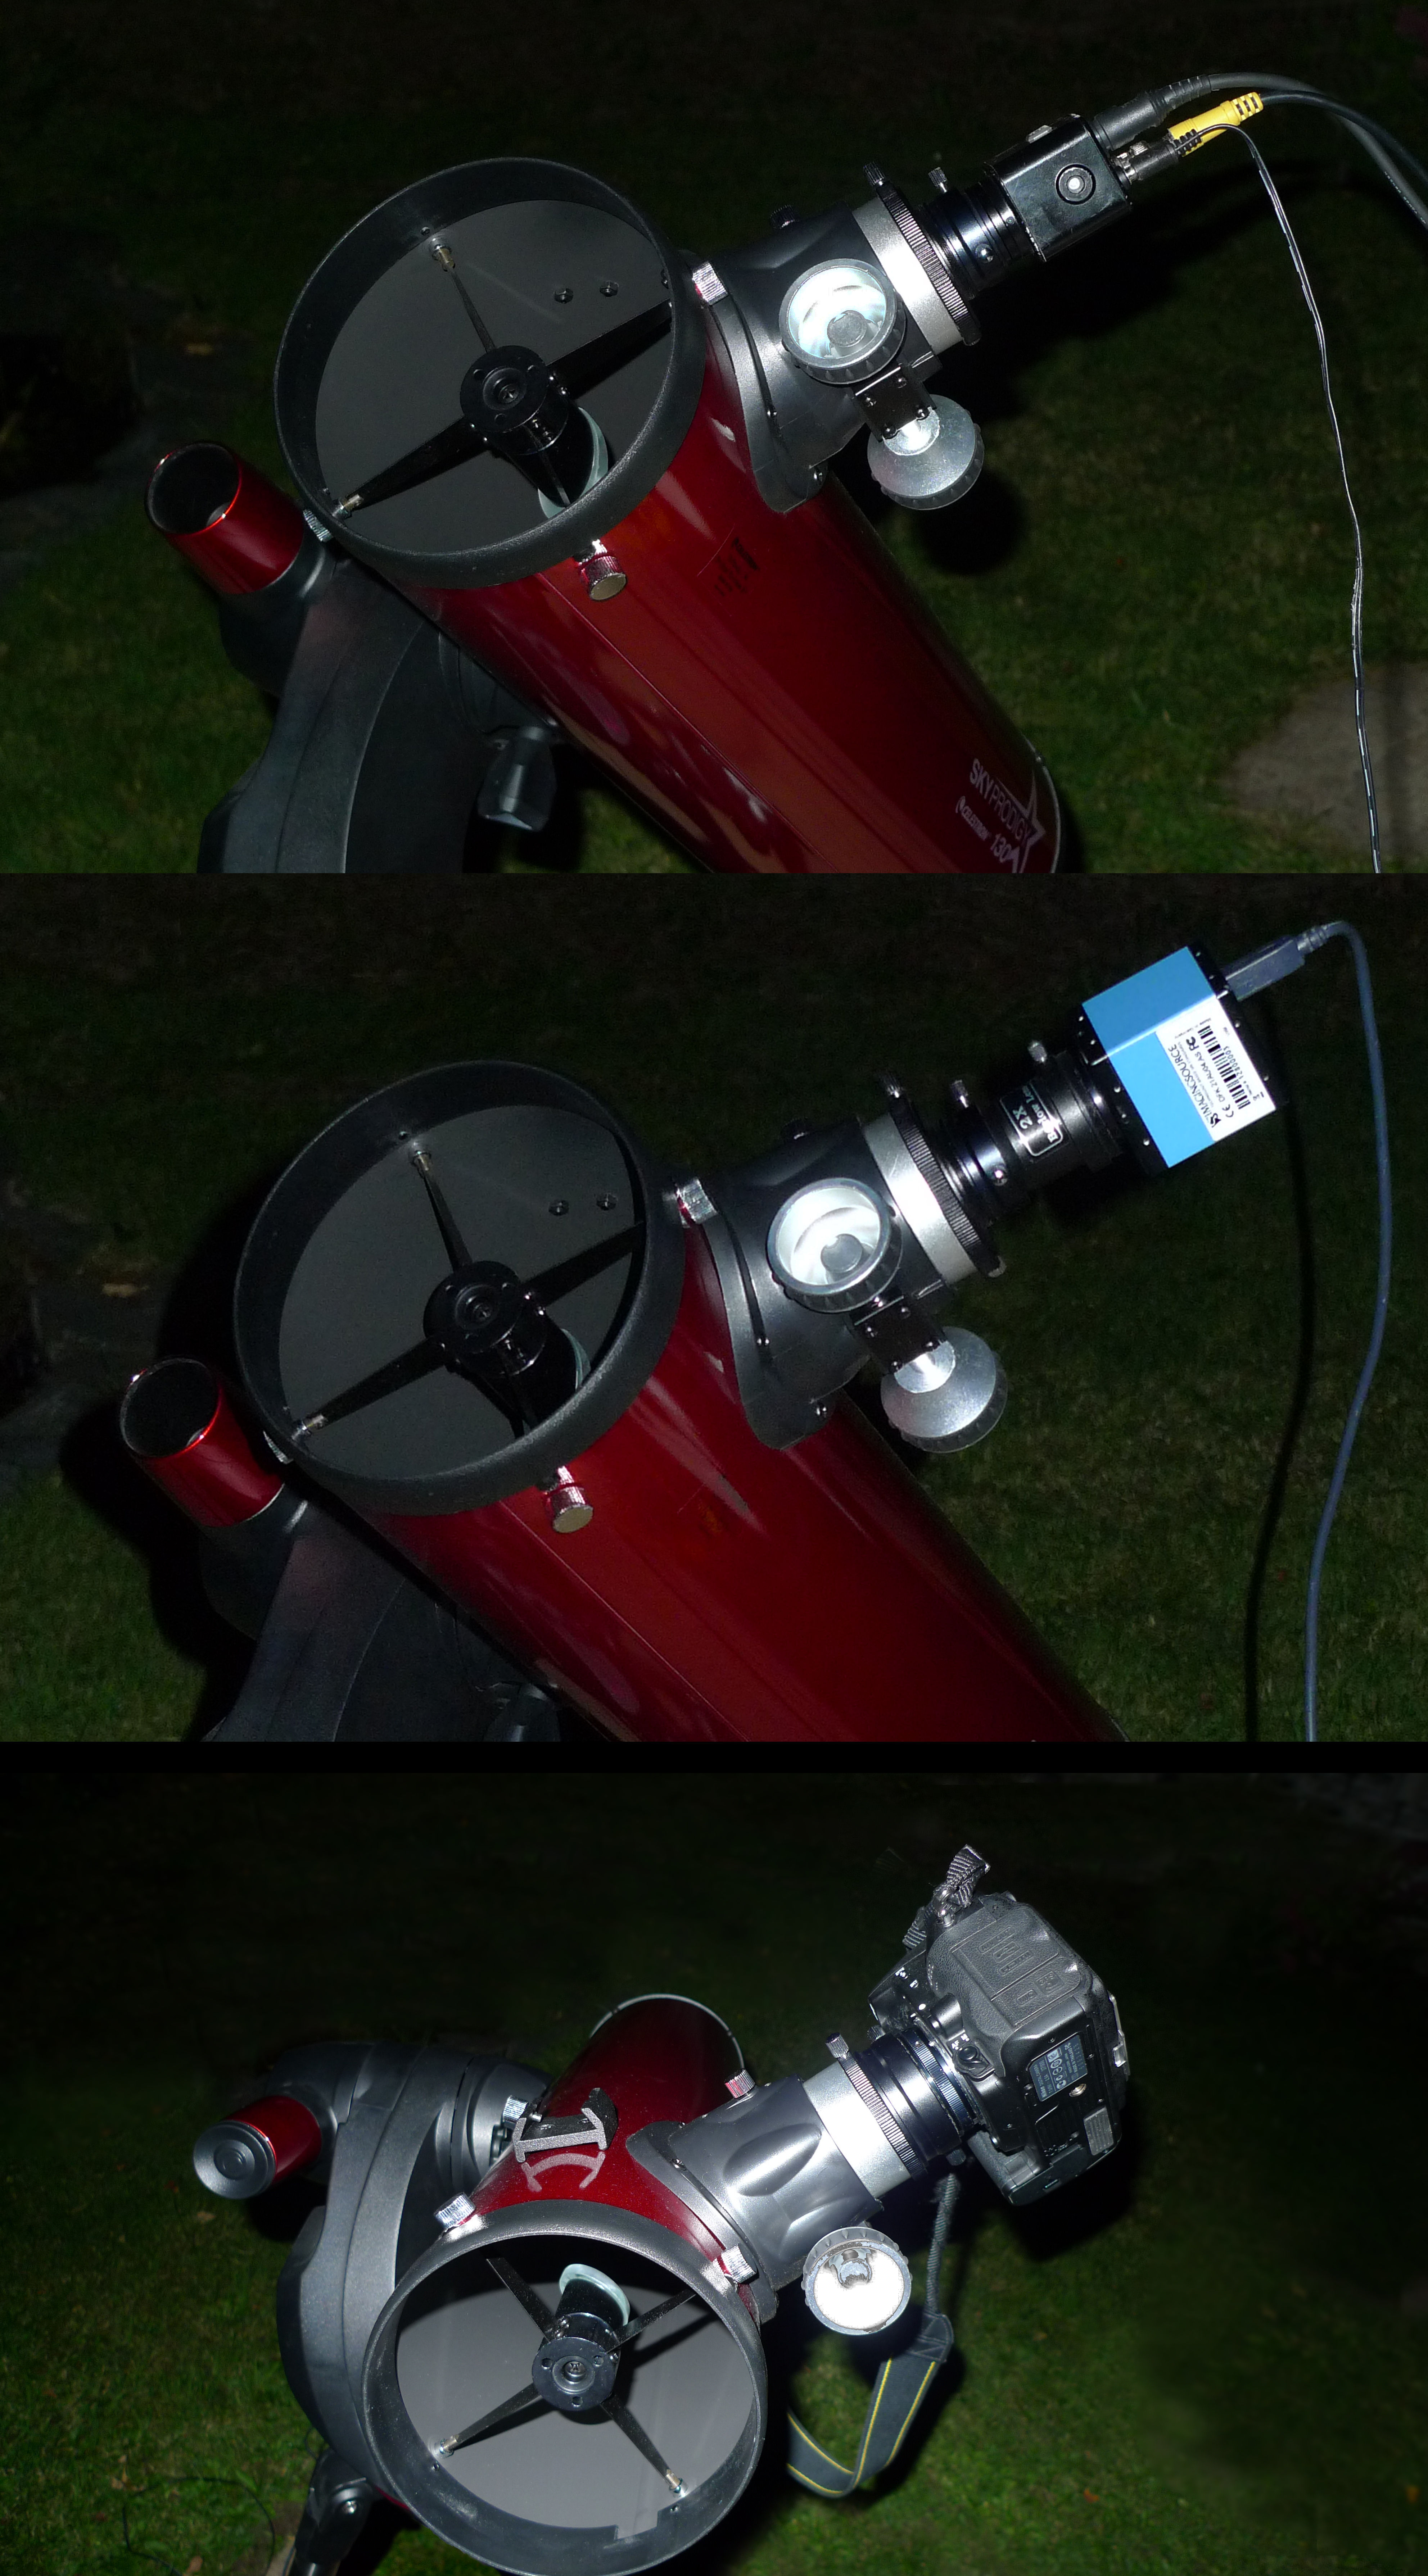
For the first imaging session, I mounted a Watec 120N integrating video camera into the focuser. M27, the Dumbbell Nebula, was the target as it was high in the sky minimising the effects of my urban light pollution. Pleasingly, that night, the sky was quite transparent. The Newtonian Tube, for optimum visual use, places the focal plane quite close to the tube so minimising the size of the secondary mirror. This is no problem when using eyepieces, but can prove a problem bringing imaging devices into focus. Happily, with the focuser at its innermost travel I just achieved focus but could not pass through it. The Watec’s internal integration time was set to 5 seconds and a total of 80 frames were captured. These, along with some 5 second ‘dark frames’ were imported into Deep Sky Stacker which took out the effects of field rotation inherent in an alt/as mount and then aligned and stacked them. The resultant image was then processed in Photoshop to adjust the black level and contrast. I was impressed. The central 13.8 magnitude star was clearly and sharply seen and faint structure in the nebula was visible. Stars in the field were visible down to ~16th magnitude. The tracking is, as expected, perfect over the 5 second integration and the slight positional drift was less than one arc minute over the 15 minute period over which I took the exposures. Excellent. This very slight drift is actually quite useful as the sky image moves slightly over the CCD array from one exposure to the next helping to eliminate any minor sensor defects.
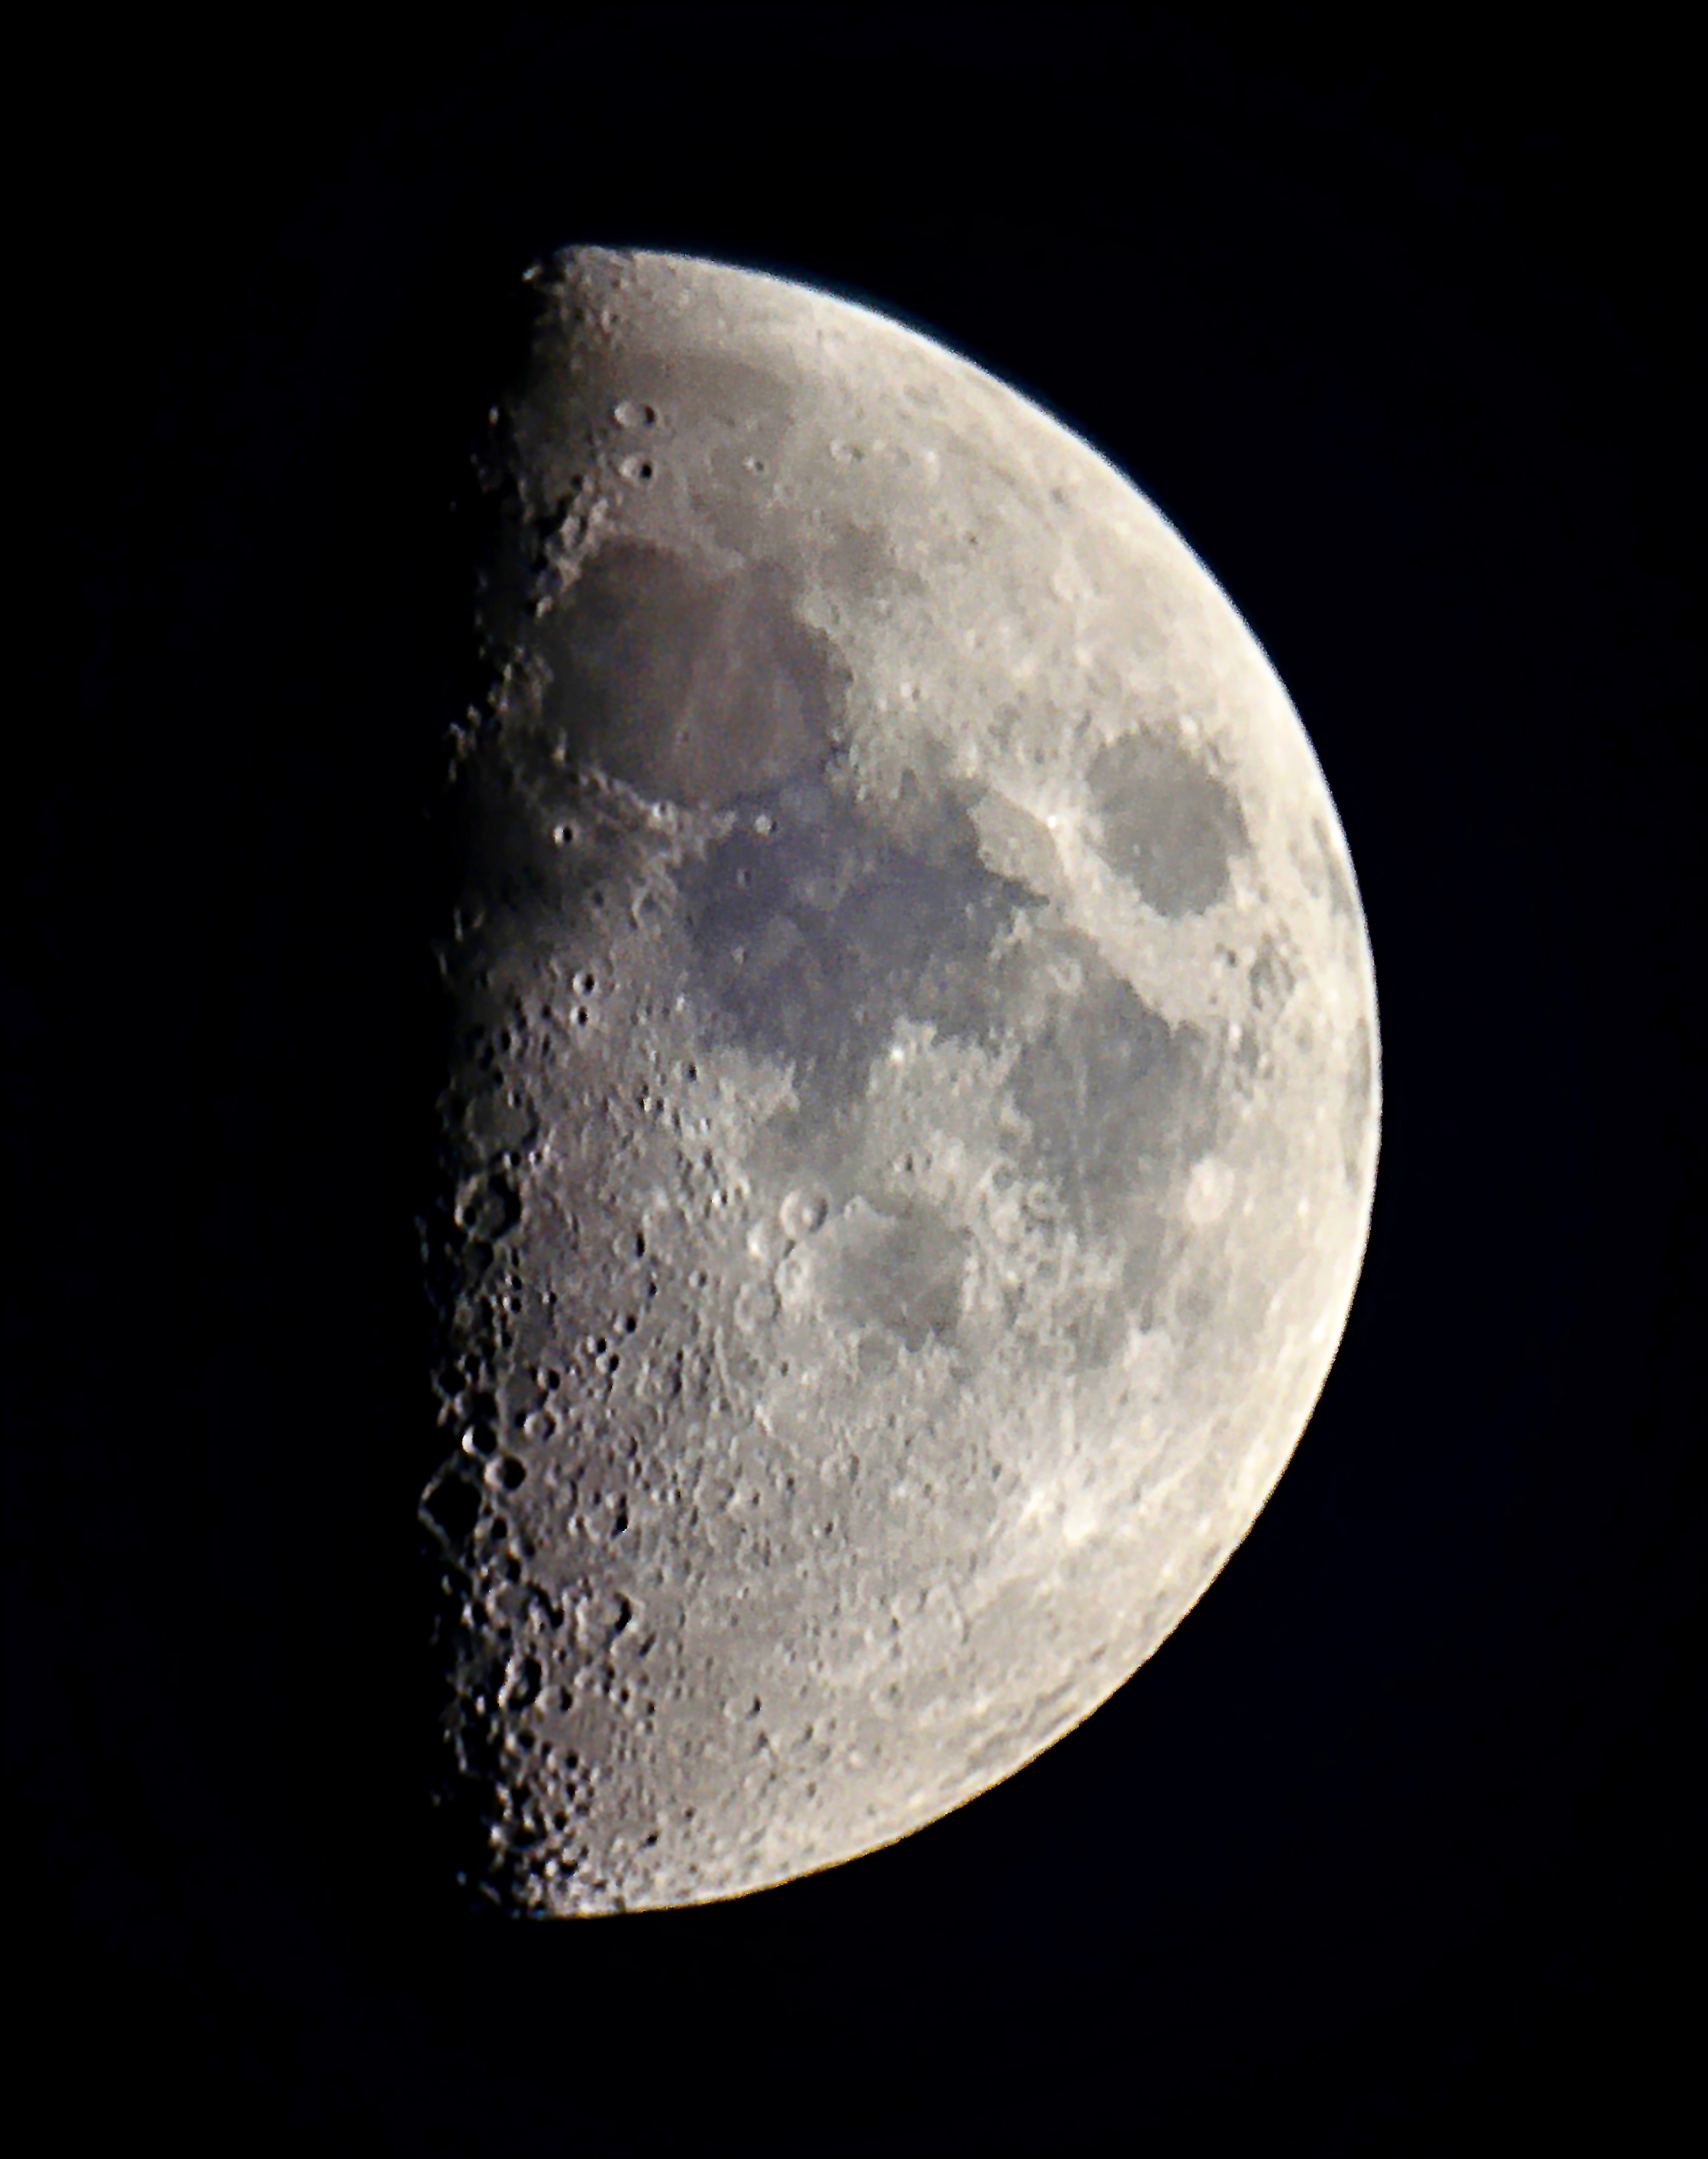
Some days later, a clear early evening gave me a brief chance to observe the first quarter Moon low in the southern sky. As it was still quite light, I first slewed to the Moon’s position and then used the ‘Solar System’ align mode. The 9mm eyepiece just encompassed the Moon which showed commendable contrast given the elevation and rather hazy sky. Using a 2x Barlow to give a magnification of x144 enabled the craters along the limb to be observed in detail. I then mounted my Nikon D7000 with T-mount adaptor into the 2’ focuser. I was pleased to find that the mount and telescope tube were quite up to supporting it. As expected (and for very good reason), one could not bring the CMOS sensor to the focal plane and so I used a Barlow lens mounted into the front of the 2’ adaptor to allow the image to come to focus and also, usefully, to increase the image scale by 1.5 so that the Moon’s image nicely filled the frame. Only a few images could be taken before clouds rolled in and that shown is the result of stacking the best four. I have enhanced the colour to show the different types of basalt on the floors of Mares Serenitatis and Tranquillitatis, slightly red and blue in colour. I felt that the telescope had acquitted itself very well given the Moon’s 15 degree height above the horizon.
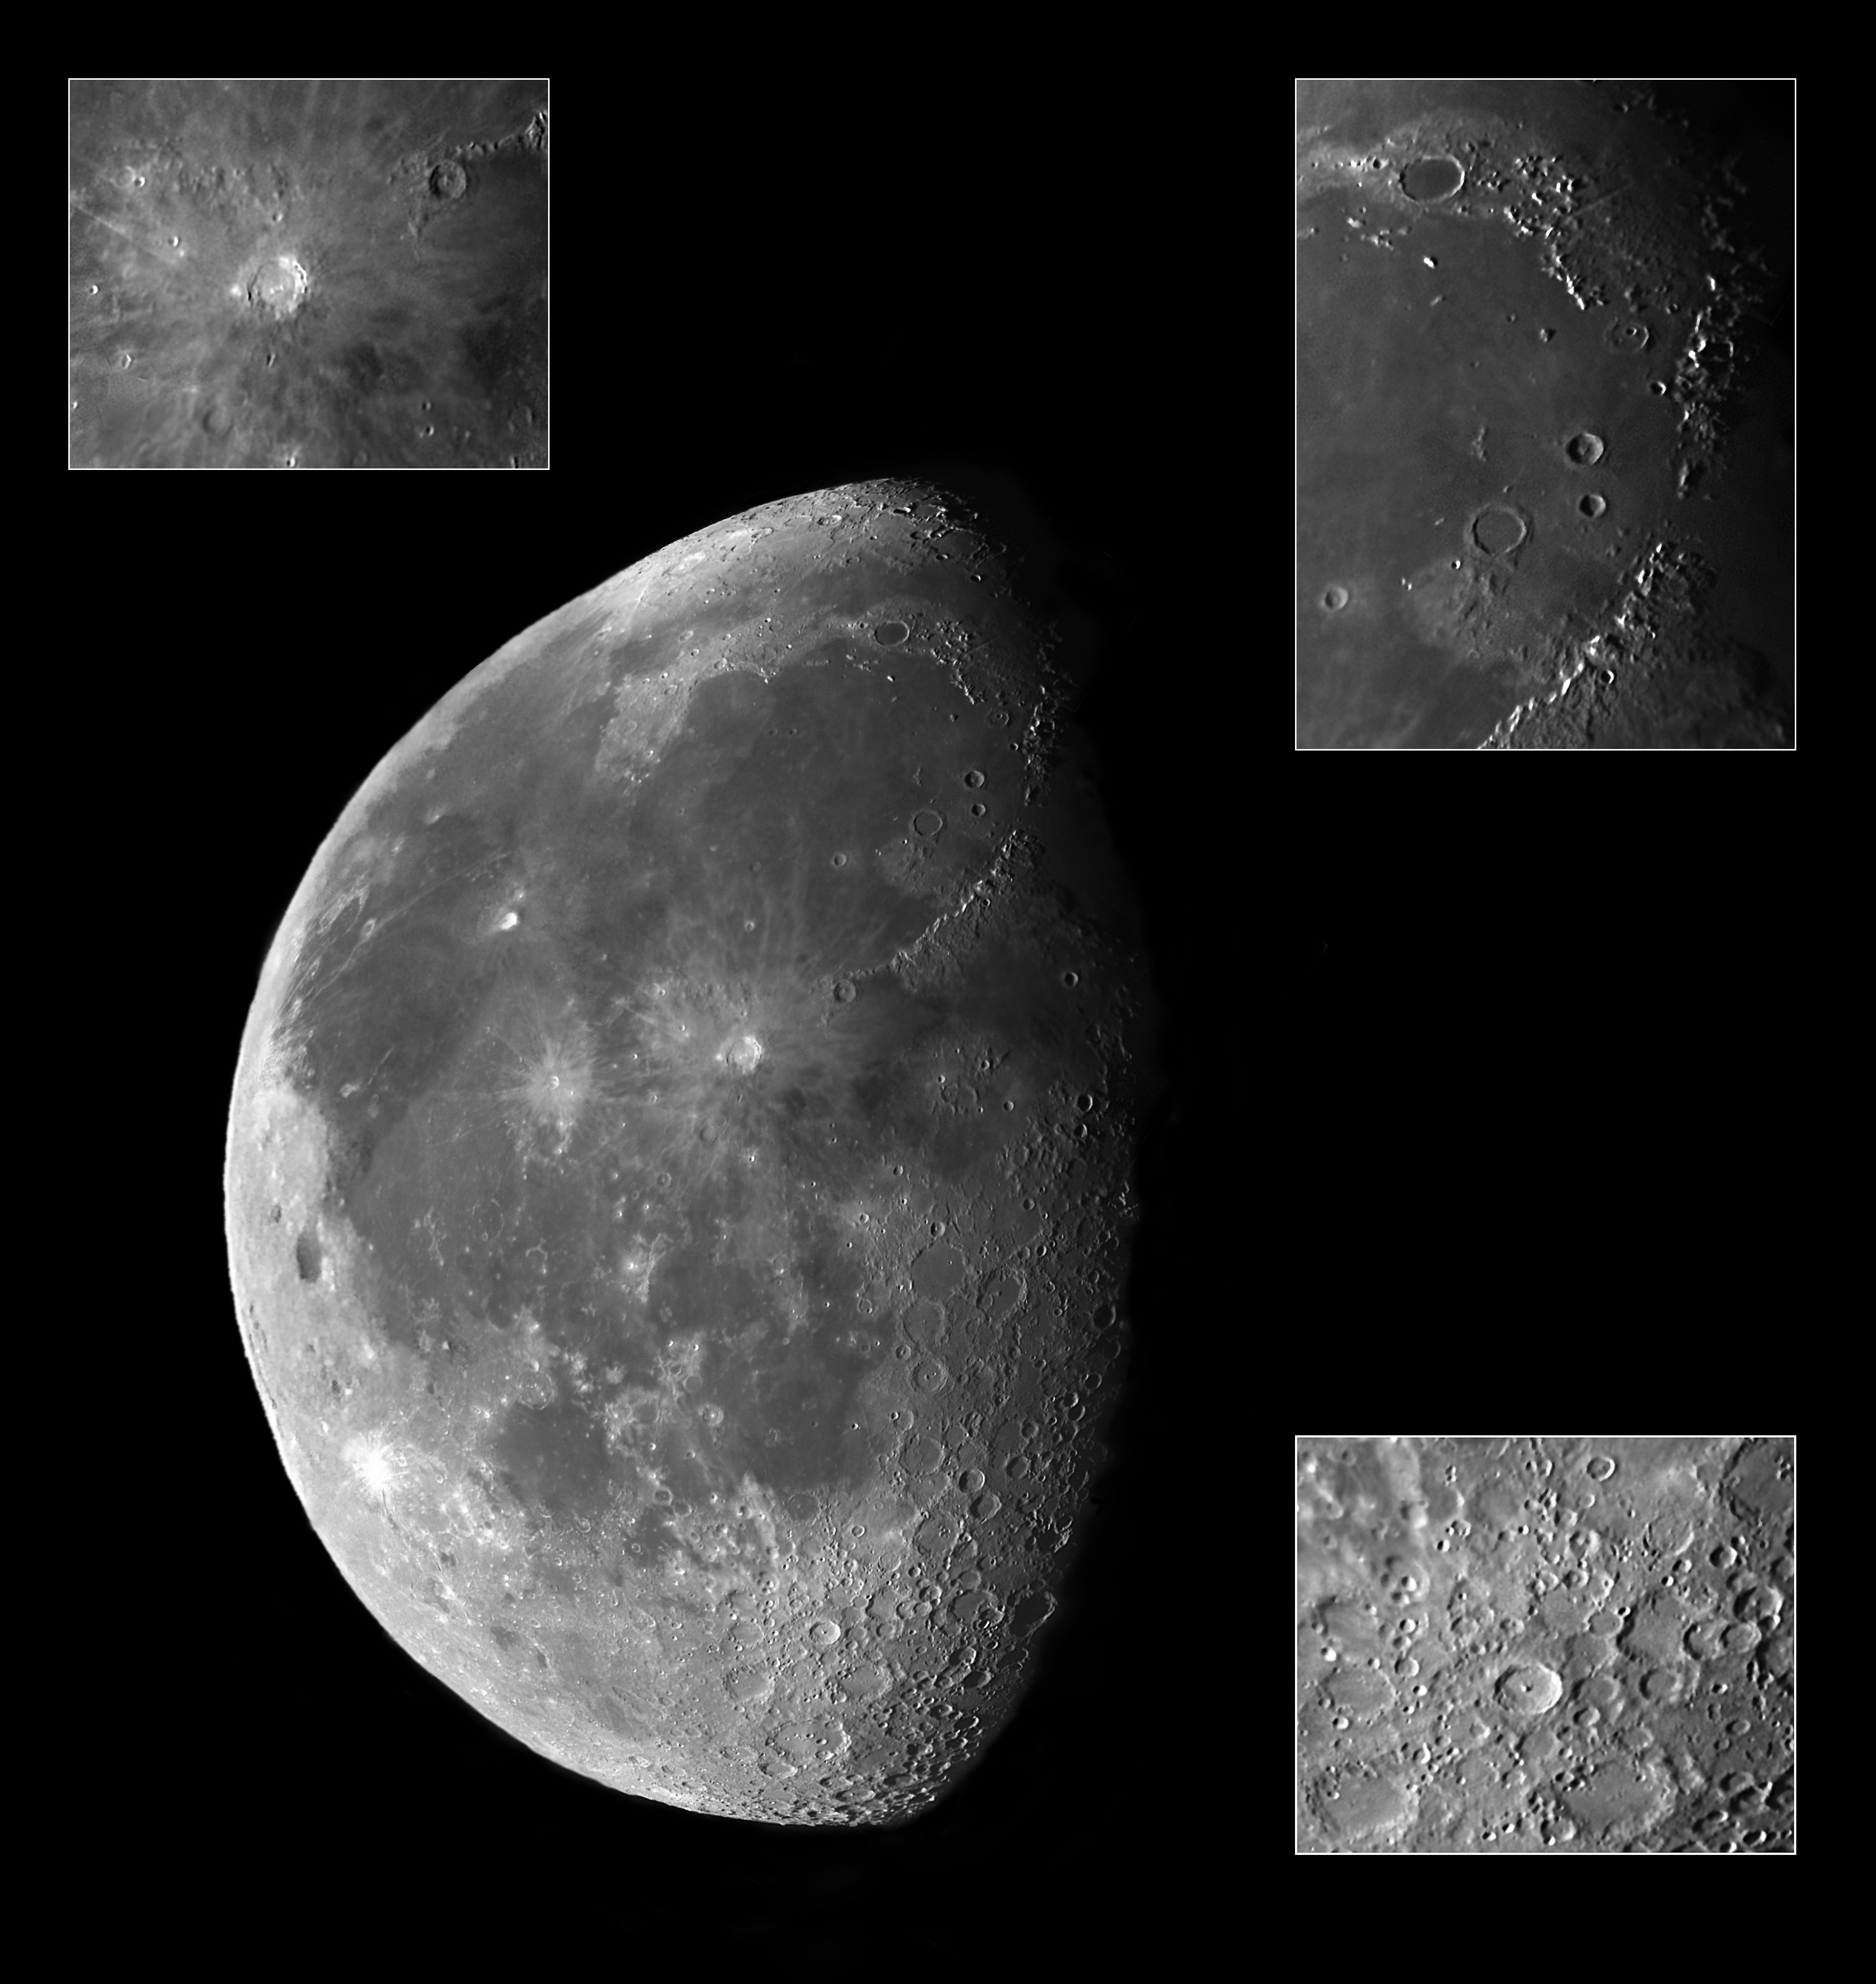
A second chance to image the Moon came a couple of weeks later when, just before dawn, it was high in the sky. This time I used an Imaging Source video camera (think ‘webcam’ imaging) to take video sequences of segments of the Moon. A Televue 2.5x Powermate was used to increase the image scale but also to allow the image to reach the plane of its CCD array. The best images from each sequence were then aligned and stacked in Registax 6. The resulting images were then imported into Microsoft ICE which, with a little later help from Photoshop, quickly produced the main lunar image, shown flanked by three of the individual segments. This image is a testament to both the image quality of the telescope and its excellent tracking: the CCD chip covered a 50 x 40 arc second area of the Moon and, during one 2 minute video sequence, the image had shifted by just a few pixels. Impressive!
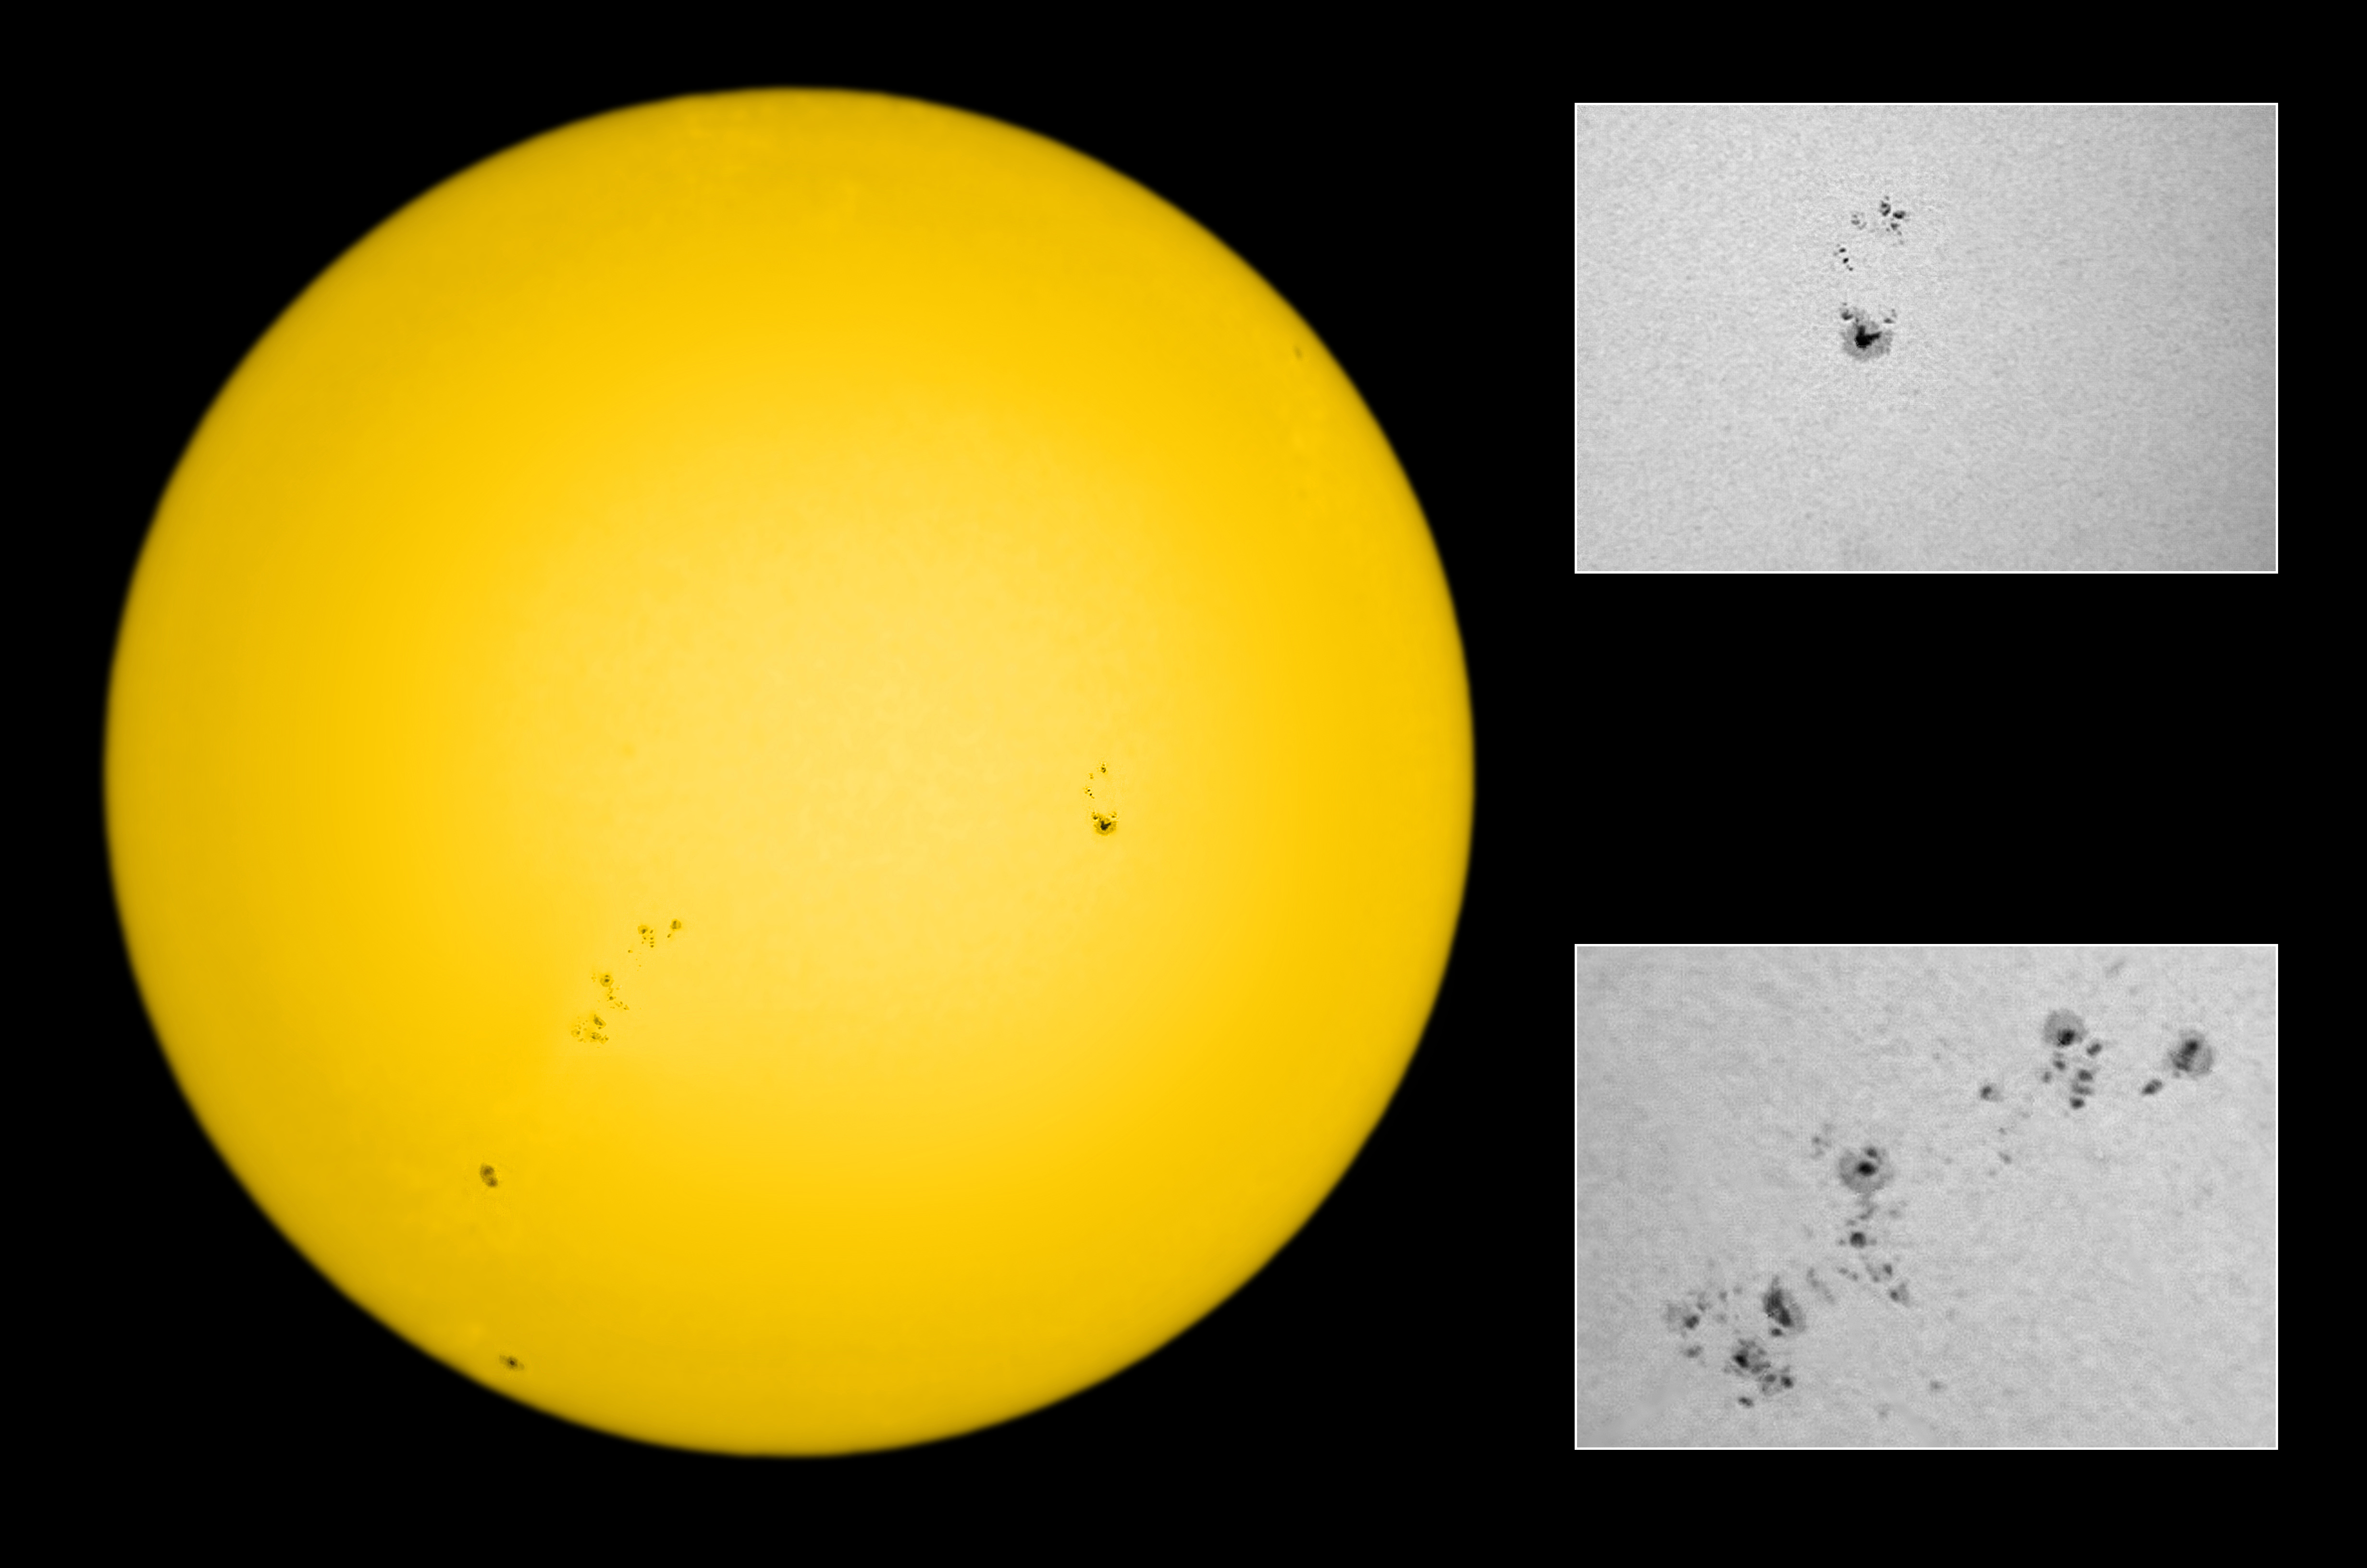
My final observations with the telescope came when I took the telescope to the first Peak Star Party. The Saturday daytime had sunny spells so the Sun was an obvious target as, nearing solar maximum, it is getting increasingly interesting to observe. Given very great care this is possible with the Sky Prodigy but there are two critical points necessary to protect the telescope. Firstly, please do not even think about using eyepiece projection as, even if the brightness is reduced by using the small aperture in the tube cover, the heat from the Sun is enough to break down the cement bonding the doublet in the eyepiece and secondly, should the cover of the Starsence CCD camera not be present, the CCD will be destroyed – I taped the cover in position so it could not possibly fall out! The only really safe way to observe the Sun is to use a full aperture solar filter. They can be bought ready made or home produced using Baader Solar Film which is widely available from telescope suppliers. With the filter in place, a very nice grouping of sunspots could be seen. The main solar image, taken with the DSLR shows how the Sun appeared using the 26mm eyepiece, whilst the images taken with the Imaging Source video camera shows the most prominent sunspot groupings as they appeared using the 9mm eyepiece and 2x Barlow.
That evening, the sky was partly cloud covered and somewhat hazy. I had not expected the scope to be able to self align and was about to use the solar align on Jupiter, but decided to try it anyway. Under the amazed gaze of some onlookers it was able to align itself and I was then able to ‘goto’ Jupiter to wow them even more.
I really enjoyed my time with the Sky Prodigy. The three alignment methods cover every eventuality and could not be faulted. The ‘goto’ mount found all the objects that I sought and, once found, tracked them with very high precision across the sky. Given a dark sky, it is surprising what can be seen through a 5 inch aperture scope and, as I hope I have shown, it can certainly be used for some simple astro-imaging. This innovative telescope really could be the answer for newcomers to the hobby.
Return to Astronomy Digest home page