
[This is just one of many articles in the author’s Astronomy Digest.]
If one has used Autostakkert! to process a planetary .avi file, as I have outlined in the post ‘Imaging Planets’, it produces two results (if asked) one somewhat sharpened. This latter image (called J1 for this exercise) can be sharpened further, but I have found that this rather destroys the overall result in terms of colour. This posting describes a method, given the use of Adobe Photoshop, of enhancing this image to, hopefully, produce a better result. When this image was produced as Jupiter was at just 35 degrees elevation the seeing was not excellent so the detail present was not as great as can sometimes be imaged. The process is actually quite straightforward: one produces two versions of the Autostakkert! sharpened image, one has had the colour enhanced somewhat and the second is a further sharpened image which has been converted to monochrome. The latter is then used to control the luminosity of the first image.

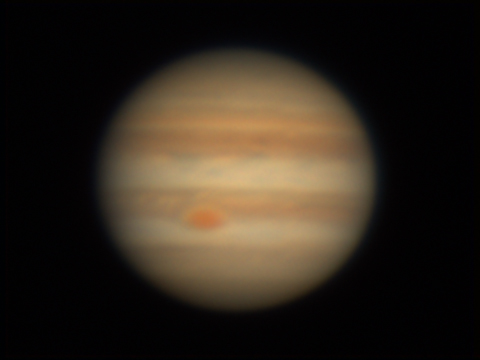
The output from AutoStakkert! – J1
Producing a colour enhanced image
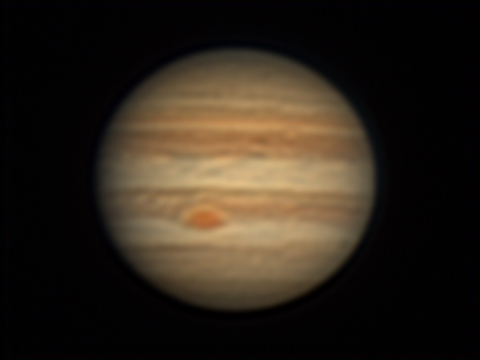
One takes the image J1 and uses the ‘Match Color’ (American spelling) tool, image>adjustments>match color. Moving the colour intensity slider over to the right increases the color saturation in a far better way than using the ‘Hue/Saturation’ tool. Adjust to suit.
J1 enhanced using ‘Match Color’
Producing a sharpened monochrome image
The aim is to sharpen image J1 without making it too noisy. One sharpening technique that works well is to use a somewhat complex technique that employs a Blur function! This is described in ‘The Art of Astrophotography’. However, I have developed a simple technique employing the ‘Smart Sharpen’ tool in Photoshop. The process is to apply many applications of a combination of small amount of sharpening which is then followed by the application of the ‘Gaussian Blur’ filter with a small radius. To make it easy to apply, this combination should be made an action initiated by pressing a function key. Details of setting up an action are given in ‘The Art of Astrophotography’ or can be found on the web.
The specific parameters will depend on the scale of the image but, with a planetary disk 270 pixels wide, I used a radius of 2.4 pixels and an amount of 13% for the smart sharpen filter. In ‘Advanced’ mode and with the ‘More Accurate’ box ticked it was set to remove Gaussian Blur. In the following use of the Gaussian Blur filter, the radius was set at 0.7 pixels. The blurring cancels out much of the applied sharpening but, with many repeated applications the sharpness does increase without increasing the noise over much – always a problem when sharpening.

The result of sharpening the image
This is then converted into monochrome by simply first setting the image mode to ‘Greyscale’ and then reverting back to RGB. (So it can be applied to a RGB image)

The monochrome sharpened result
Producing the final result
The colour image is copied (Ctl A, Ctl C) and pasted over the monochrome (Ctl V) to give two layers. The blending mode is set to ‘Colour’ and the depth of colour applied controlled by the position of the ‘Opacity’ slider to give the final result shown below. [Alternatively one can paste the monochrome image over the colour image and use the ‘Luminosity’ blending mode in which case the opacity slider adjusts the sharpening of the final image.] I believe that this process gave a more pleasing result than when I simply sharpened the Autostakkert! image. Perhaps you might try it too.
Return to Astronomy Digest Home Page