[This is just one of many articles in the author’s Astronomy Digest.]
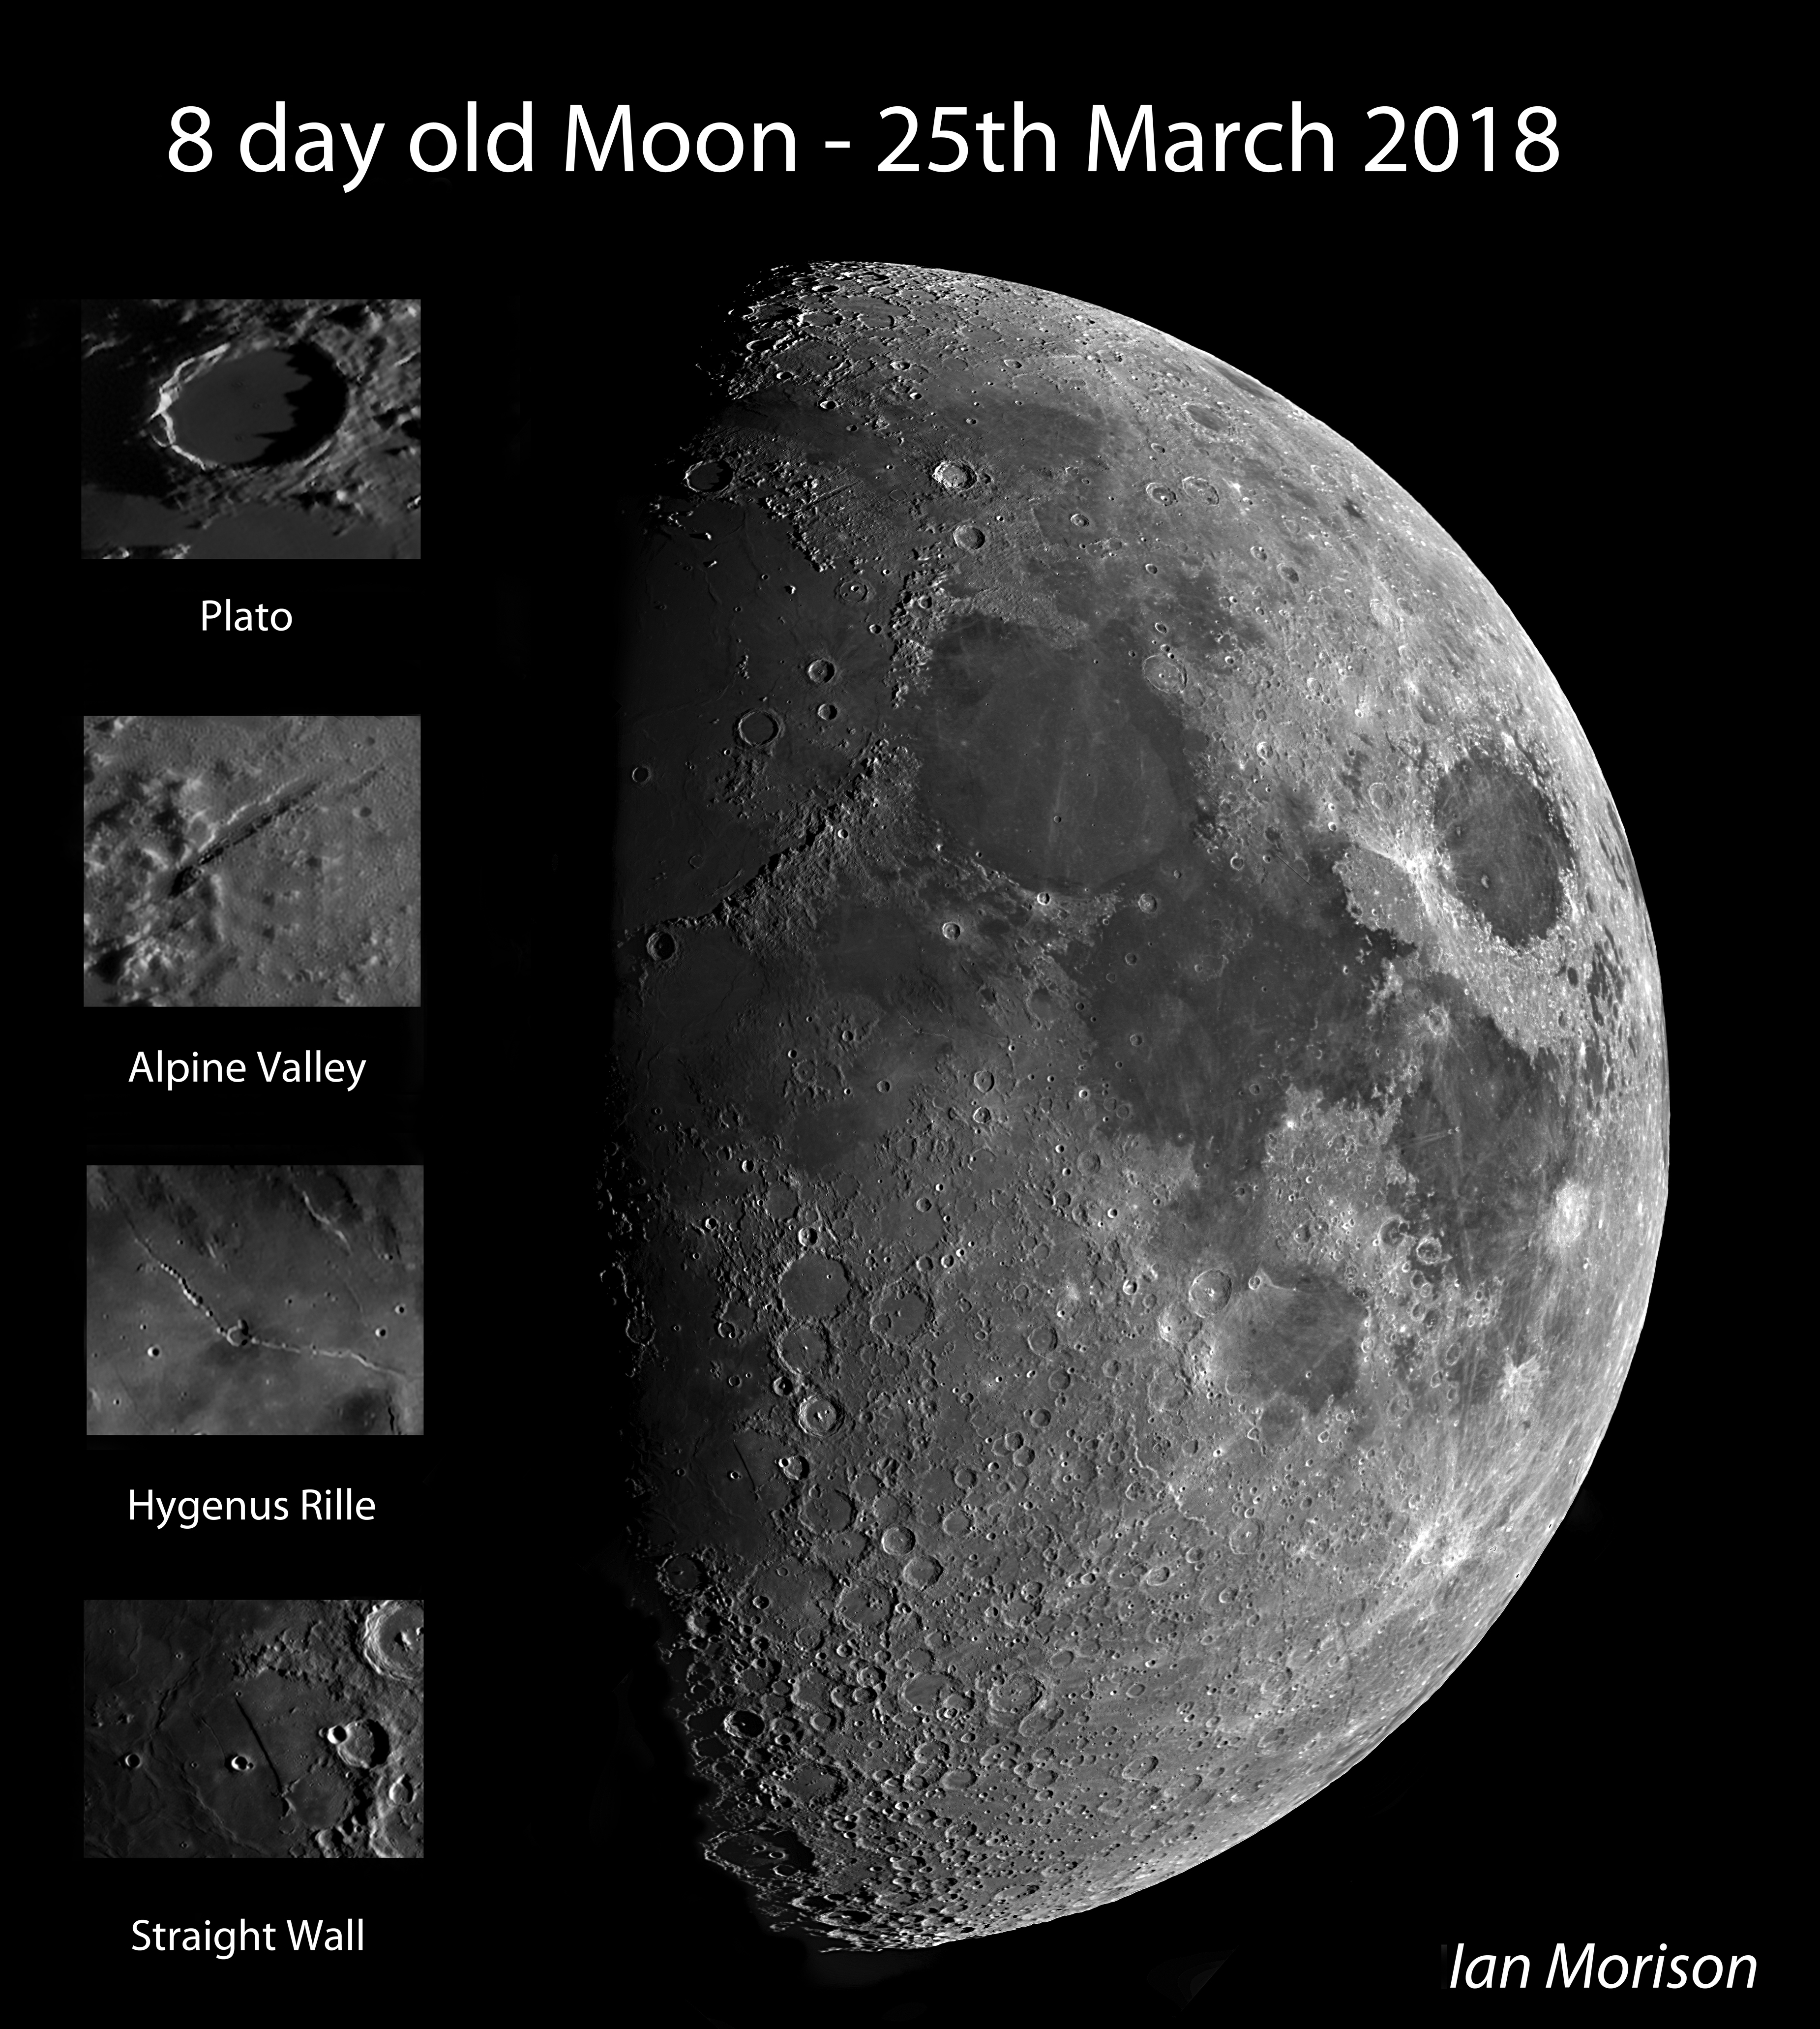
This article – one of over 40 articles on the author’s Astronomy Digest – shows how a single imager using equipment that is within reach of most astrophotographers can make a high resolution image of the lunar disk, in this case that of the 8 day old Moon.
Back in April 2009, a group of imagers using Celestron C11 and C14 telescopes in Sir Patrick Moore’s garden at Selsey made what has become known as the ‘World Record Lunar Image’. Together they made video sequences of close on 1,000 small areas of the lunar surface from which 288 of the resulting images, called ‘panes’, were used to build up an image of the 9 day old Moon. Each of the 9,550 pixels across the lunar surface subtended ~0.2 arc seconds and the image has a resolution of ~0.4 arc seconds allowing lunar features of as small as 1 km to be clearly seen.
Over the last year or so my imaging quest has been to produce as high a resolution image as I believed I could make myself from my home location in northern England with equipment that most astrophotographers could own. Simply due to the time it takes to acquire each video sequence no single imager could hope to produce 288 video sequences in one evening so I had to decide how to best to tackle the task and decided to aim for an image with a resolution of 0.6-0.8 arc seconds. I have accomplished that target and this article explains how this was achieved.
Webcams, many of which are now made specifically for astroimaging, can be used for imaging the Moon. By the taking of many frames in a video sequence and using either Registax 6 or AutoStakkert!2 software to align and stack the better of the individual frames, an image can be produced which aims to eliminate or reduce the effects of atmospheric ‘seeing’ − a process called ‘lucky imaging’. One with a monochrome sensor would be best and for several years I have used an Imaging Source DMK 21AU618.AS webcam. However, the use of a webcam gives rise to a problem. In contrast to the 23 × 15 mm sensor size of an APS-C sensor DSLR, that in my Imaging Source webcam is just 4.46 × 3.8 mm. This means that an individual pane will only cover a relatively small area of the lunar surface. The result is that one needs to produce a number of panes which are then combined into the final image of the lunar disk. By hand this would be a very time consuming job, but I discovered a free program called Microsoft ICE (Image Composite Editor) which, in this application, is well nigh miraculous.
One needs to make sure that there is plenty of overlap between the individual panes that will make up the final image. The area of the Moon covered by an individual pane will obviously depend on the telescope’s focal length. I used my Taskahashi FS102, 800 mm focal length refractor to image a Full Moon with Jupiter nearby; making 42 panes to cover the Lunar Surface, a single pane with a longer exposure for Jupiter and a pane with an even longer exposure to image the 4 Gallilean satellites. The image below shows the result having placed Jupiter and its moons somewhat closer to the Moon to increase the image scale.

However, if I had been using my 2,350 mm focal length Schmidt-Cassegrain, the individual panes would cover about one ninth the area − so requiring well over 300 individual video sequences to be taken to give the panes that could be combined into a full disk lunar image. As the taking of a single video sequence could take a few minutes, each followed by re-pointing the telescope to the next area of the lunar surface, one can begin to see why the use of a long focal length telescope becomes a real problem. This is a real pity, as longer focal length telescopes will normally have a larger aperture and hence a better fundamental resolution so giving the possibility of producing a higher resolution lunar image − providing that the atmosphere cooperates.
There are two ways in which this problem can be ameliorated. The first is to use a webcam with a larger area so requiring fewer video sequences to be taken. I acquired a Point Grey Chameleon monochrome camera whose sensor has an area of 6.26 x 5.01 mm containing 1.3 million square pixels, each 3.75 microns in size. But when I first used it, a problem arose. Though my i5 processor based laptop could read in the data from the camera and buffer it in RAM in real time, it then took twice as long to write this data (around 2 gigabytes) to disk – thus effectively doubling the time required to take each video sequence. The problem was solved by buying a USB3 external SSD drive into which to write out the data.
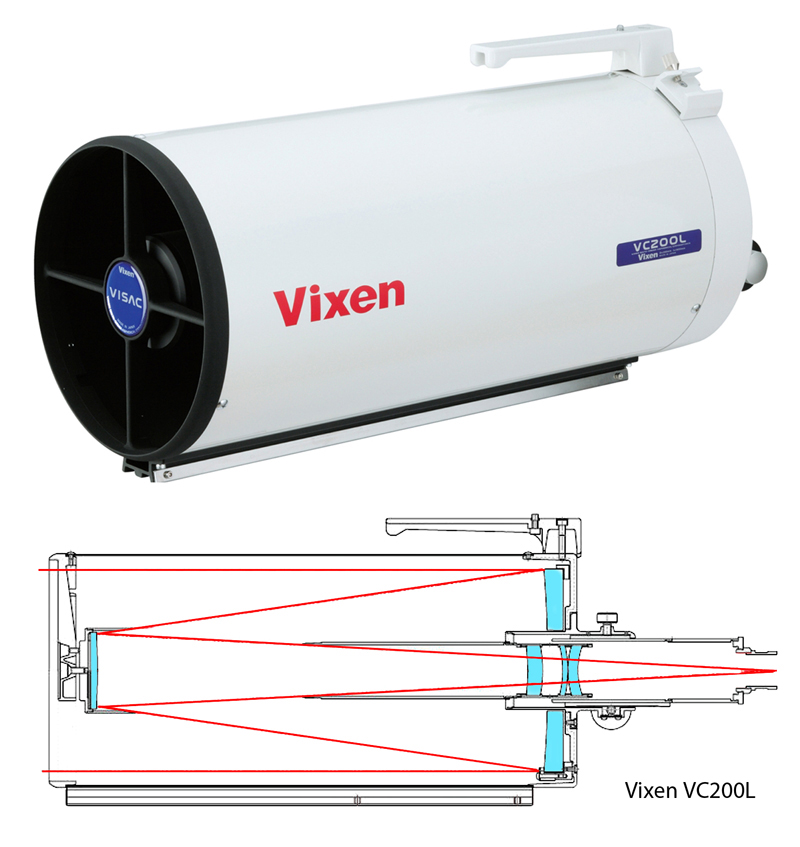
To carry out the imaging, I chose to use my Vixen VC200L catadioptric telescope which has a focal length of 1,800 mm. This is a unique telescope design. It employs a 6th order aspherical primary mirror, a convex secondary mirror and triplet corrector lens mounted in the baffle tube to provide a flat field and give sharp stars across a full frame sensor. It is thus termed an ‘astrograph’ whose nearest equivalent in the Celestron 8-inch Edge HD. Three advantages over the Celestron are that there is no corrector plate to dew up, it will cool down more quickly and that a fixed mirror and Crayford focuser eliminates image shift.
With the use of the Point Grey Chameleon I calculated that, with some duplication, around 50 individual video sequences would be required if only half the lunar disk was to be imaged such as at first or third quarter. But it would still take well over 2 hours to complete capturing all the video sequences. It is possible to maximise the time when the Moon is at high elevation (so improving the seeing) by imaging in the near infrared rather than the visible part of the spectrum. As this essentially eliminates the blue sky light, it means that one can begin to image the Moon well before darkness has fallen. The, highly useful, added benefit of imaging in the infrared is that atmospheric turbulence has far less effect at longer wavelengths thus making the lucky imaging process more likely to eliminate its effects. A further minor advantage is that, in the near infrared, the telescope’s mirror might well have a specification of 1/10th wave ‘peak to valley’ rather than 1/6th wave in the green part of the spectrum.
Assuming that, with excellent seeing, the lucky imaging technique could effectively remove the effects of the atmosphere, the maximum possible resolution will be determined by that of the telescope. For the 200 mm aperture Vixen, this is nominally ~0.6 arc seconds in the visible but will be greater when imaging in the infrared part of the spectrum. However, due to its rather large central obstruction of over 40%, the angular diameter of the Airy Disk is actually reduced somewhat over that of an unobstructed aperture so the telescope’s actual resolution might still be close to 0.6 arc seconds. But there is a further problem relating to the camera. The Nyquist sampling theorem states that the image scale of a single pixel of the camera sensor should be no more than half that of the resolution that might be attained. The 3.75 micron square pixels of my Point Grey Chameleon camera would subtend 0.42 arc seconds on the lunar surface and so could not sample the image well enough to achieve the hoped-for resolution. The first Wide Field Planetary Camera of the Hubble Space Telescope (HST) suffered from the same problem having pixels that were too large to correctly sample the superb resolution of the telescope’s mirror. The solution to their problem, and mine, was the development of a process called ‘Drizzle’ shorthand for ‘Variable-Pixel Linear Reconstruction’ (https://arxiv.org/pdf/astro-ph/9708242.pdf). If the image wanders slightly over the sensor as a large number of ‘frames’ are taken then, when this process is applied when the frames are stacked, its use can reduce the effective size of the camera’s pixels so that the image can be sampled sufficiently finely. At ground level, the atmosphere will probably achieve the slight movement of the image over the sensor required but, in order to ensure that this happens, I very slightly miss-align the polar axis of my equatorial mount allowing some small movement of the image over the sensor during the time it takes to capture a video sequence. [In fact, the mount’s polar alignment was very accurate and there was only a drift of 3 pixels during the taking a video sequence.] The drizzle technique might well reduce the effective size of the camera’s pixels by ~0.6 giving, in my application, an effective diameter of ~2.25 microns thus subtending an angle of ~0.25 arc seconds on the lunar surface so allowing the Nyquist criteria to be met.
The two requirements of a Moon at high elevation and a night of superb seeing coincided on the evening of Sunday 25th of March 2018. The 8-day old Moon, just after first quarter, was at its highest declination of the month and so, as I began my imaging session, was at an elevation of 54 degrees. Some 2 hours later it was still at an elevation of 51 degrees. To capture in the near infrared, an Astronomic ‘Planet IR Pro 747’ filter was screwed into the camera’s 1.25-inch barrel. Kept permanently in place, this prevents dust falling on the sensor. Usefully, the Sony ICX445 sensor employed in the Chameleon camera is still quite sensitive in the near infrared.
Using plenty of overlap, I first took video sequences around the east and west limbs to cover the majority of the lunar surface and then worked up through its central regions − hoping that I had not missed out any part of the surface. With some duplication, I had finally taken some 56 video sequences giving me over 112 gigabytes of data to process. I chose to use AutoStakkert!2 to process the video files to give the ‘panes’ that would cover the lunar surface. First, it sets align points across the area of the first of the video frames in the sequence, then aligns them and ranks them in order of sharpness. I chose to stack the best 60% of the frames and specified the x1.5 Drizzle mode.
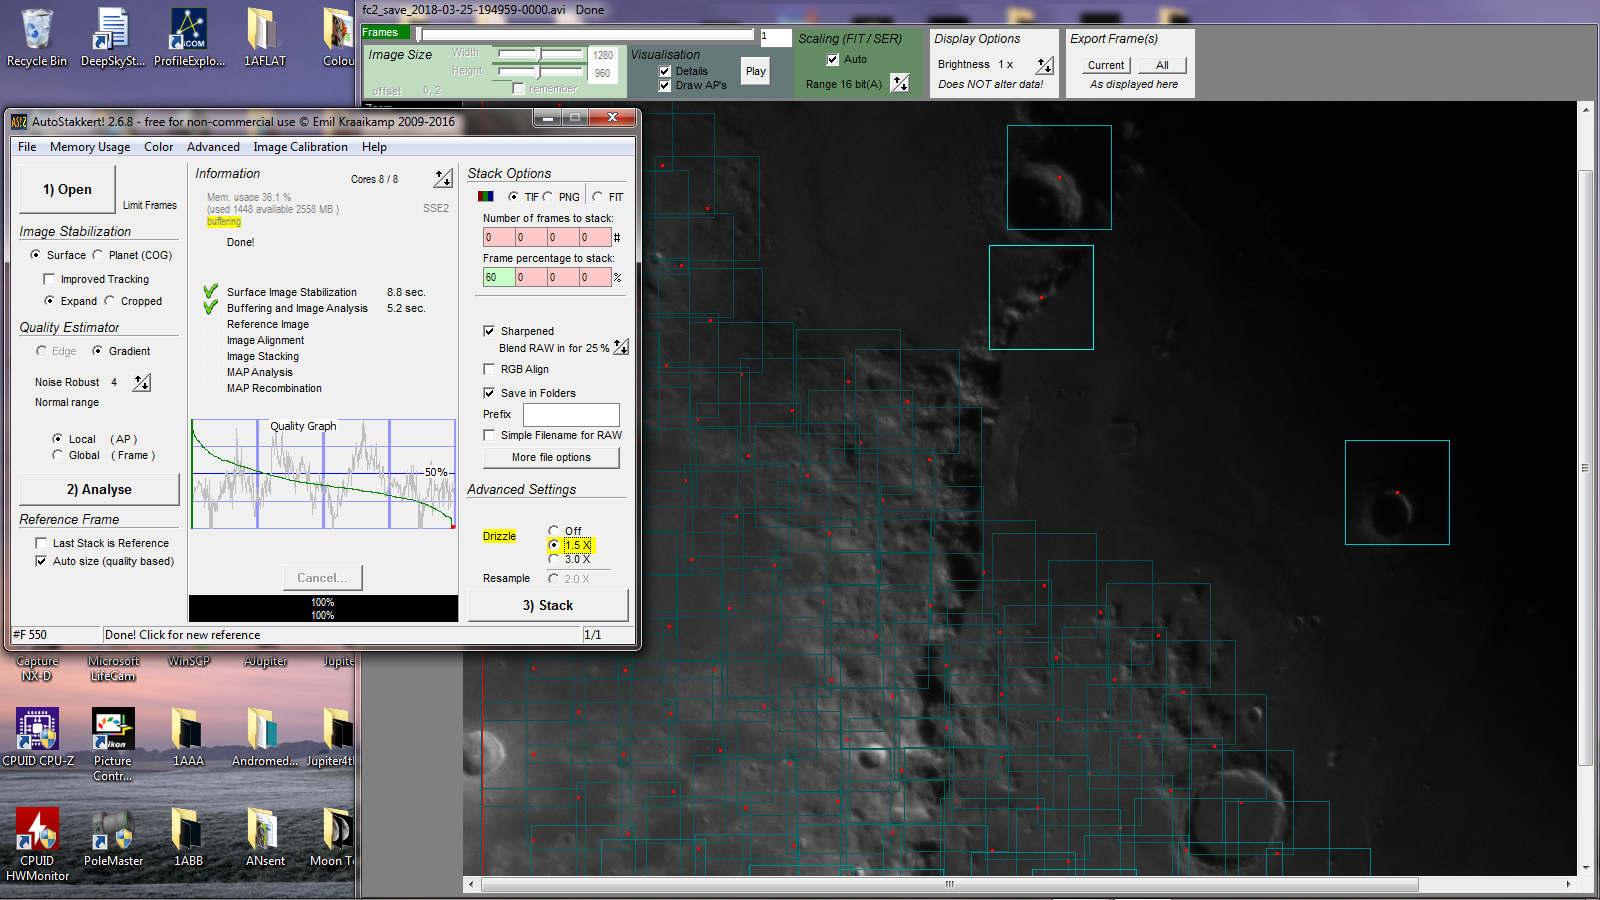
The percentage to stack and the x1.5 drizzle mode have been selected
This process took quite a while, about as long as it had taken to capture each sequence and it was helpful to have the use of an i7 laptop using 8 processors nominally working in parallel at 3 GHz. When stacking, the processors do initially run at 3 Ghz, however when working flat out, they naturally increase in temperature. To prevent damage to them, the clock speed is reduced (and the cooling fan speed increased) to limit their temperature to 99 Celsius giving a continuous clock speed for the majority of the stacking process of only 2.2Ghz.
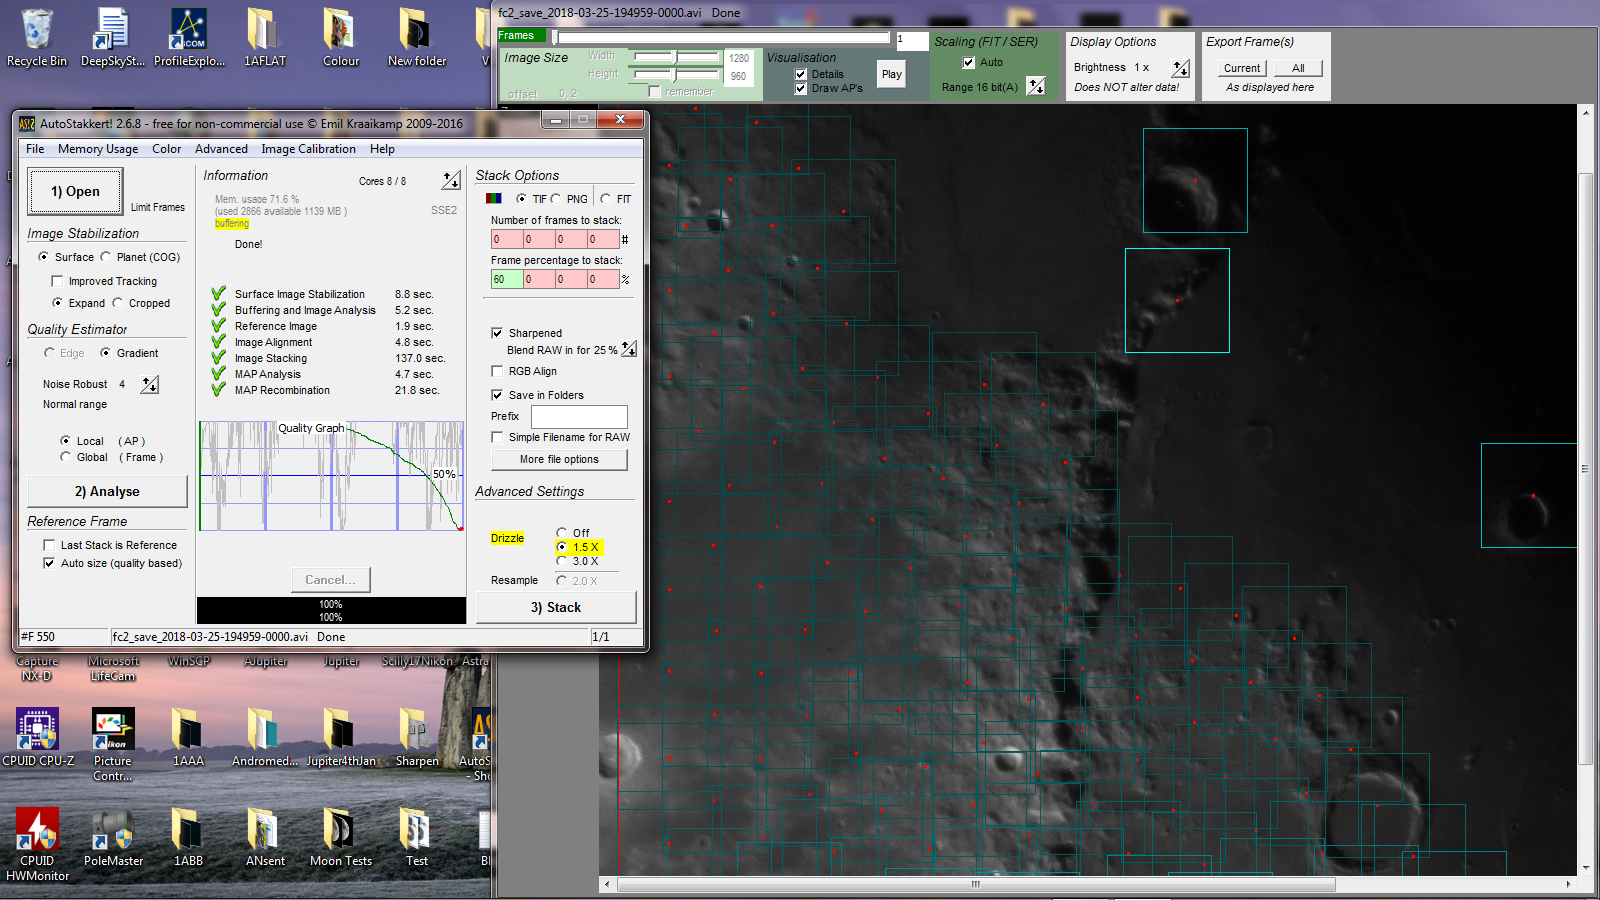
The stacking took 137 seconds
Autostakkert!2 can produce two versions of each pane, one unsharpened and, optionally, one sharpened. As I chose to use a deconvolution sharpening method that had been initially developed to improve the HST images before its mirror’s optics were corrected, I first selected and loaded the 56 unsharpened panes into Microsoft ICE.
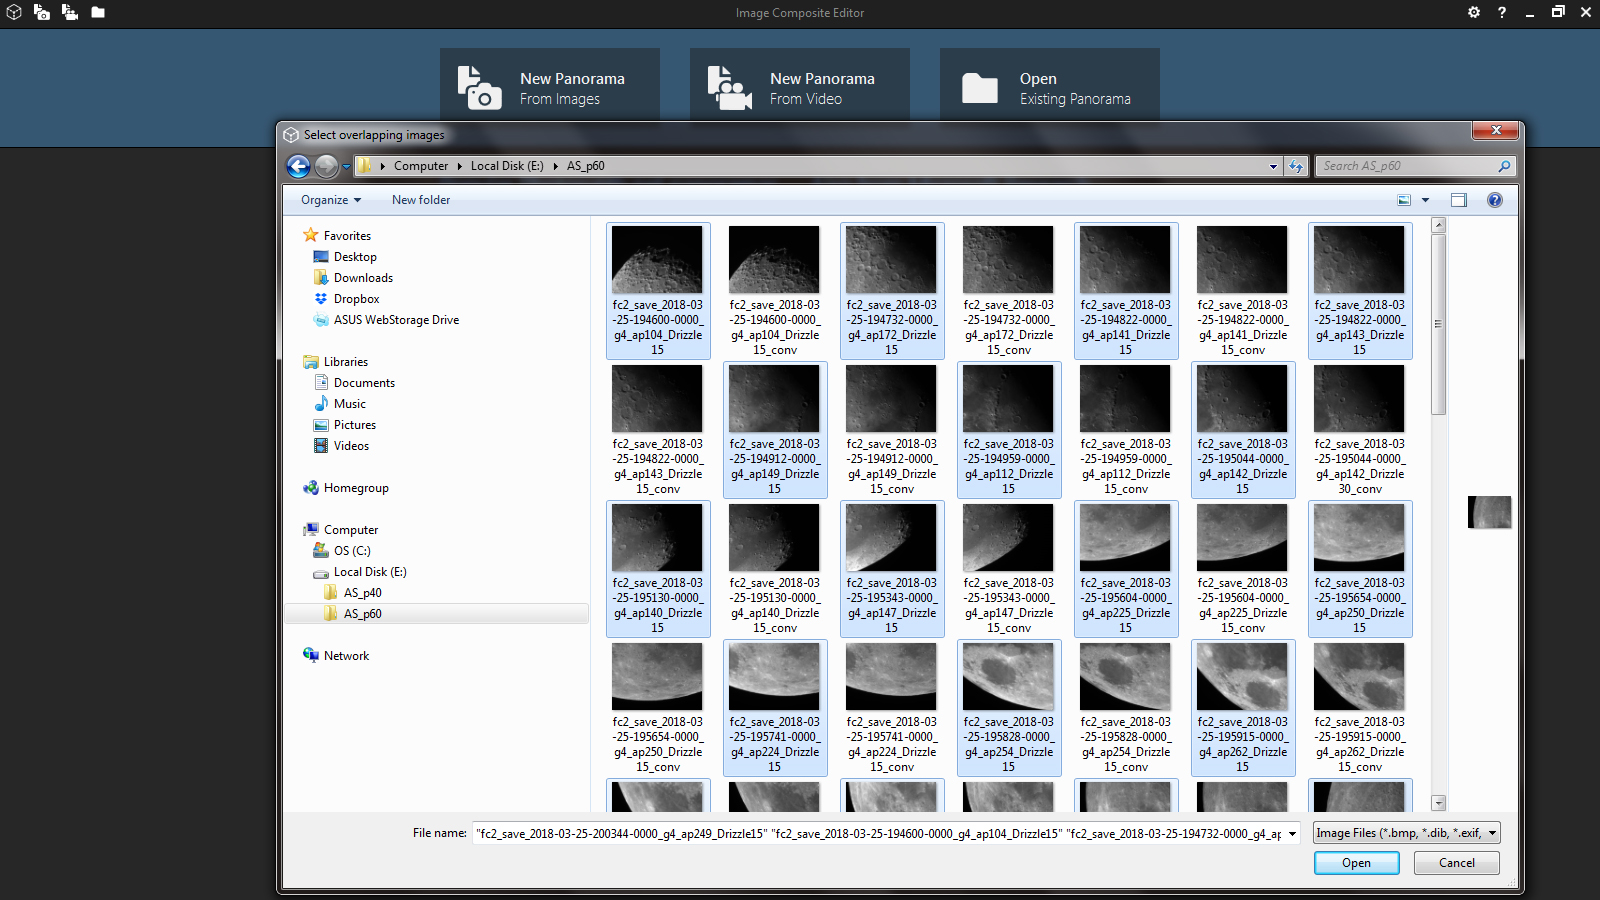
Selecting the unsharpened panes produced by Autostakkert!2 to be stacked in Microsoft ICE
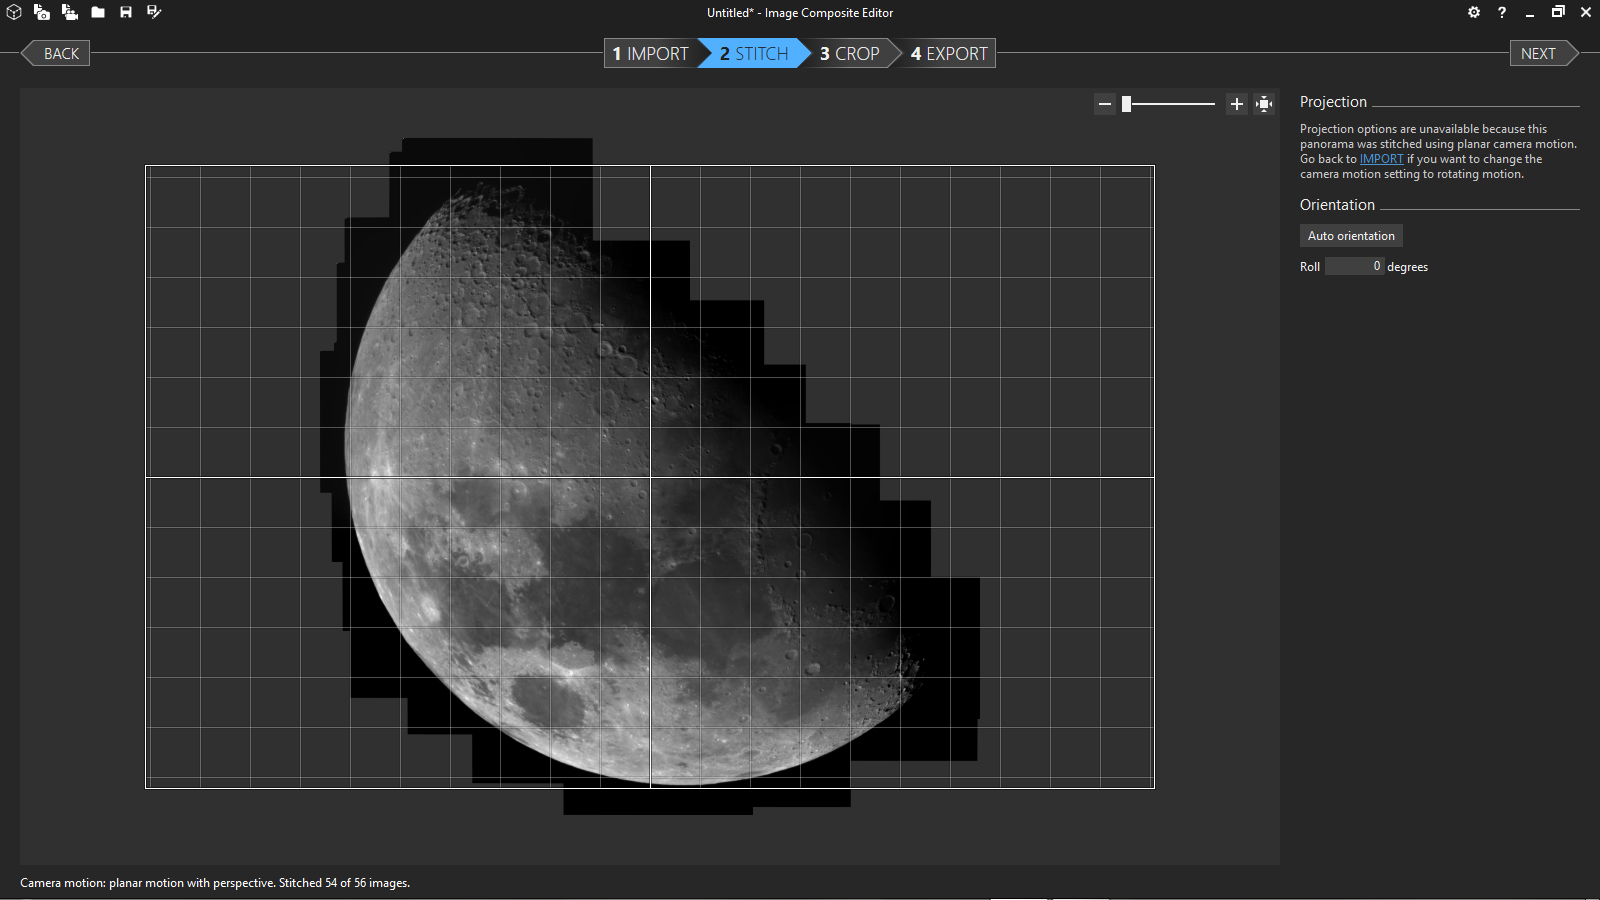
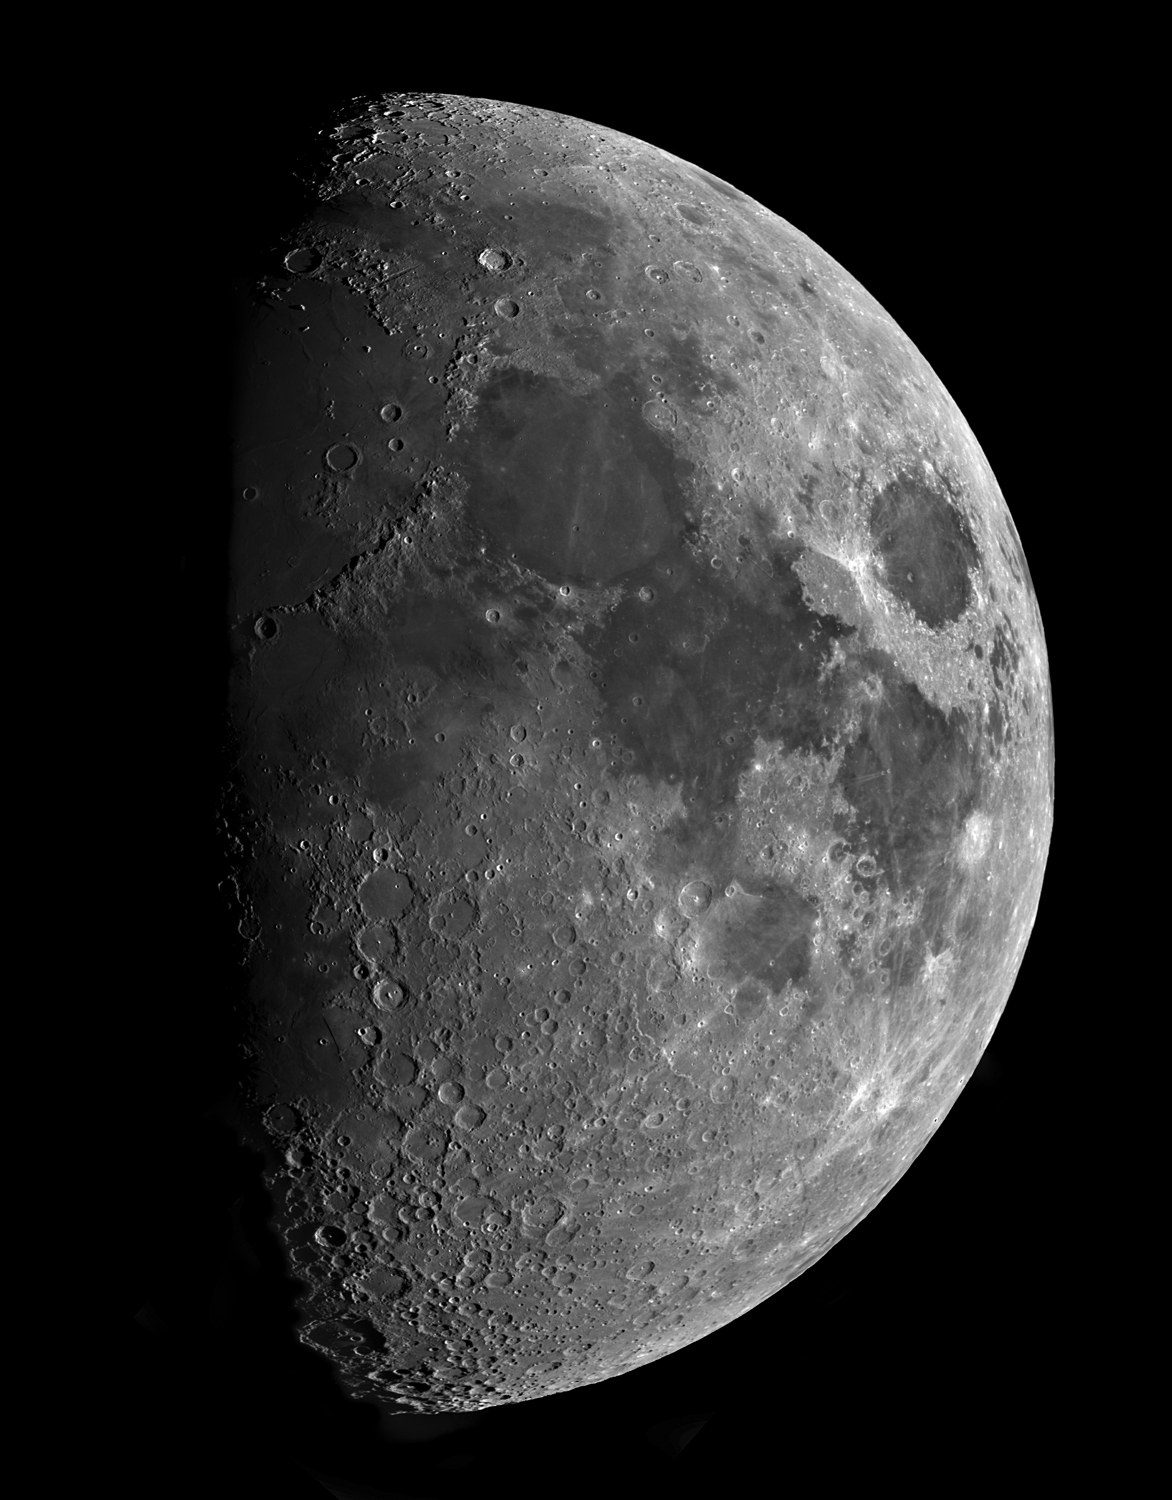
 It then used 54 of the 56 panes to build up the full disk image. I was somewhat relieved to see that no part of the surface had been missed.
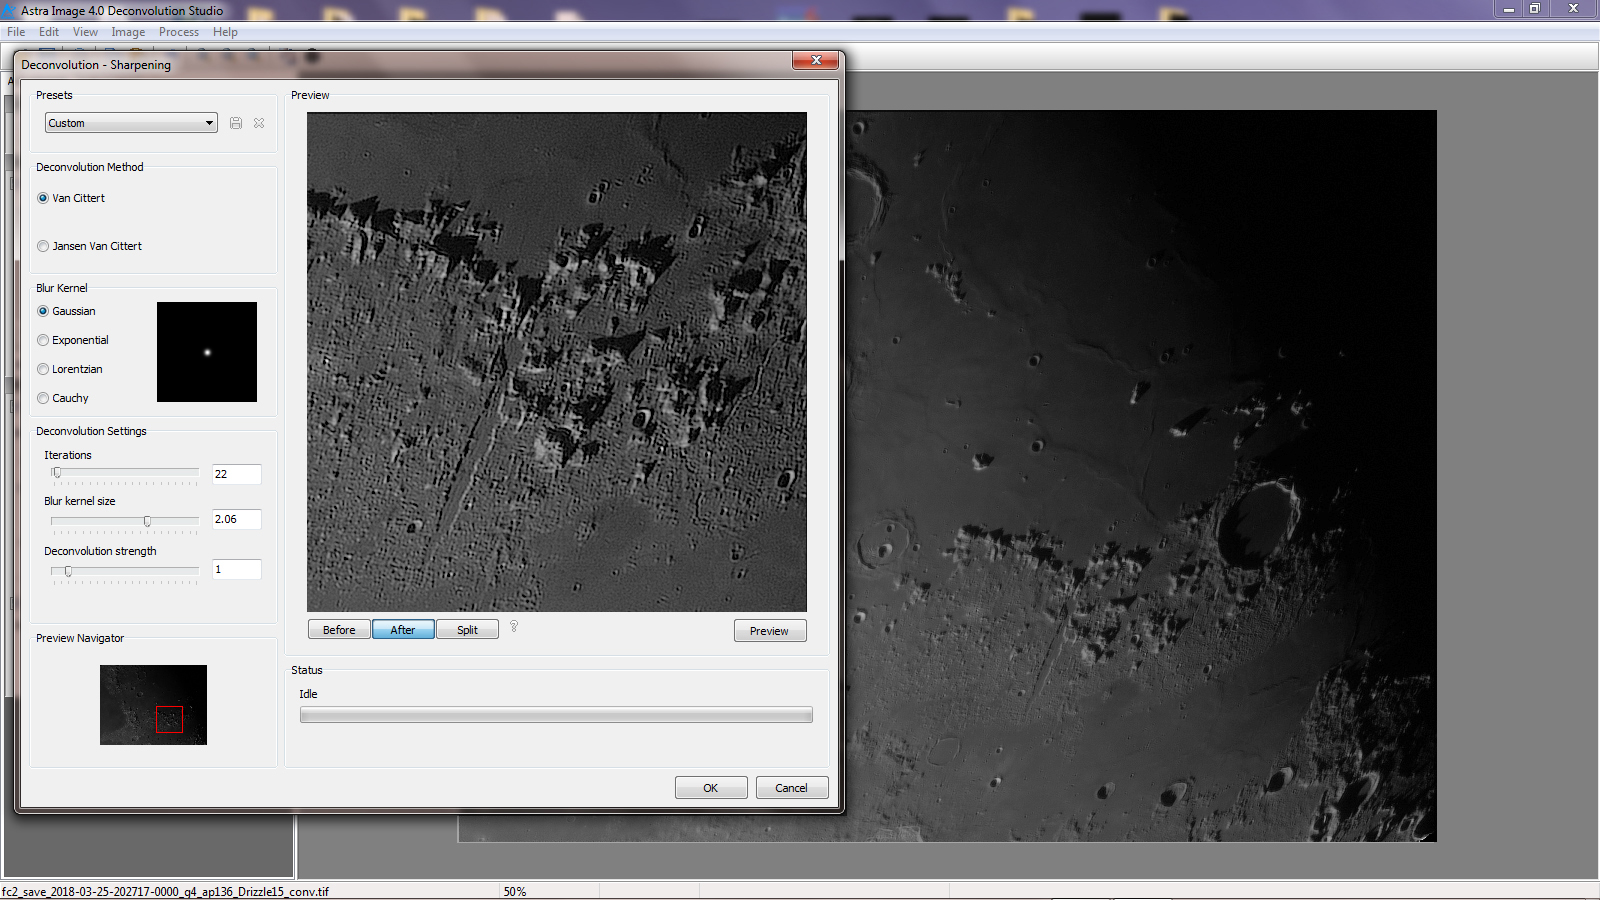
The image was cropped and then exported as a Tiff file. Given this image as a 16-bit Tiff file, I used the ‘Astra Image’ deconvolution software to sharpen the image. The software allows one to apply the sharpening process to a small area of the image to decide on the parameters to be used used. I found that, for this application, 92 iterations with a ‘blur kernel’ size of 2 pixels and a ‘devolution strength’ if ~1.5 appeared to give a good, but not over sharpened, result.
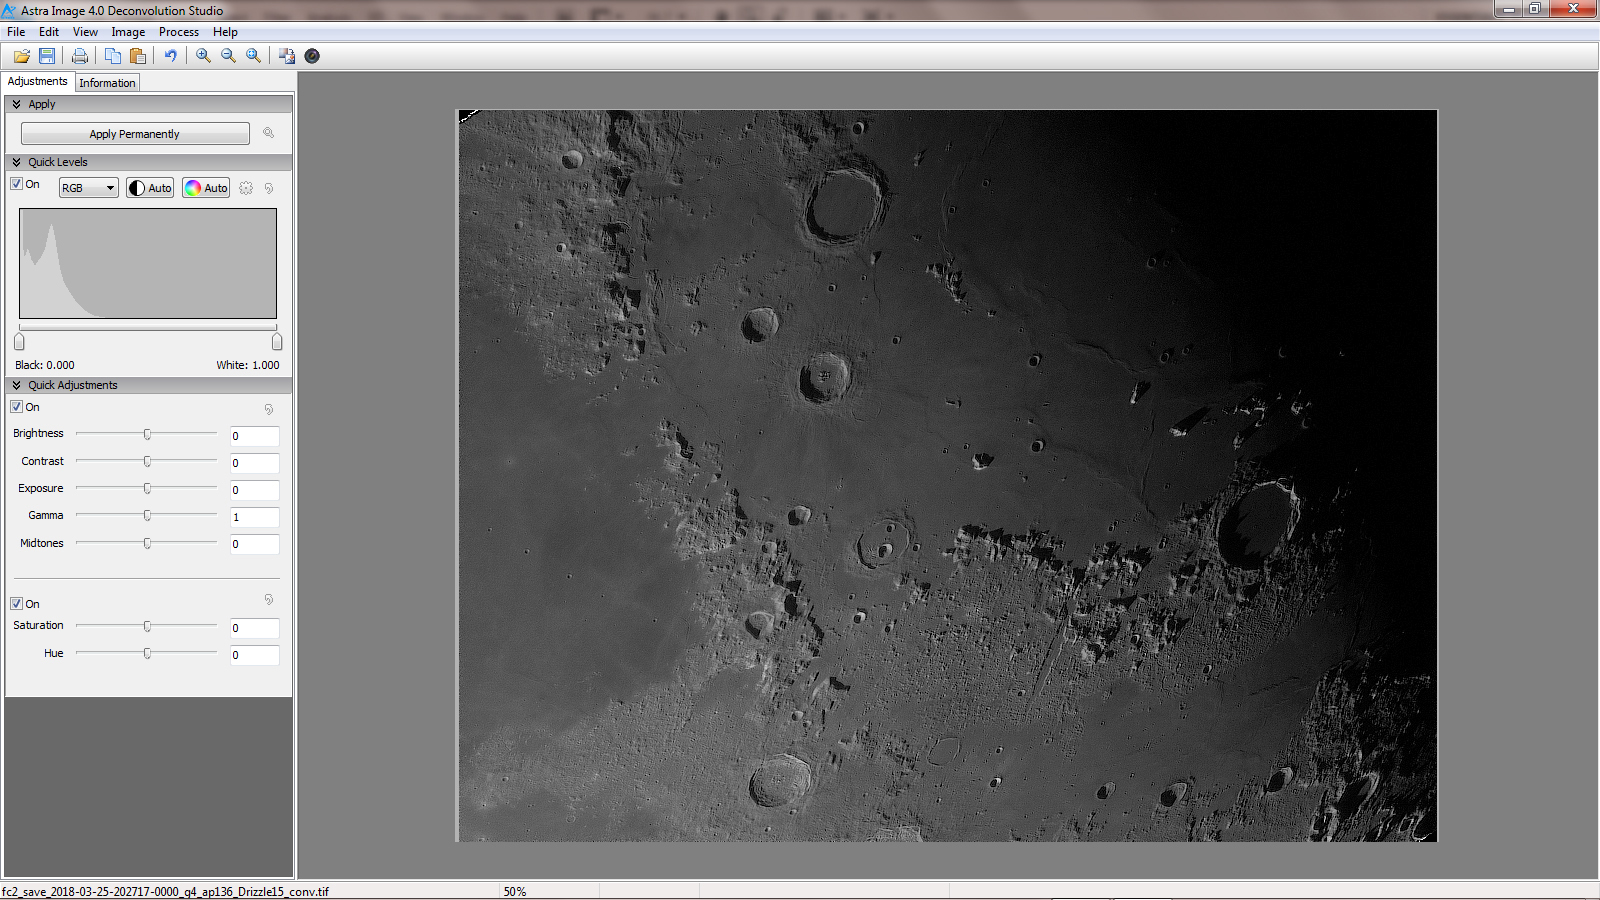
Though taking some considerable time to process, the resulting image quality was impressive.
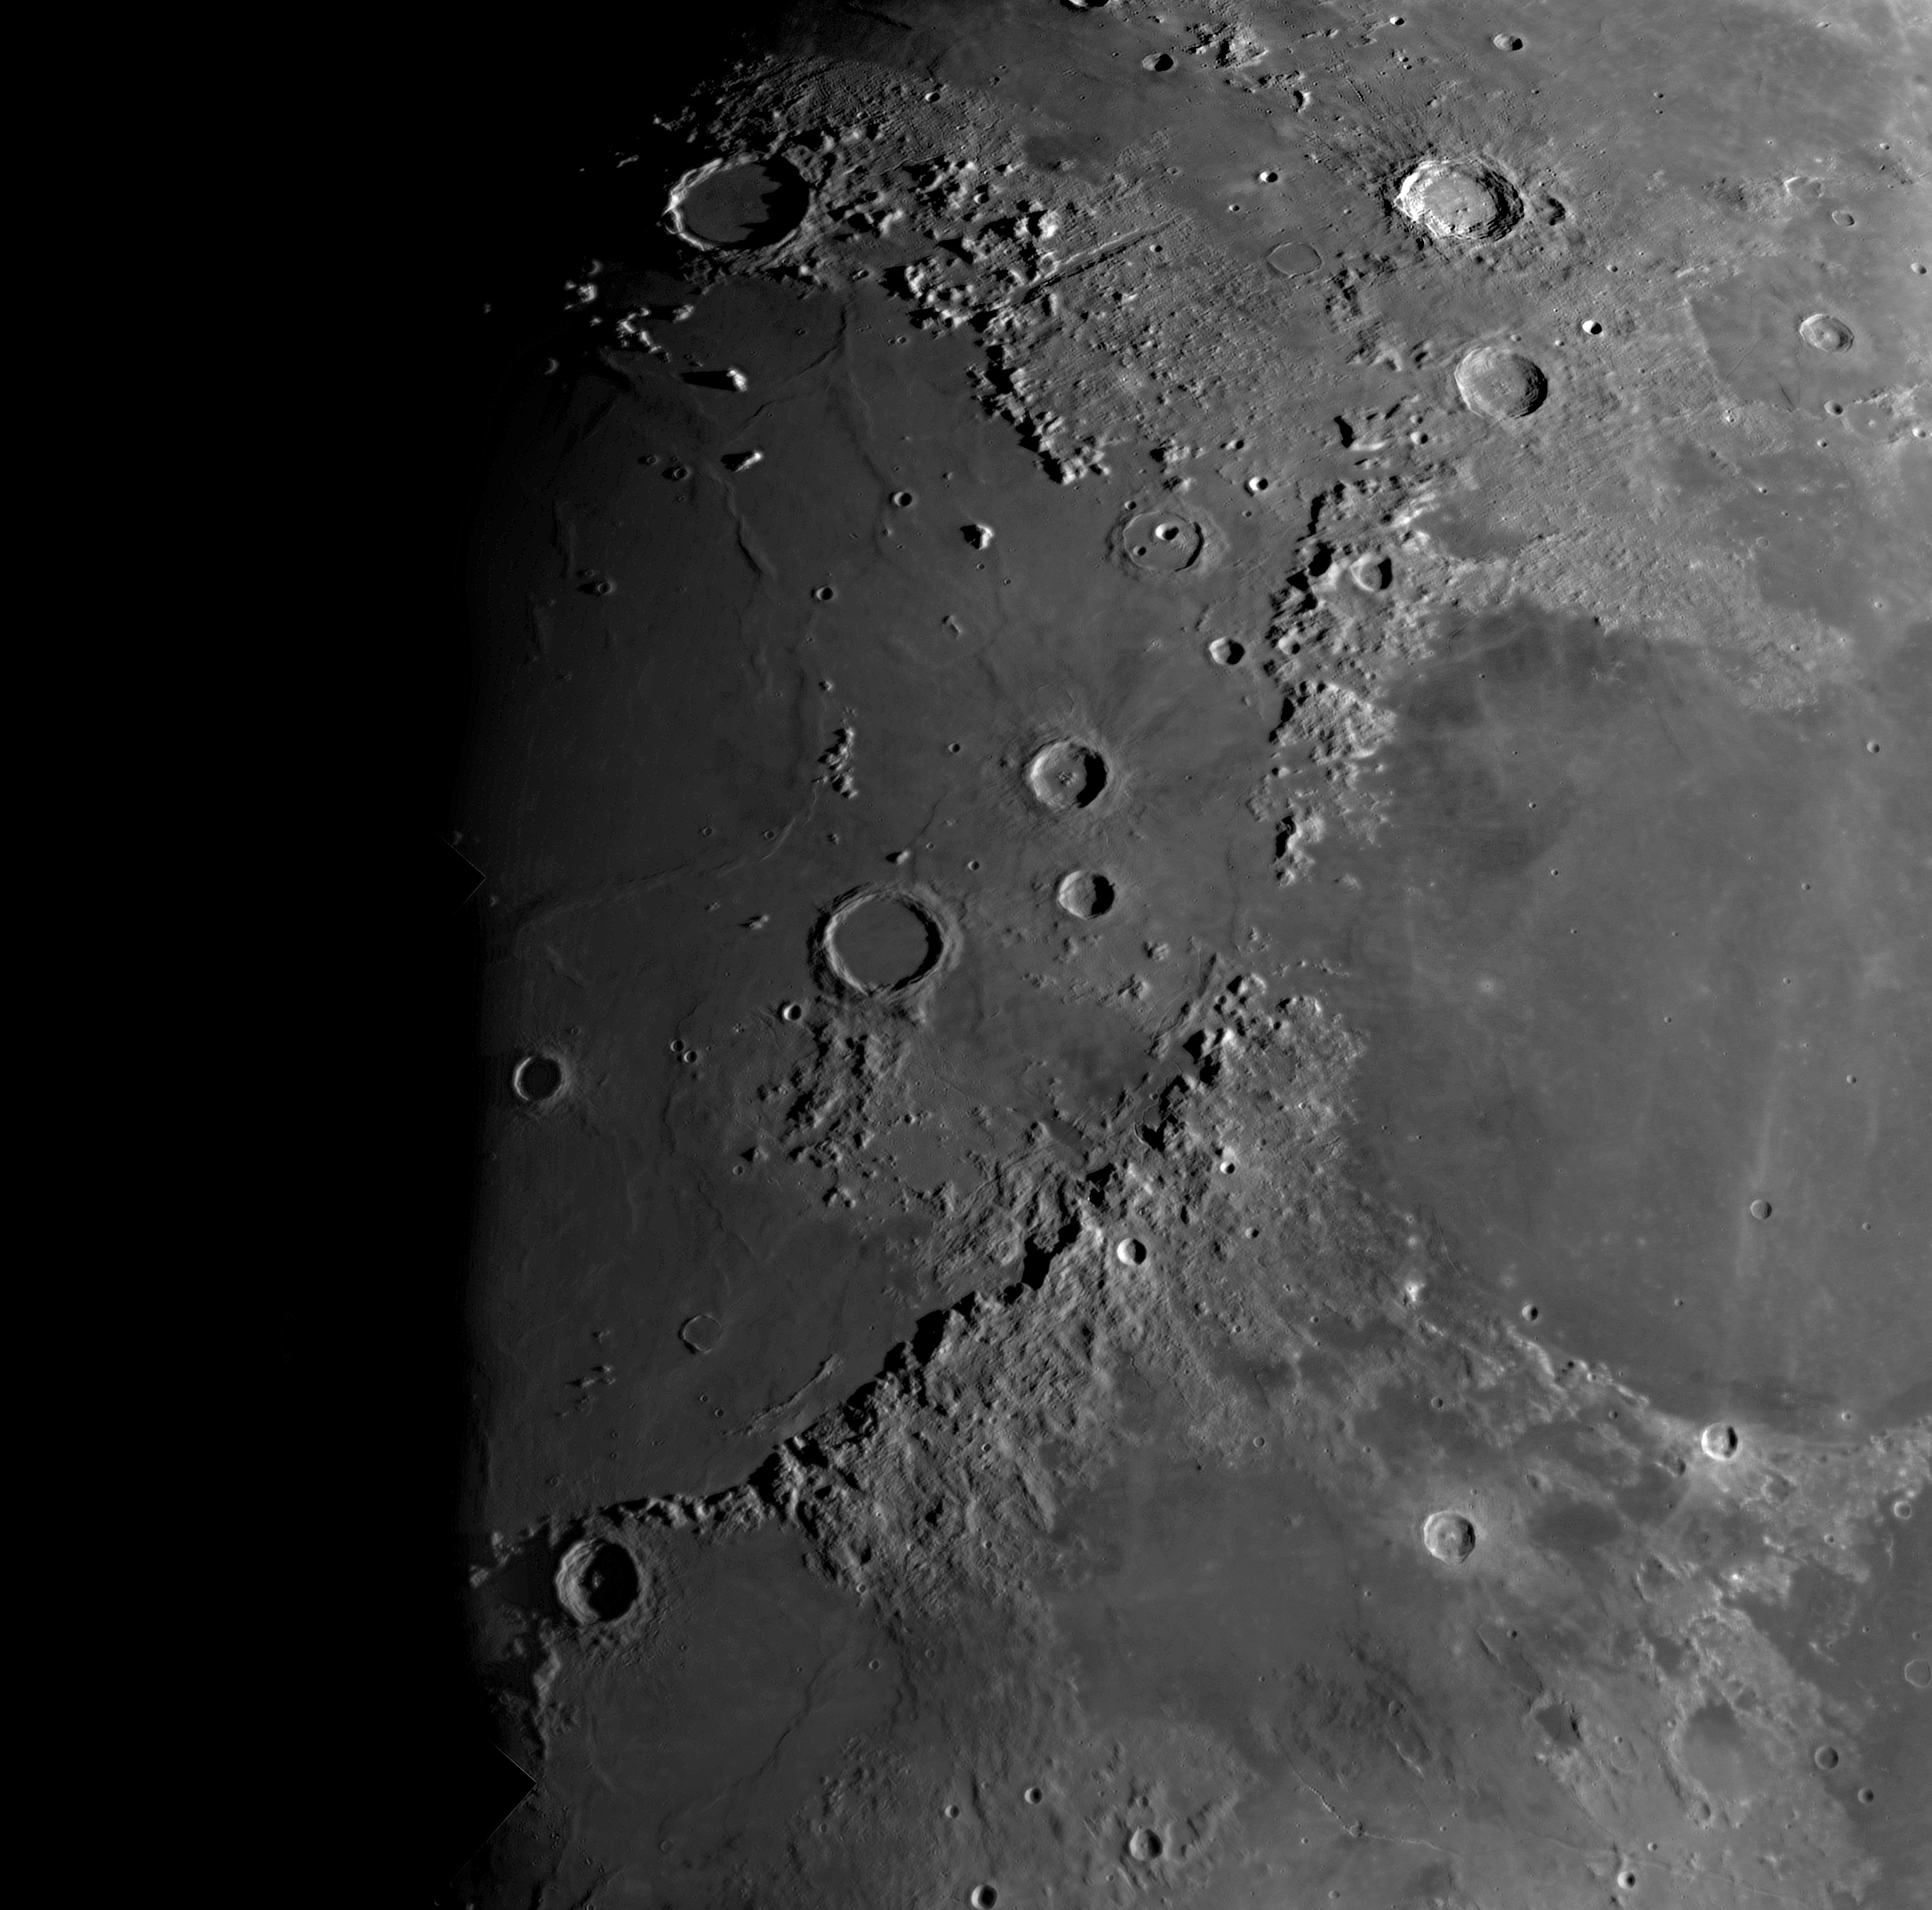
In Adobe Photoshop, I applied some further processing of the image to increase its contrast and provided a little further sharpening. The lunar image spans 6,912 x 4,352 pixels, just over 30 megapixels in total. It is impossible to get a sense of the resolution achieved from the full disk image but a higher (but still not full resolution) image can be found here.
A segment showing Mare Imbrium, and seen below, gives some idea.
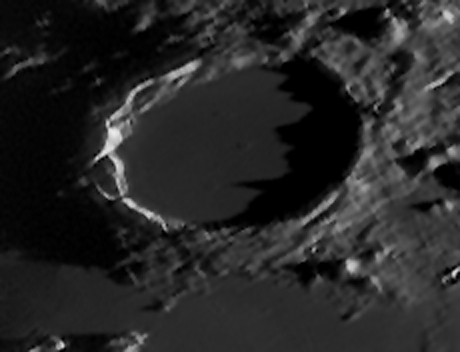
It was interesting to find that, during the two hours or so of imaging, the lunar phase had changed sufficiently so that whilst the floor of Plato was totally black in the image taken at the start of the session, when imaged at the end of the session its floor was partially illuminated showing 4 small craters as shown below.
The following image shows the Alpine Valley some 53 miles long and 7 miles wide. It is just possible to see the narrow rille running along its centre line which is just ~0.4 miles across (this only subtends ~0.33 arc seconds across, but linear features can often be seen or imaged below the nominal resolution of the telescope used).

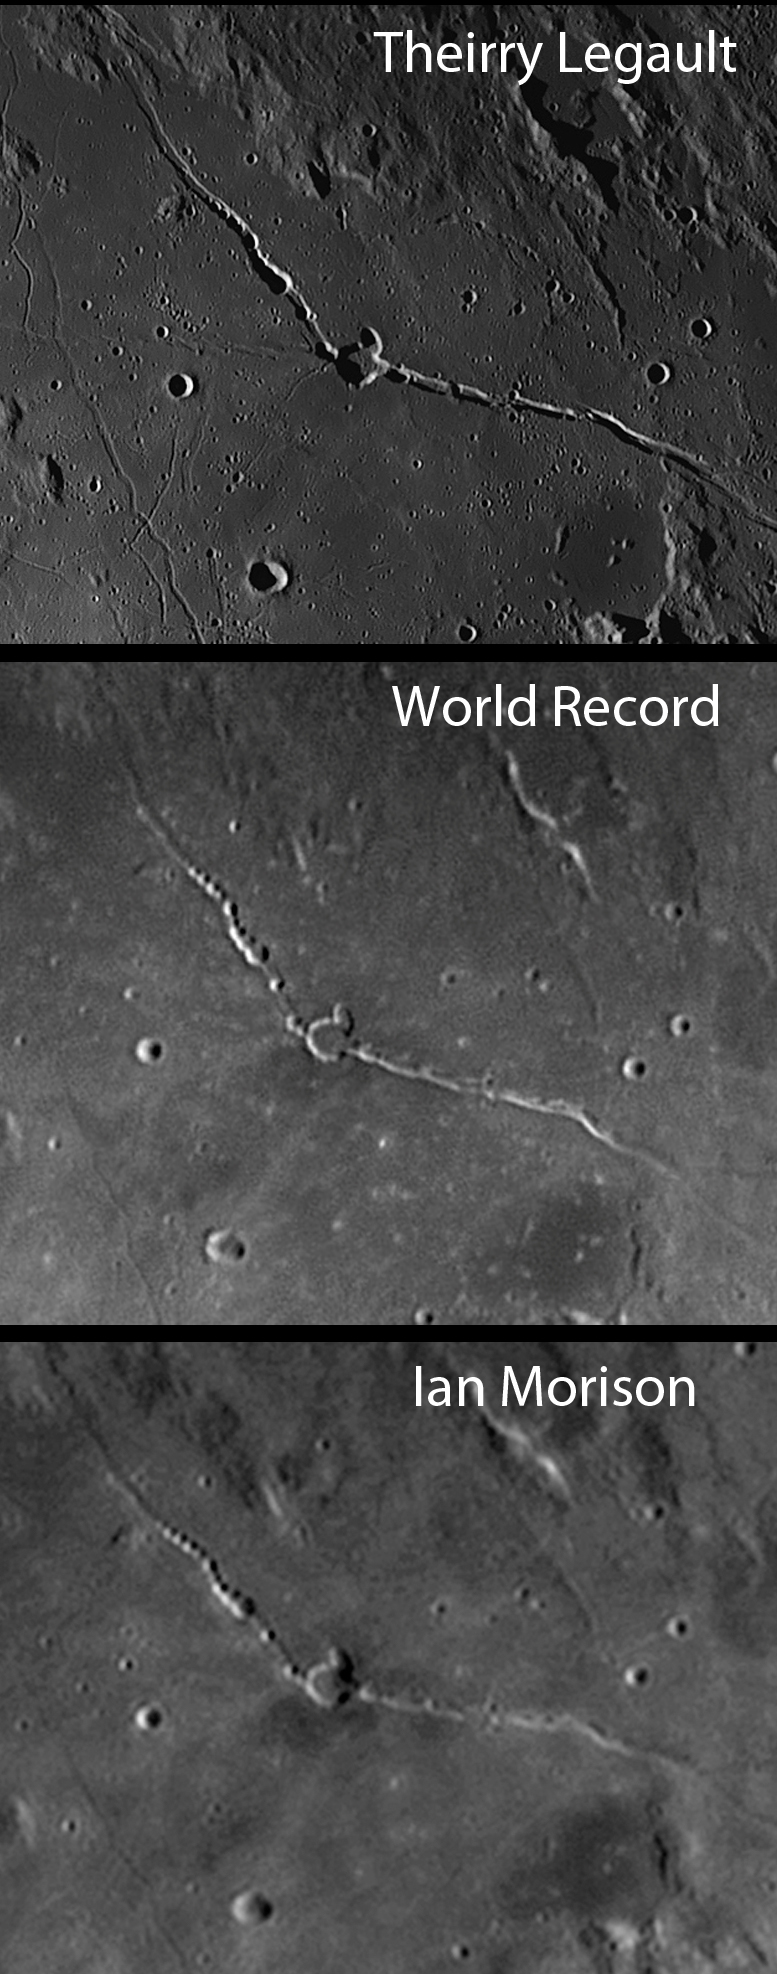
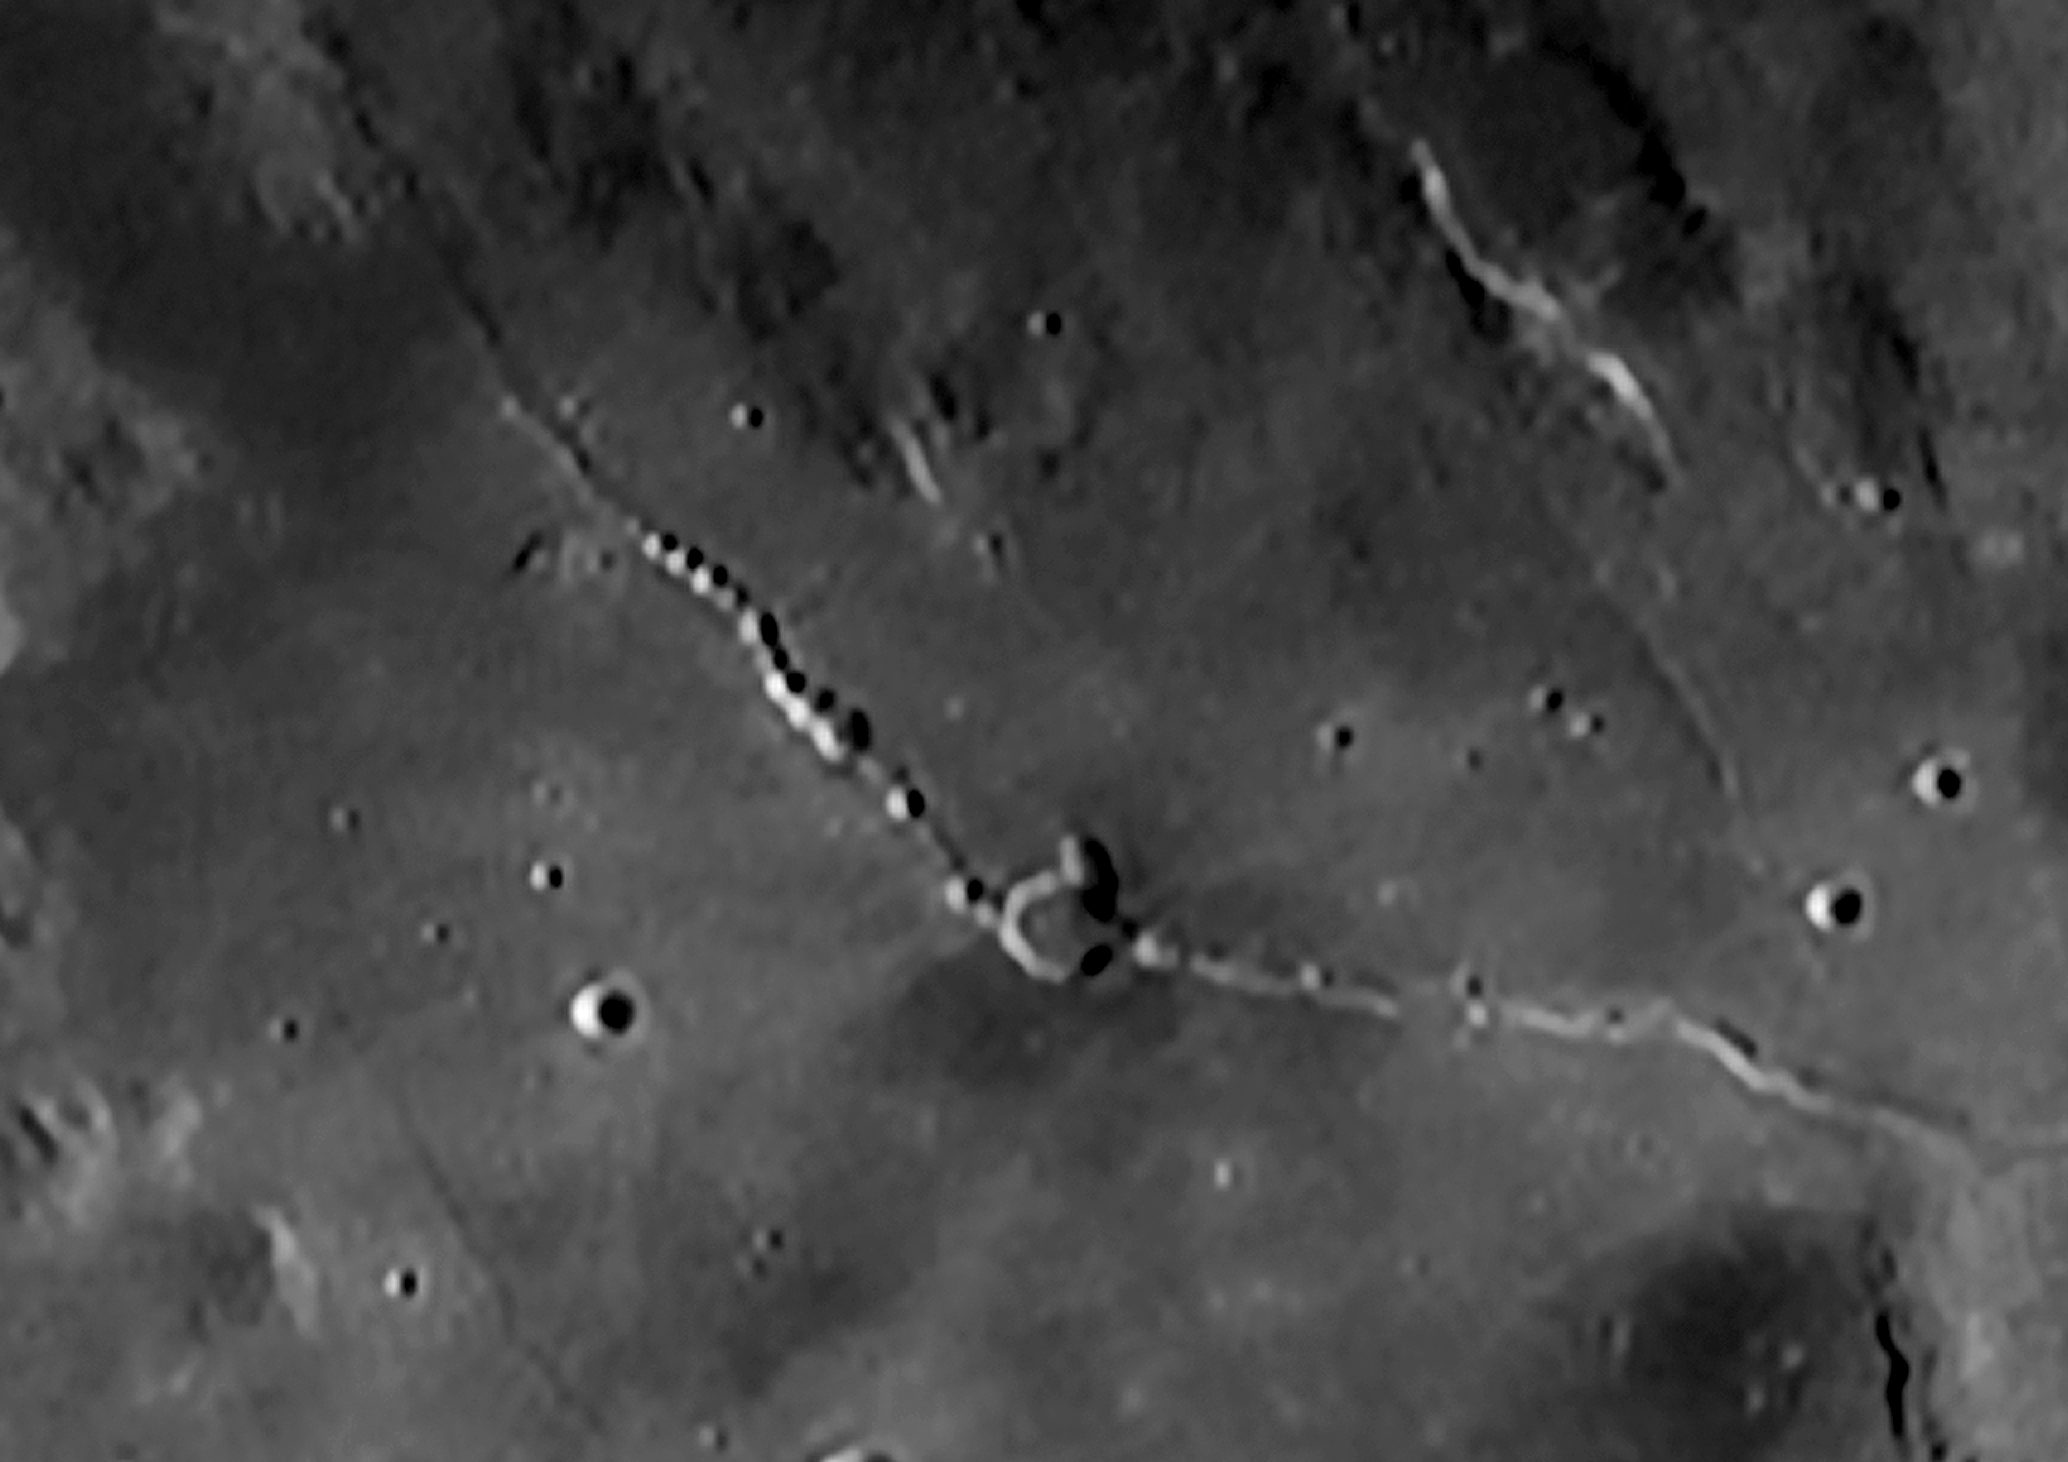
The image below shows the collapsed volcanic crater Hygenus and the Hygenus rille showing the path (I believe) of a lava tube with small craters above where the roof has collapsed.
The World Record Lunar Image provides stunning detail across the lunar disk which spanned some 9,550 pixels across, but my 6,800 pixel image stands up surprisingly well. Comparing the World Record Image it to mine as seen in the final composite image below, it appears that the resolution of my image is only about 50% less. With the resolution of the WRI of order 0.4 arc seconds this would imply that that of my own is order 0.6-0.7 arc seconds just as I had hoped to achieve – with thanks to the Hubble Space Telescope Institute for providing the processing techniques that made this possible.
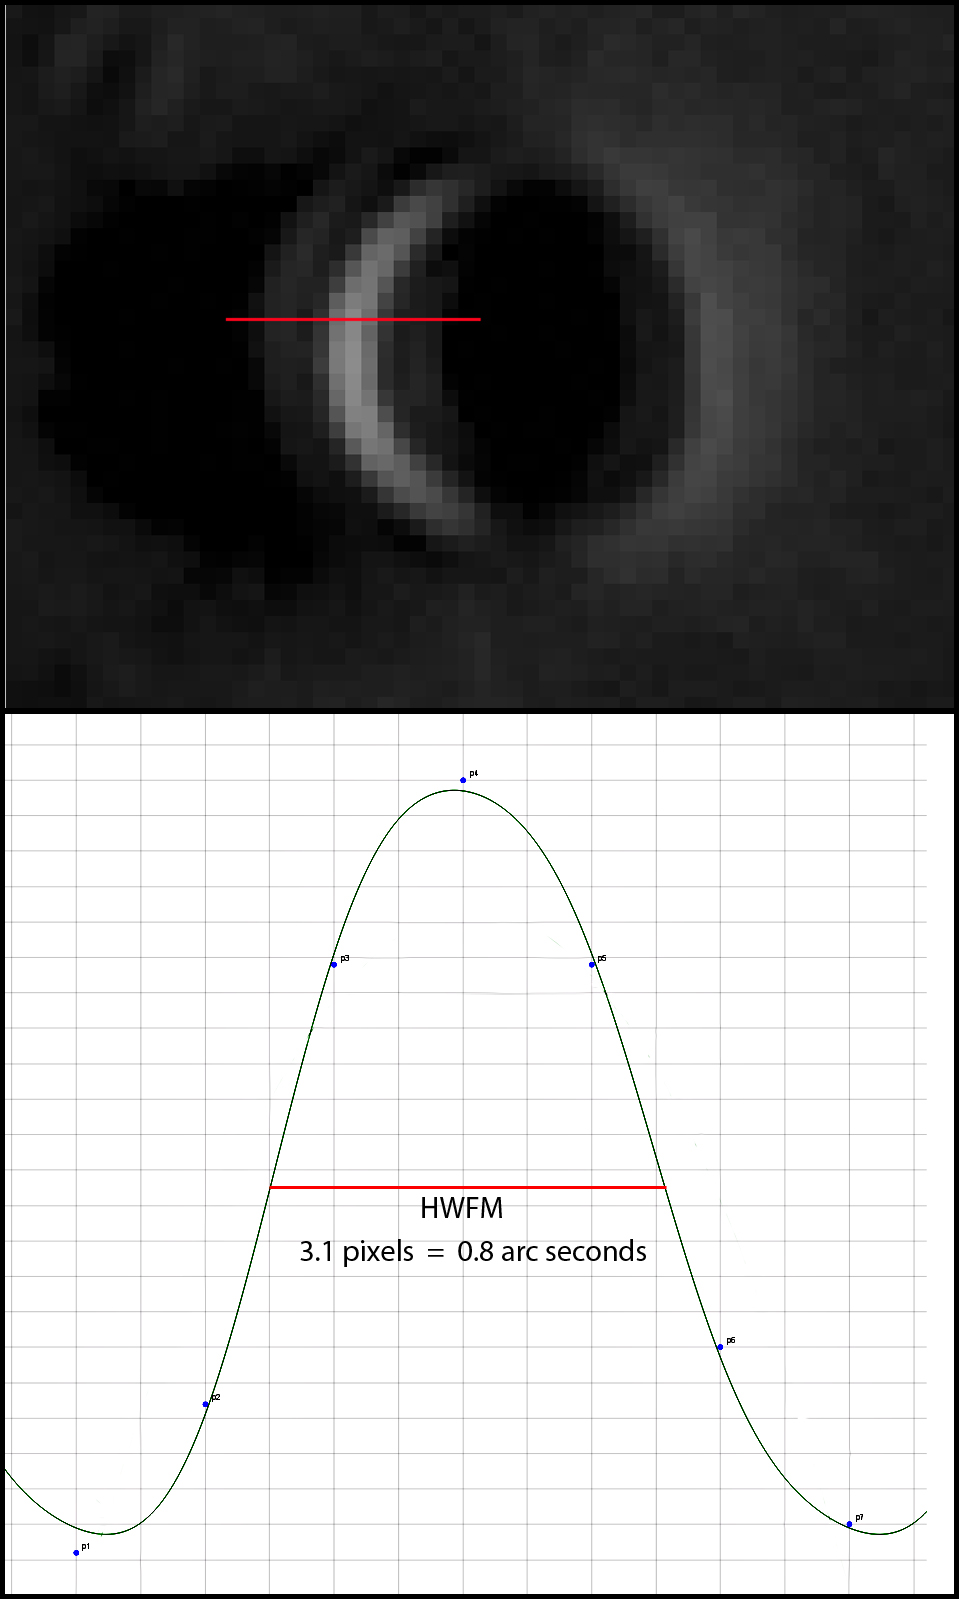
It is possible to measure the resolution of a lunar image by analysing of the ‘point spread function’ of a fine linear feature, as for example, the limb of a crater close to the terminator. The image below shows such a feature from the author’s image. The values of the brightness across this feature can measured and plotted as shown in the accompanying plot. A measure of the resolution is given by the ‘Full Width Half Maximum’ (FWHM) of the plot. This would be expected to be larger than the real value if, as one might expect, the object whose point spread function is measured is not a ‘point source’. The FWHM of the point spread function was 0.8 arc seconds so that a real resolution of 0.6-0.7 arc seconds was entirely possible, so agreeing with the comparison with the World Record Lunar Image.
What could I do now? It happens that I do have a 300 mm sub-aperture Maksutov with a focal length of 2,700 mm – comparable to those used in creating the World Record Image − and I now hope to use this and my IR camera to equal their resolution when imaging small, interesting, regions of the lunar surface.
Finally, I should point out that the French astronomer, Thierry Legault, has achieved some superb resolution lunar images, better even than the ‘World Record Lunar Image’. He used a Celestron C14 Edge HD from a height of 2,800 m in France, taking video sequences using the ZWO ASI1600MM camera having a 16 megapixel sensor so only requiring 10 panes to cover the lunar disk. His image spans over 13,600 pixels in height and, I suspect, has a resolution of 0.25 to 0.3 arc seconds and appears to be solely limited by the telescope’s resolution – the effects of the atmosphere having been totally eliminated. Amazing! His images can be found here.
This final image shows the Hygenus Rille region for all three lunar images. I find it somewhat surprising how only the relatively small reduction in resolution from that achieved in the Thierry Legault image to that of the World Record Image has such an effect on the numbers of very small craters seen.