[This is just one of many articles in the author’s Astronomy Digest.]
These imaging exercises were a test to see if I could image a star field when the Moon was virtually full so that there would a considerable amount of (blue) light pollution. It shows how the moonlight was removed from the image − which then showed stars down to a surprisingly deep magnitude with, in the second imaging session, the comet W2 (Africano). The use of a lens designed for full frame sensors on the smaller APSC sized sensor meant that only the central part of its image circle was used giving superb corner-to-corner stellar images. The article also gives two examples of using the superb ‘plate solving’ program astrometry.net. So it might be worth reading even if the results are not that exciting.
Capturing the image frames
The sky overhead was imaged at ~10 pm BST of the night of 13th September 2019 – just 8 hours before a ‘Micro Harvest Moon’. [That means that the Full Moon was at its most distant from the Earth and so the opposite of a ‘Super Moon’.] I used a Sony A5000 camera mounted on a StarSync tracker aligned on the North Celestial pole using its laser pointer attachment. [See articles about both in the digest].
I deliberately was not too careful about the tracker alignment as I wanted the image to move across the camera sensor to eliminate what Tiny Hallas calls ‘Color Mottling’ (he is American) − the sensitivity of the red, green and blue pixels varies somewhat over regions of ~20 pixels wide and, if the image is static on the sensor, gives a background of varying colour rather than grey.
The lens employed was a superb Zeiss 40 mm lens attached to the camera using a Contax G – Sony E mount adapter and set to an aperture of f/4. I knew that this would give excellent star images across the whole field of view (200% images of two of the extreme corners, shown at the end of the article, bears this out) but it does produce a ‘star’ effect on the very brightest stars due to its hexagonal aperture having only 6 iris blades.
The ISO was set to 400 and 68, 30 second, exposures were taken giving a total exposure of 34 minutes. As described in the article on the Sony A5000, the taking of a dark frame after each light frame to remove hot pixels was inhibited. Doing so would halve the time taken capturing photons from the sky and would also add some noise into each light frame. [The latter is not so commonly known.] Deep Sky Stacker can eliminate hot pixels when stacking the frames though I preferred the result from Sequator (see article comparing the two in the digest) and had to manually remove some hot pixel streaks from the image due to the ~90 pixel movement of the image over the sensor.
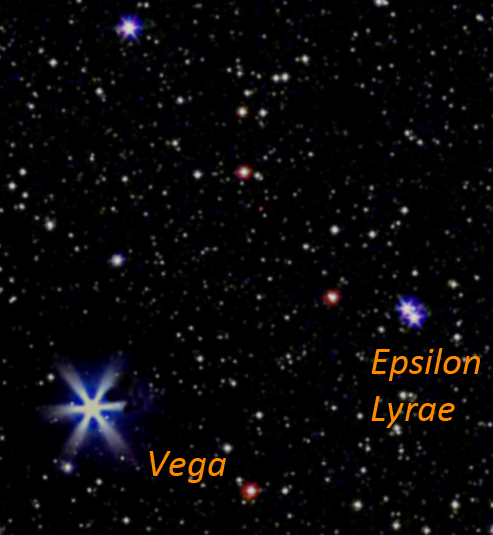
Due to the moonlight it was difficult to see in a single exposure the area of sky that I was imaging but I was pretty certain that it included Vega in Lyra and so expected to see Epsilon Lyrae, the ‘Double-Double’ in the image. Comparing my final image with star charts it was obvious that the image extended from Lyra towards Hercules − as became obvious when I plate-solved the result.
Processing the frames.
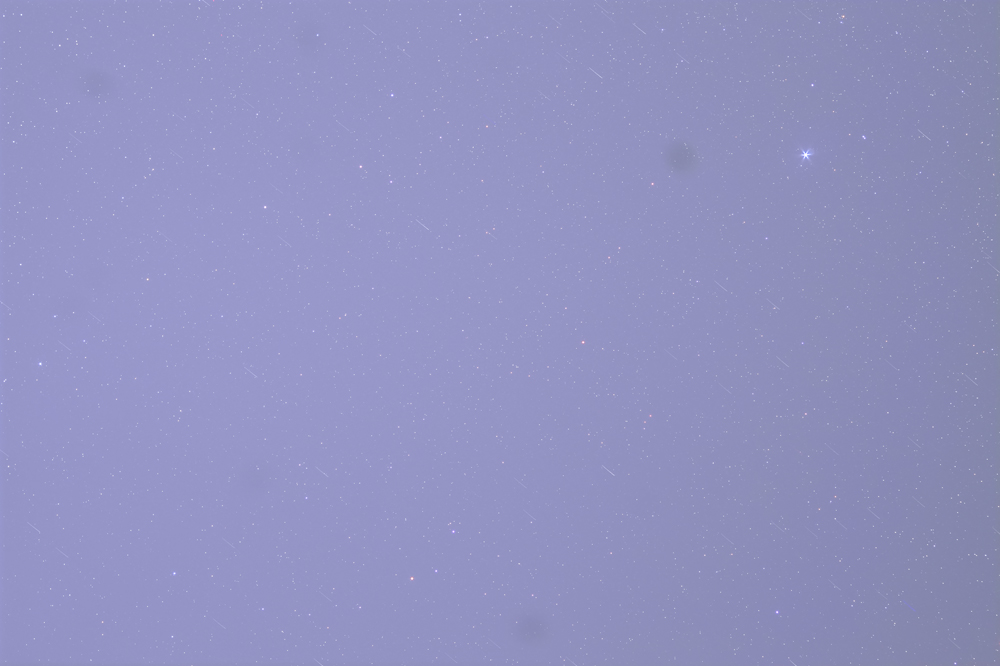
The 68 frames were loaded into Sequator and, with none of the possible optional adjustments employed, stacked. The result below is, not surprisingly, blue. This also showed the effects of some dust on the sensor.
I used Adobe Photoshop to carry out the further processing of the image which includes removal of the moonlight and any further light pollution. One could, instead, use the free program GIMP. The removal of light pollution is somewhat more complex but the digest includes an article as to how this can be done – ‘Removing Light Pollution in Adobe Photoshop and GIMP’.
The stacked result was loaded into Photoshop and duplicated to give two layers. The ‘Dust and Scratches’ filter with a radius of 19 pixels was applied to the upper layer. The filter thinks the stars are ‘dust’ and removed all but Vega which was cloned out from an adjacent part of the image.

The two layers were then flattened using the ‘Difference’ blending mode which totally removed the moonlight from the image.
The image was then stretched using several applications of the ‘Levels’ command with the middle slider moved leftwards to 1.2. This brightens the fainter stars more than the brighter ones. A final levels application was used to bring up the ‘Black Point’ using the left hand slider to remove the noise from the image. The white streaks were cloned out to give the final image below.
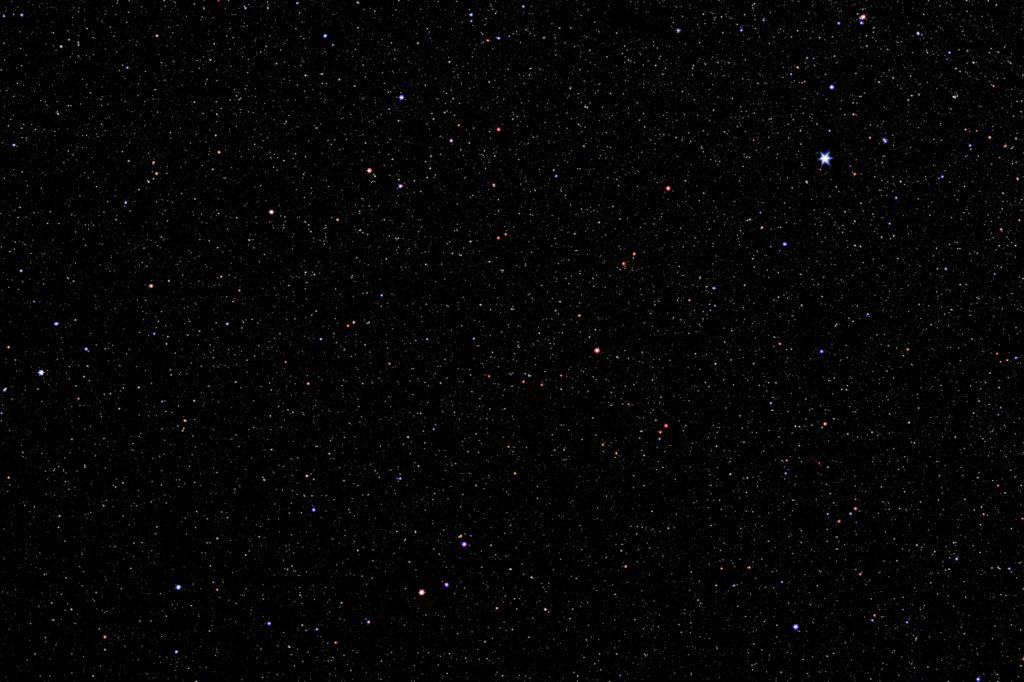
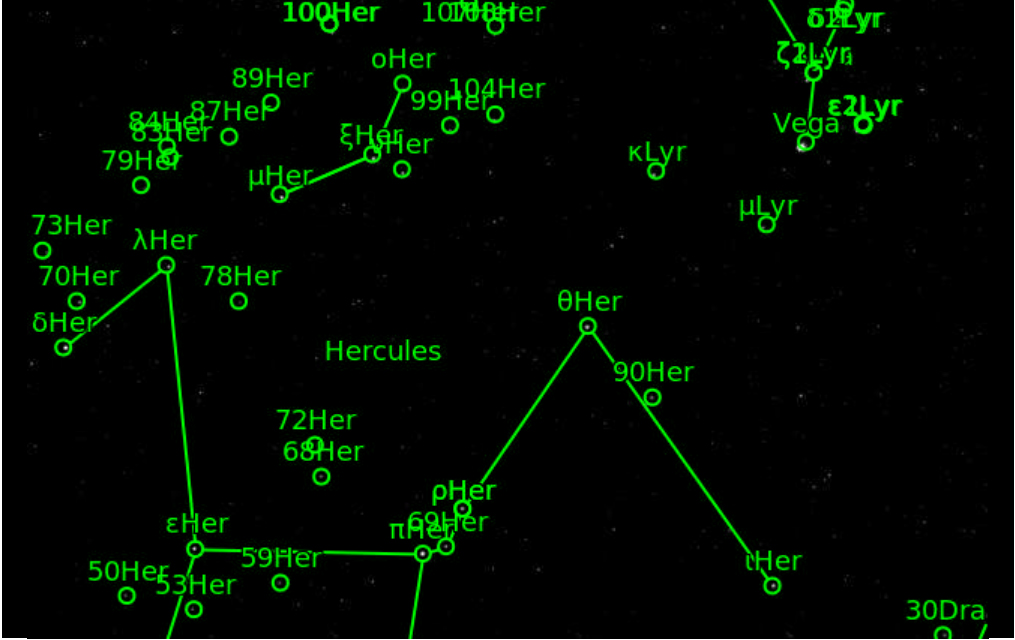
The levels command was use to bring out the brighter stars and, based on the Astrometry.net plate solving result shown below, the constellation patterns were added.
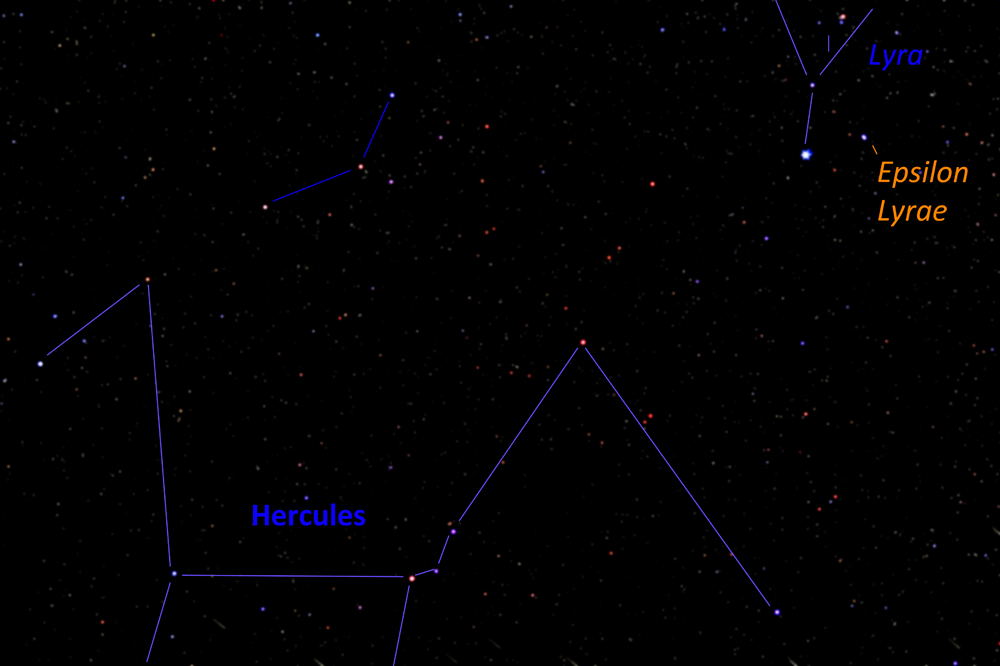
In the image crop below it was good to see that the two stars, 208 arc-seconds apart, making up the Double-Double star, Epsilon Lyrae, were well separated along with a third, 10.5 magnitude, star visible close by.
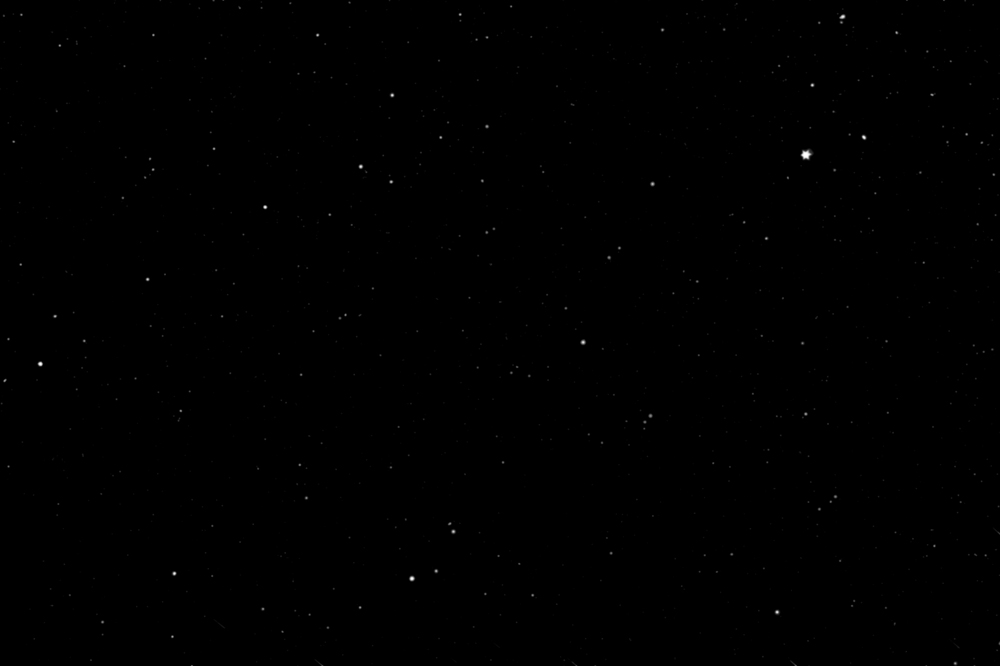
One can compare a highly cropped part of the image with that from the ‘Digitised Sky Survey’. (One needs to take into account that the lens had an effective aperture of ~20 mm and the DSS images were captured with a 48 inch diameter mirror!)

Lens quality
Prime lenses with focal lengths of ~40mm or greater tend to give higher corner to corner sharpness that those with shorter focal lengths as they are easier to design and tend to have fewer elements. If a lens designed for a full frame (FX) sensor is used with an APSC (DX) sensor only the central part of the lens’s image circle is used so the outer parts, where aberrations such as coma tend to be present, are not used. The Zeiss 45 mm, f/2, Planar lens, used to capture this image, was designed for use with the Contax G rangefinder film cameras and is said to be one of the highest quality lenses ever produced. It still commands high prices on the second hand market. The image below shows 200% crops of the top two extreme corners. The stellar images are perfect and no different from those captured in the centre of the image. One advantage of using, as here, a mirrorless camera is that, using adapters, legacy prime lenses from many camera systems can be used and can often be bought at low cost.
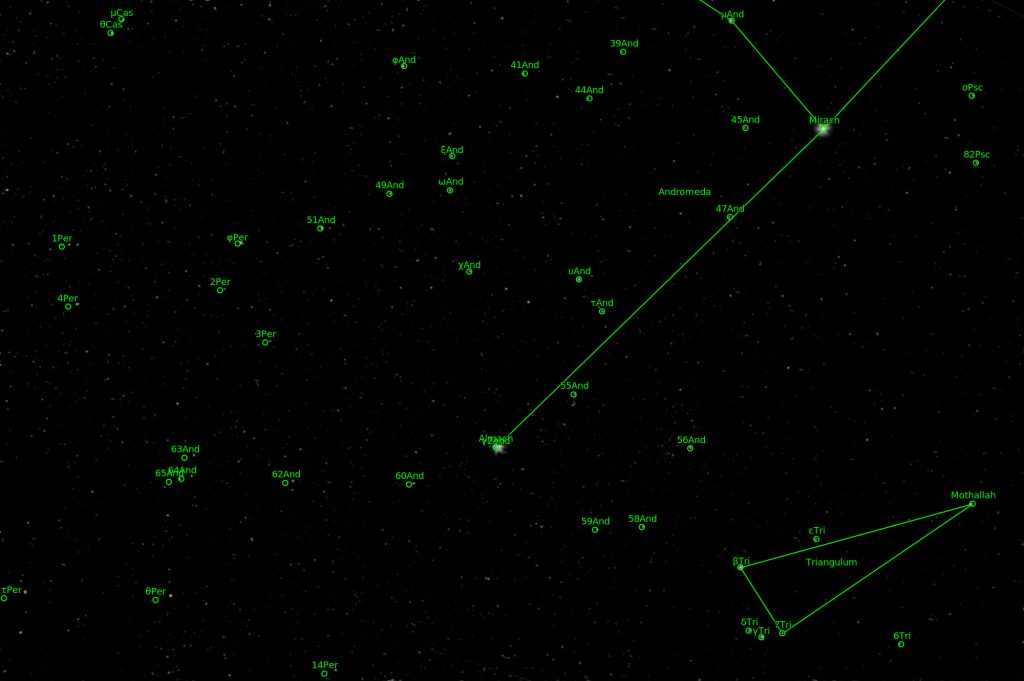
Using the plate solving program ‘Astrometry.net’
From the final image I produced a 1,000 pixel width monochrome version having used the levels command to bring up the black point so that only the brighter stars were visible.
This was submitted to Astrometry.net which produced the following result showing the regions of Lyra and Hercules that had been captured.
The program also provides some calibration data.
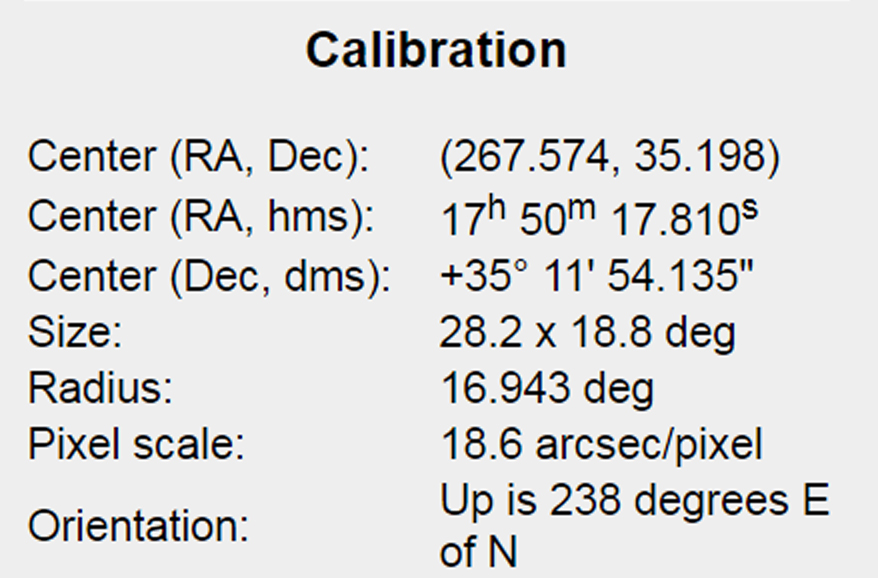
The image scale was shown to be 18.6 arc seconds per pixel within the 28.2 x 18.8 degree field of view. Observing stars in the image which were not overexposed (their central, brightest, pixel was less than peak white) it appeared that the stars had a ‘beamwidth’ of ~4 pixels. This gives a captured image resolution of ~74 arc seconds which agrees well with a calculated resolution of ~72 arc seconds assuming a lens aperture of 20 mm.
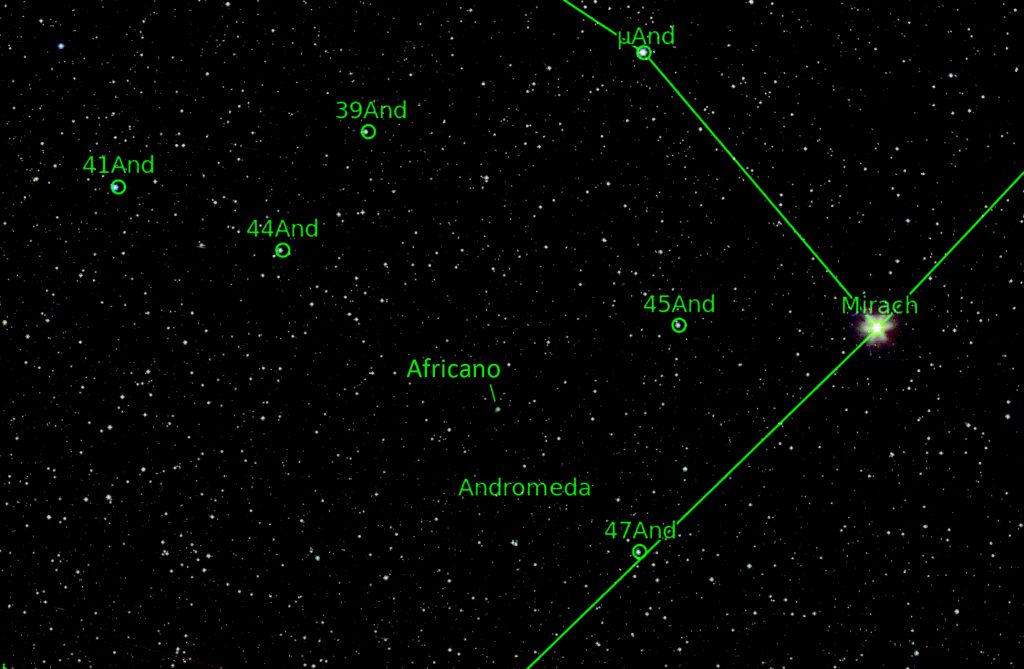
Imaging Comet W2 Africano
On the evening of the 17th September 2019, at a meeting of the Macclesfield Astronomical Society, we discussed the fact that a comet, W2 Africano, lay close to the star Mirach in Andromeda. Though only a few days after Full Moon, given the fact that a surprisingly large number of stars could be seen in the image taken on the 13th discussed above, I thought that it might be worth attempting to image it. I used exactly the same equipment as above and took 42, 30 second, exposures at an ISO of 400. The stacked image shows how much moonlight filled the frame with the Moon rising over to the right.

Having removed the moonlight, I made a monochrome JPEG of the brighter stars.

This was submitted it to Astrometry.net giving the result below.
I overlaid this onto the stretched image taken with the 45 mm focal length lens. A slightly elongated greenish ‘blob’ is visible in the image -which I have highlighted in red.
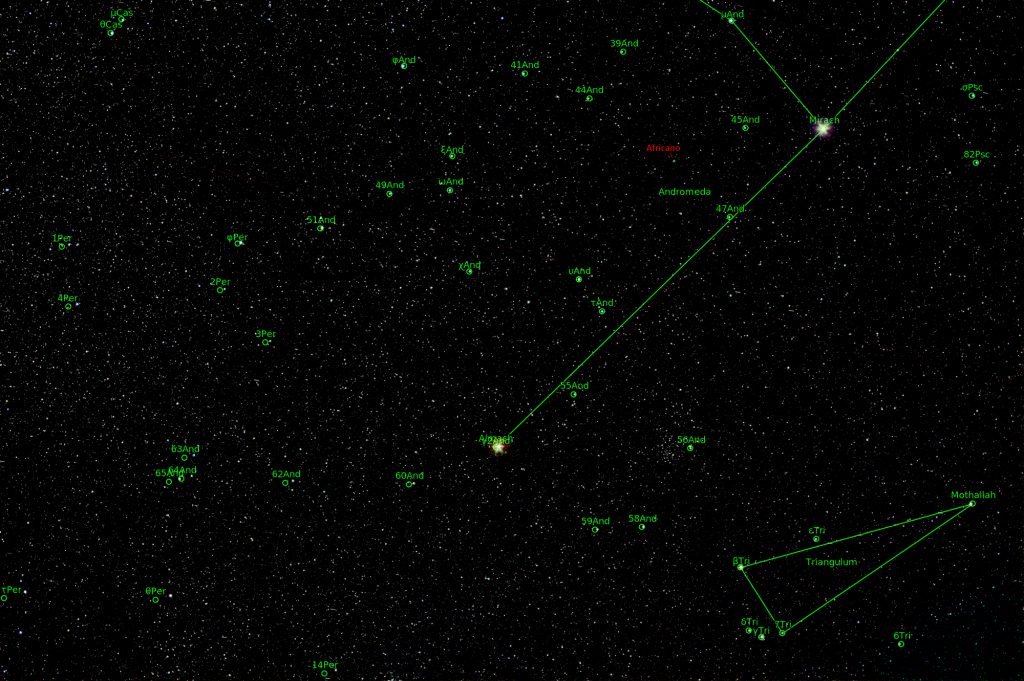
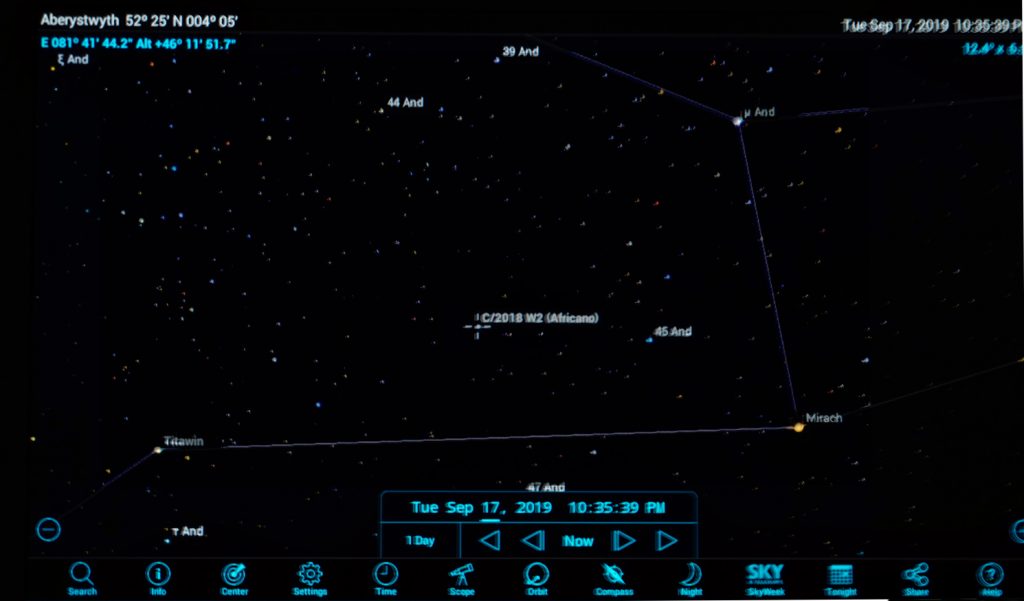
This agrees with the position of W2 Africano given by the screenshot of the Sky Safari image of this region at the time of the exposure so I believe that I had imaged the comet.
A crop of the region surrounding the comet.