[This is just one of many articles in the author’s Astronomy Digest.]
[This is just one of many articles in the author’s Astronomy Digest.]
There are two approaches to imaging meteors: the classic method, outlined in this article, is to use a DSLR or mirrorless camera to take many short exposures – perhaps in the hundreds – and hope that some will have captured a meteor. Those captured during a meteor shower can then, as detailed below, be ‘composited’ into an image showing meteors diverging from the shower’s radiant.
An alternative that is now possible with cameras capable of using ISOs of up to ~100,000 is to take video sequences capturing, say, 30 frames per second. As each exposure is very short this technique can capture far fainter meteors than with exposures of several seconds but, of course, the image quality will be far less having only an image size of, perhaps, 1980 x 1080 pixels. In the second article, how an image of a meteor can be derived from a video sequence will be described – which could then be placed into high quality skyscape.
Capturing meteors using short exposures
Having first discussed how best to go about capturing the meteor trails the article will show how to include them within a composite image such as those that can be seen on the NASA APOD website (search for APOD Meteor Trails). I assume that a DSLR or mirrorless camera will be used either with an APSC (DX) or full frame (FX) sized sensor. The cost of full frame (FX) DSLR or mirrorless bodies has now fallen to the point where they could be considered – particularly if bought second hand.
One point to note is that the latest high resolution cameras with perhaps 40 million pixels are perhaps not the best choice when aiming to capture meteors. Their pixel size will be smaller than cameras with a lower resolution and so the meteor’s image as it tracks across the sky will spend less time over each pixel and so cameras with larger pixel sizes of 6 to 9 microns will be better. Full frames cameras with their larger sensor will be better still: my ~12 megapixel Sony A7S full frame camera has a pixel size of 8.4 microns, whilst my 24 megapixel A7II has a pixel size of 6 microns. In contrast a Sony A5000 having a 20 megapixel sensor will have a pixel size of 4.25 microns whilst the Fugi X-A10 having a 16 megapixel sensor has a pixel size of 4.76 microns.
The choice of lens is actually quite a complex question. The sensitivity of a DSLR to meteor trails depends on the effective area of the lens’s aperture. This is 491 square millimetres for a 50mm, f/2, lens but just 72 square millimetres for a 24mm, f/2.5, lens and only 4 square millimetres for an 8mm, f/3.5, lens. One might therefore think that the 50mm lens would be the obvious choice, but there are two other considerations to bear in mind. The shorter focal length lens will see far more of the sky (3.7 and 11 times greater for the two lenses sited above) and so give a greater chance of capturing meteor trails. The trail will also move more slowly across the sensor when a short focal length lens is used so allowing the pixels along the trail to collect more light and so increase their effective sensitivity. It turns out that short focal length lenses will detect brighter meteors over a wide area of sky whilst the 50mm lens will detect fainter meteors but within a smaller area. There is thus no obvious ‘best’ lens to use but I suspect that a medium wide angle lens would be a better choice if one was hoping to make a composite image. I have used three lenses to capture meteors: a Samyang 8mm fisheye lens (though nominally for APS-C cameras) coupled to a full frame Sony mirrorless camera (as described above) to give full-sky coverage, a 24 mm, f2.5, Tamron lens coupled to the Nikon D610 full frame camera and an 18mm f/2.8 lens coupled to a full frame Sony Camera mirrorless camera.
As meteor trails only last for a few seconds, short exposures using a high ISO will best capture them. The noise performance of the latest DSLR’s is quite amazing and ISOs of up to 6,400 could reasonably be used. As a meteor has a greater chance of being captured the shorter the exposure, exposures of 10 to 20 seconds with an ISO of 1,600 or 3,200 would be a good choice. But first try some test images of the sky to ensure that reasonably faint stars can be seen and that the sky is not washed out. Given the (very!) large number of images will need to be inspected (a large SD card will be needed) saving JPEG files is the right choice. A dark sky is an absolute must: using a lens at full aperture and high ISO in a light polluted location will give an almost white sky!
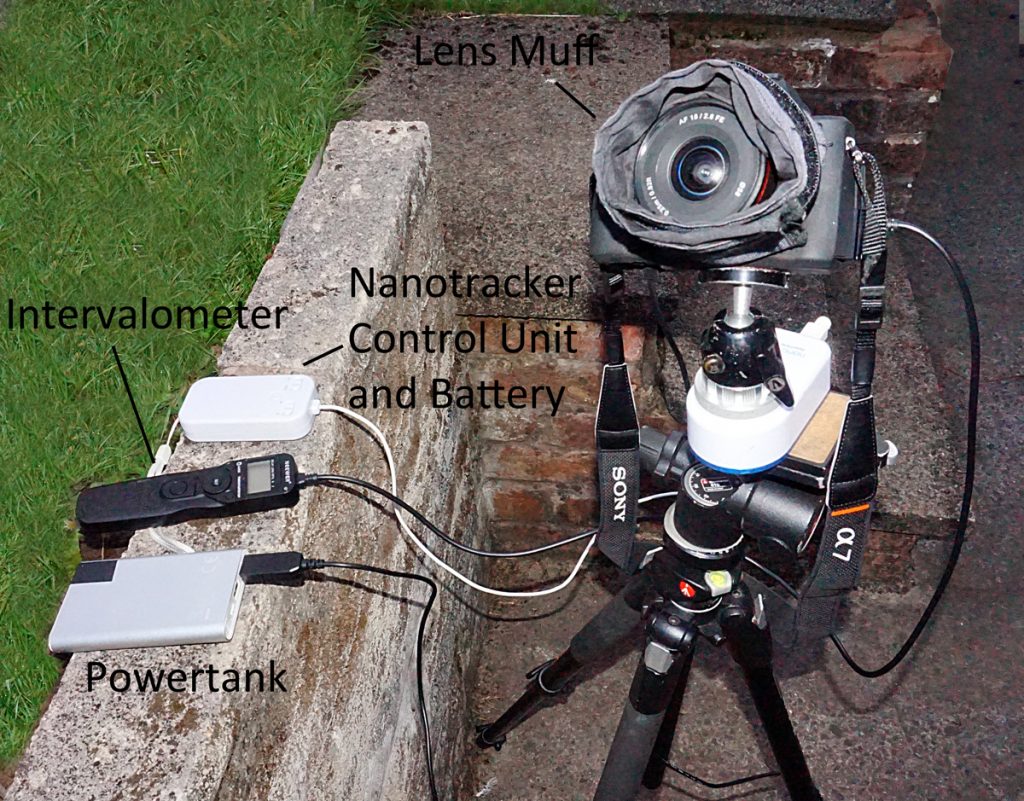
Two fully charged batteries will probably be needed or a ‘dummy’ battery; the best of which gain their power from a 5 volt ‘USB’ supply which can be provided by a suitable ‘powertank’ – these are normally used to recharge mobile phones. An intervalometer to trigger each exposure is also a real necessity. Some cameras include them within the system but I find them fiddly to use, particularly in the dark, and much prefer to use an external intervalometer. These can be bought for under £20 but it is important that one with the correct connector for the camera is chosen. The camera is set to manual mode and the exposure time and lens aperture set. If the exposure were 20 seconds long, the intervalometer would be set to initiate an exposure every 21 seconds. My Viltrox intervalometer allows for a total of 399 sequential exposures so allowing for a continuous imaging period of over three hours. The camera should be mounted on a sturdy tripod and aimed around 30-40 degrees away from the radiant (near the radiant, the trails are very short as the meteors are coming towards you) and at an elevation of ~50 degrees as this captures the height in the atmospheres where most trails are to be seen. To prevent star trails, a tracking mount, as a Baader Nano Tracker as seen in the figure below would be a useful asset but this is not too necessary if a wide angle lens is used. (It will, however, be a great help if a composite image is to be made.) Obviously, a fish eye lens is simply mounted to view vertically.
A lens will tend to dew up after about an hour and so must be kept warm. A Dew Strap could be used but one can simply place a short sock around the lens, with a hole cut in the toe, to hold a pair of hand warmers. A neater, but more expensive, alternative is to purchase a Lens Muff from Kevin Adams in the USA. (Search for ‘Lens Muff’.) These can hold three hand warmers and have a Velcro strap to hold them around the lens.
The figure below shows my current imaging system.
Imaging with an ‘All Sky’ camera
This essentially means using a ‘Fish Eye’ lens. One of the very best, and also of relatively low cost (from ~£250), is the Samyang 8mm f/3.5 UMC CSII. To use with a full frame camera to give an almost ‘all sky’ image it must be the later version with a detachable lend hood. [Note: there is now an f/2.8 version at slightly more cost BUT its lens hood cannot be removed (short of sawing it off!) so it cannot be used to give a nearly all sky image when used with a full frame camera.] The image quality of this lens across the frame is excellent and the lens is also ‘flare’ resistant.
As seen in the image below, taken when mounted on a Sony A7 II full frame camera, though the full 180 degree field of view is present across the long axis of the sensor, the view is limited across the short axis to ~150 degrees. It may well be that the surroundings, as in the image, may limit the field of view in any case.
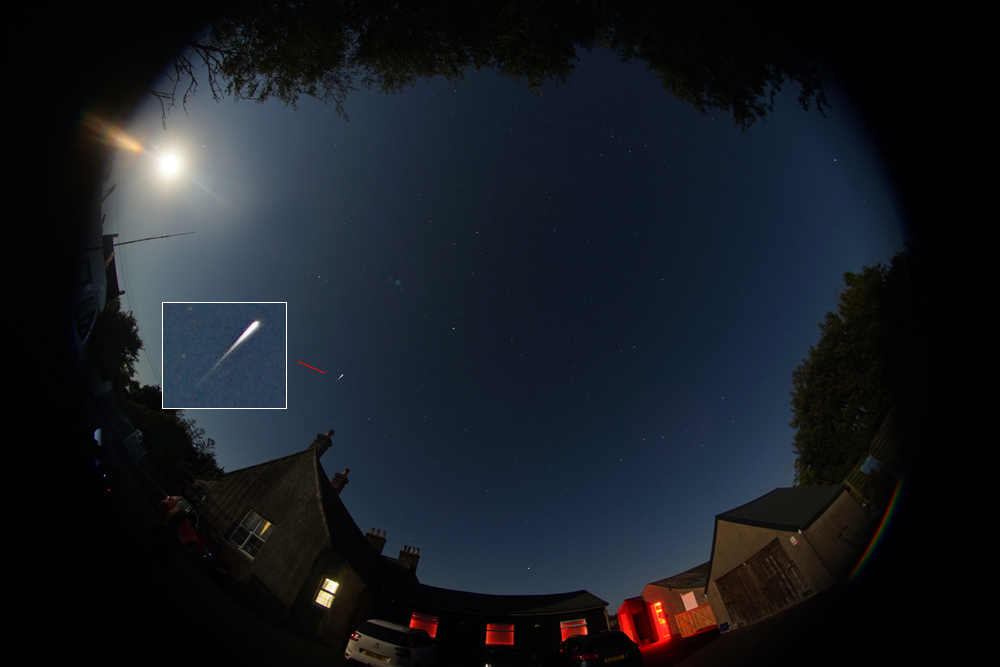
This image was the only one of ~600 taken over two nights at the time of the Perseid meteor shower in 2022 that showed a meteor – and it was a sporadic meteor, not a Perseid. Sadly, in 2022 the nearly full moon was in the sky which made capturing meteors almost impossible.
Using a wide field lens on a DSLR
The use of a short exposure and high ISO will naturally give a rather noisy image and so a single image of a meteor trail will not be too good. This is not too important if one is going to try to produce a composite image of several meteors captured during a meteor shower.
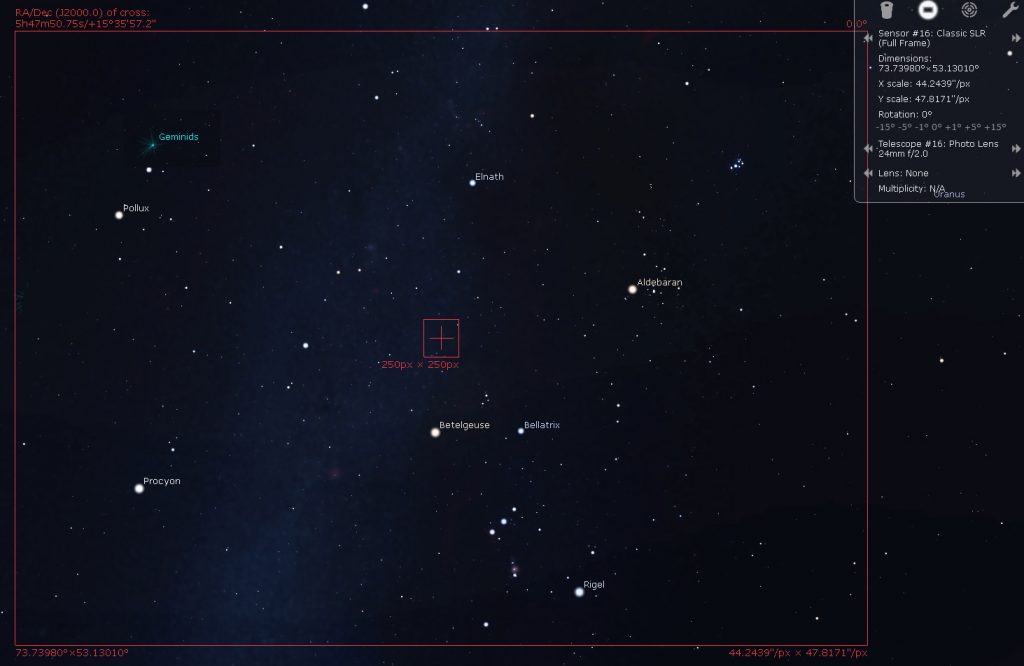
One needs a camera/lens combination to image of the sky where one expects to observe the meteors. As an example, let’s take the Geminid shower in mid December. Gemini lies in an interesting region of the heavens close to the Auriga, Orion and Taurus constellations, so an area of the sky including them would be a good region to choose. As seen in the Stellarium field of view calculation below, I found that a 24mm lens when used with a full frame DSLR sensor would nicely encompass this region (~73 x 53 degrees) and was then able to purchase a second hand Tamron lens of this focal length.
Capturing some meteors
The camera system was set up to image this region and an intervalometer used to initiate a very long sequence of 30 second exposures – hoping that one would capture a meteor. To help with adding any captured meteors into a composite image the camera was mounted on a tracking mount. The imaging was done in a very dark sky location at Lake Bala in Mid Wales.
The figure below shows an image of a meteor taken with an exposure of 30 seconds using a full frame Nikon D610 at an ISO of 1600 and Tamron 24mm, f/2.5 lens at full aperture mounted on the Baader Nano Tracker.
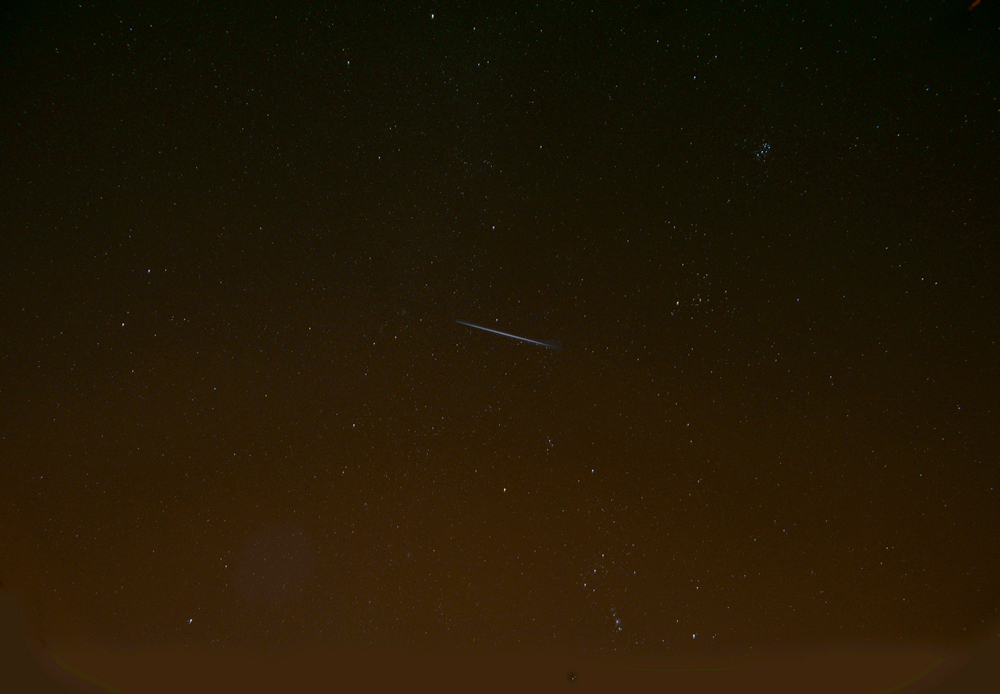
The image was stretched using a few applications of the Levels’ command with the middle slider set to 1.2. This showed some light pollution towards the lower part of the image which was removed by duplicating the base layer applying the dust and scratches filter with a pixel size of 10 pixels and cloning out any remaining bright stars (and in this case, the Orion Nebula) to produce an image of the light pollution. Flattening the two layers using the ‘Difference’ blending mode the removes the light pollution. The image was further stretched, the brighter stars selected using the colour range tool and the selection expanded by 9 pixels. The Gaussian Blur tool was then used with a radius of 4 pixels to expand these stars but as this make them fainter, their brightness was brought back using the Curves tool with the fainter parts of the image ‘pinned’ but the brighter parts lifted.]
The stars of the main constellations can be seen along with Hyades and Pleiades open clusters and, pleasingly, both the red giants Betelgeuse and Aldebaran show their orange colour but this, in itself, is not a good image. As will be seen below, if a composite image is to be made, the quality of the star field against which the meteor trails will be seen does not matter as they will be ‘added into’ a high quality star background.
Imaging a meteor shower
The beautiful images of meteor showers on the Astronomy Picture of the Day NASA website show many meteor trails against a beautiful star background whilst also having a smooth sky background and an attractive foreground. These very well crafted composite images are not too difficult to achieve as I hope the following description will demonstrate. The procedure does require a reasonable working knowledge of Adobe Photoshop or Affinity Photo (perhaps also now the free program Glimpse). Many of the processes outlined below have been covered in other digest articles.
Making a ‘Skyscape’ in which to composite the meteors
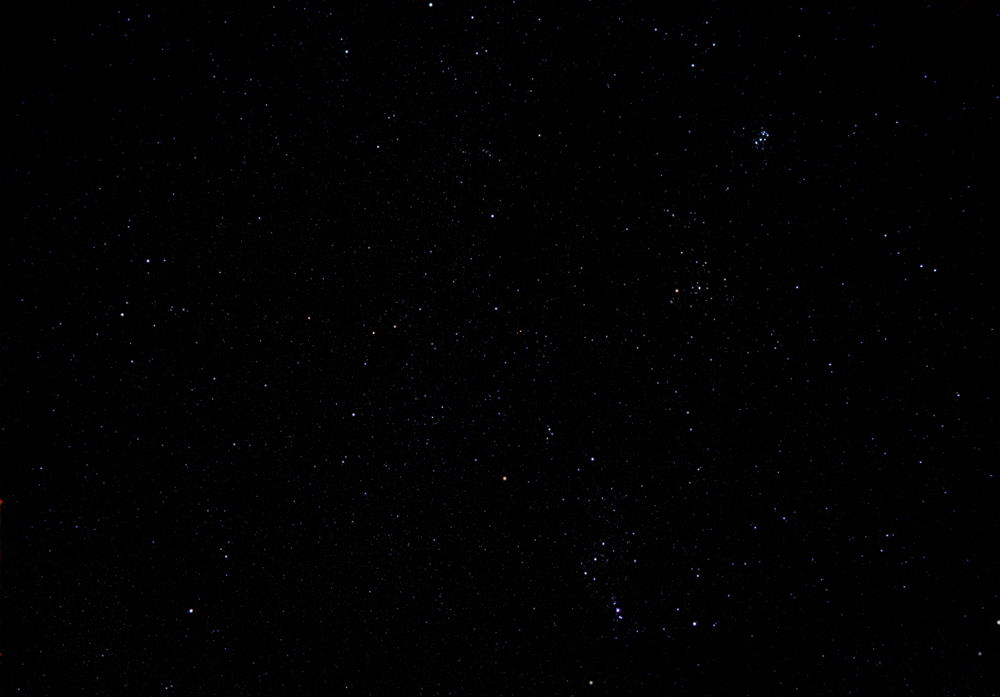
The region was imaged with the same imaging setup but with the Tamron 24 mm, f/2.5, lens stopped down to f/5.6 (to give better image quality than when at full aperture) and with a reduced ISO of 800. A set of 24, 25 second exposures, were made giving 10 minutes total exposure. The use of a tracking mount was a great help but, otherwise, exposures of 10 seconds will minimise star trails. As many images are to be combined, JPEG capture would be adequate but raw files could, of course, be used. The images were stacked and aligned using Deep Sky Stacker, the sky glow removed and then stretched with two applications of the levels command in Adobe Photoshop with the centre slider set to 1.2. I called the resulting image, which shows little noise and whose main constellation stars have been enhanced, ‘Skyscape’. These techniques have been described in other Digest articles such as ‘An in-depth processing tutorial imaging the Veil Nebula‘.
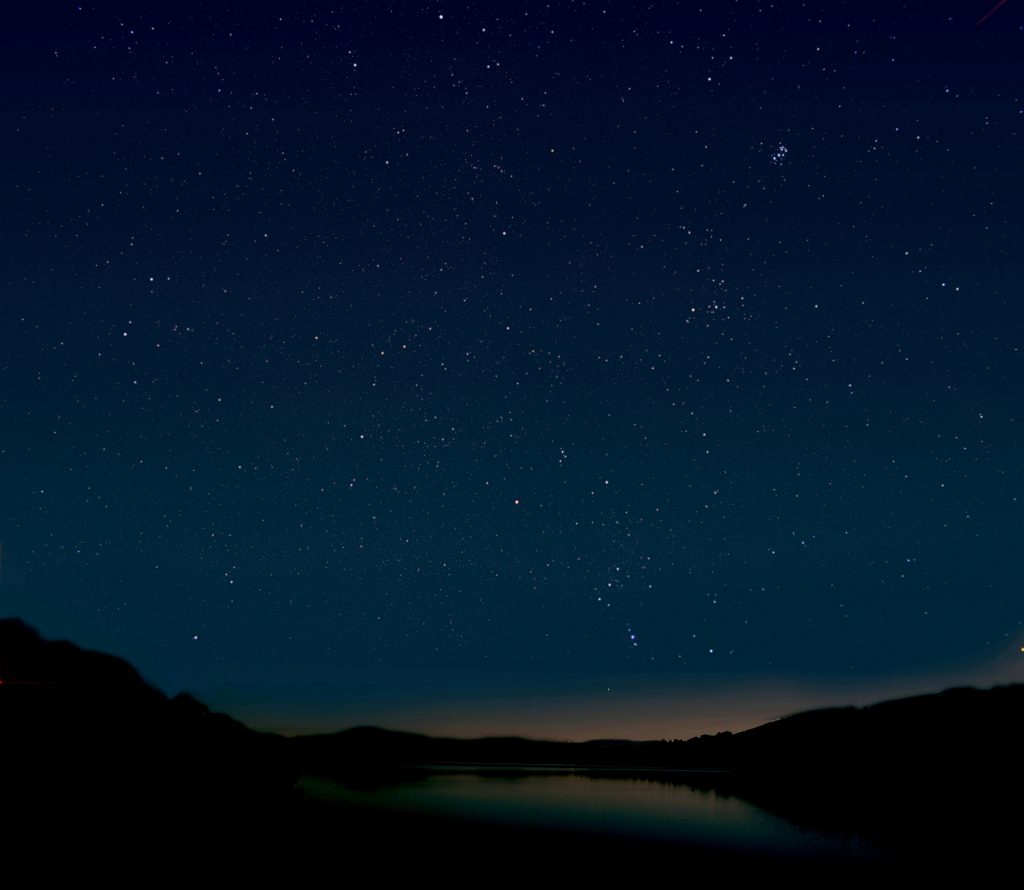
Totally black skies are not too attractive and the Skyscape image could have some colour added. In this case, the image was saved as ‘Blue Sky’ (this ensures the same image size) and over painted with a blue colour (R = 56, G = 82, B = 75 ). As skies tend to get brighter towards the horizon, the gradient tool was then used to darken this towards the top.

The result can then be added into the skyscape using the ‘Screen’ blending mode with a suitable opacity. Some experimentation is required. The final touch might then be to add an interesting foreground to the base of the image. The canvas size (in black) of the skyscape was extended beneath the image and a suitable foreground image copied and pasted over it. This could even have been taken in daylight and suitably darkened first. The appropriate blending mode would depend somewhat on the image to be added, but the ‘Lighten’ mode is likely to work well. One might well consider that this is ‘cheating’, but I promise you that this is how these composite images are made. This is quite a pleasant image even without the meteors added to it.
Adding the meteor trails into the skyscape.
The requirements for best capturing meteor trails during a shower were outlined above. Ideally the same camera and lens employed to make the skyscape should be used, preferably on a tracking mount and having the same orientation on the sky as this will make adding the trails into the skyscape easier. In this case the exposures to make the skyscape image were taken prior to opening the lens’s aperture and increasing the ISO to 1600 in order to, hopefully, capture some of the Geminid shower. Exposures of 30 seconds were used with each exposure triggered every 31 seconds. As seen in the description above, the star images will not be good but this is not important, neither is any star trailing that would result should you not have a tracking mount as the effective exposure of the meteor trail is only a few seconds.
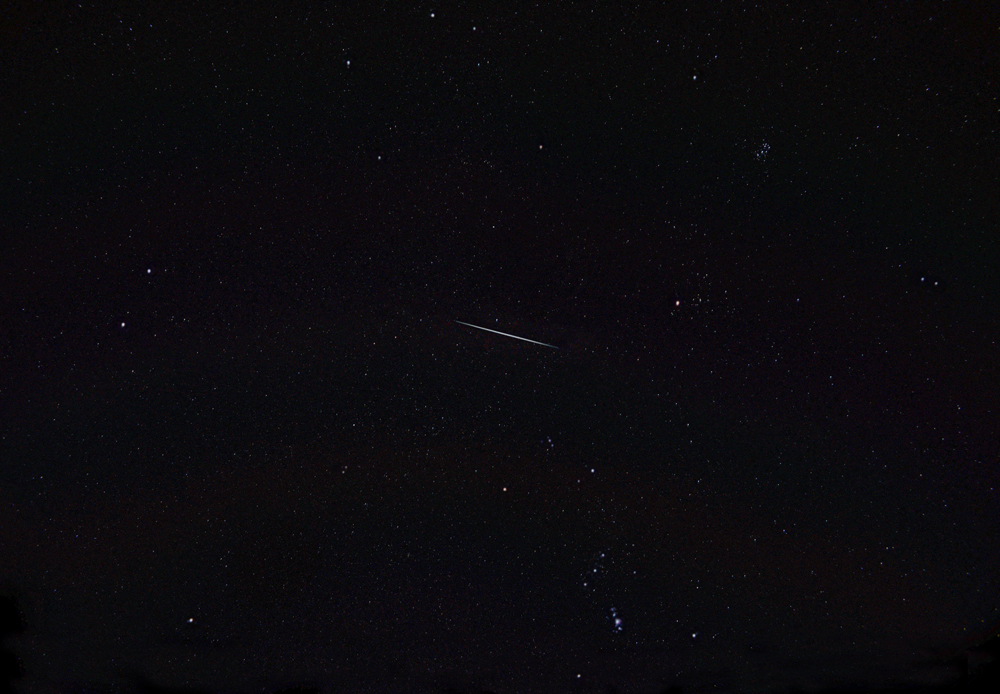
Having looked through them all (a good reason for using JPEG files), one hopes that a few will show a meteor trail. The position of the trail with respect to the stars in the field should be noted and then the region around it cropped. (In this first example, the Hyades Cluster was adjacent to the meteor trail.) Using the Polygonal Lasso Tool, the trail is selected as shown in the top part of the image below. The selection is inverted and the remainder of the field painted black as shown in the bottom part.
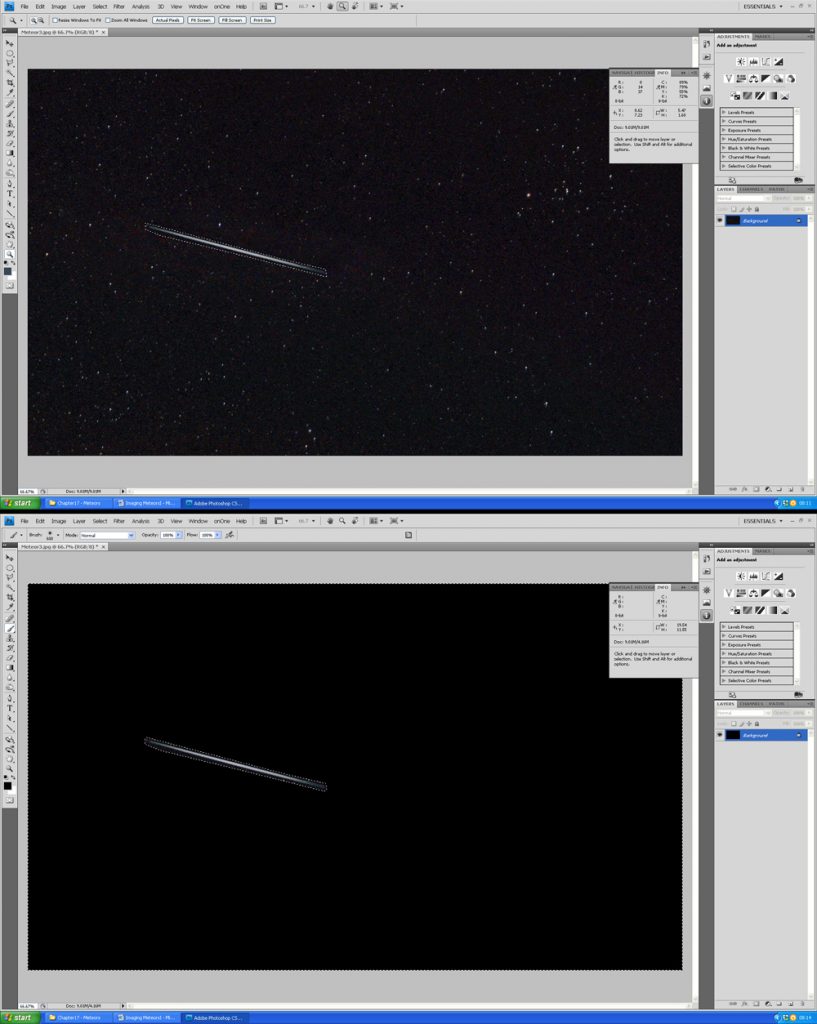
This image of the meteor trail should then be copied and pasted over the Skyscape image with the blending mode set to ‘Lighten’. (This compares each pixel of the two layers and put the brighter of the two into the flattened image – perfect for this process.) The trail will now be seen within the background stars. By pressing ‘CTL T’, the trail can be moved using the cursor keys to its correct position in the field and, if necessary, rotated so that it points away from the radiant − in this case just above the star Castor. [If all the images have been taken using a tracking mount, as in this example, then the meteor’s position and orientation should be correct.]

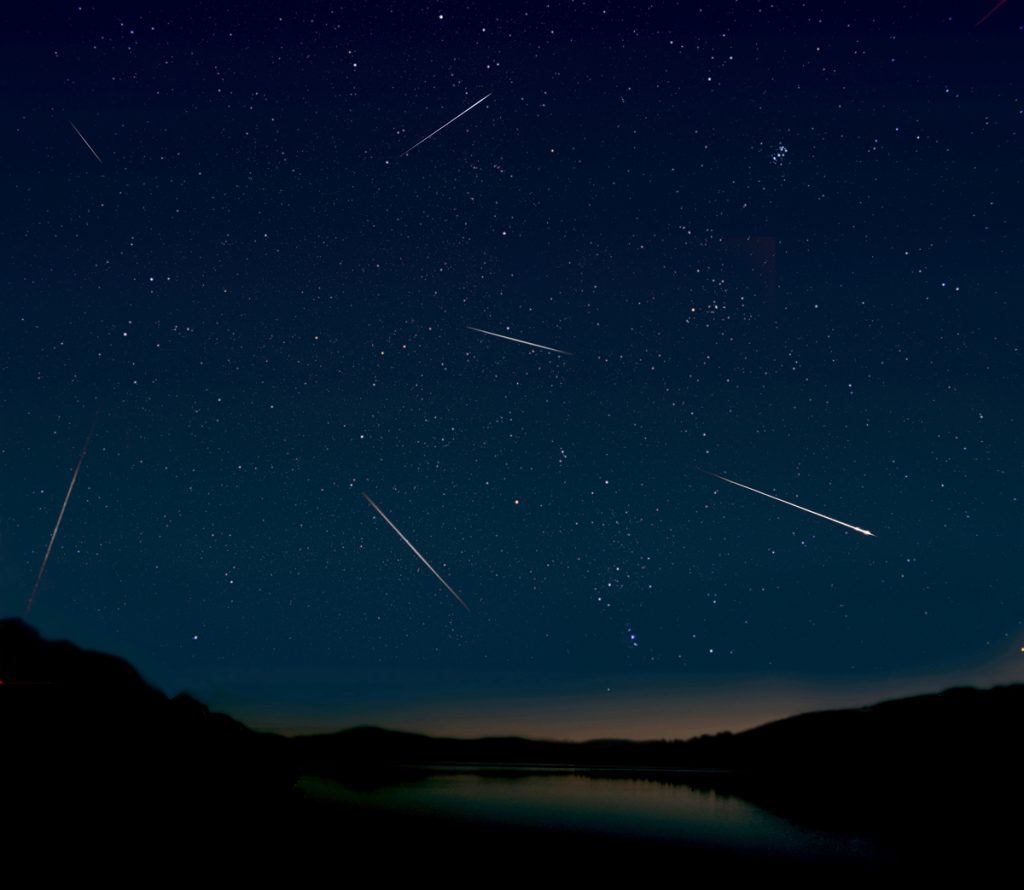
Exactly the same process is employed for all the trails that have been captured to give a composite image of the meteor trails against the star background as shown below