
This is just one of over 100 articles in the author’s Astronomy Digest: http://www.ianmorison.com
Calibration frames are used to correct the ‘Light Frames’ captured when imaging an object by correcting them from different kinds of noise generated within the camera, vignetting of the image and specks of dust or other imperfection in the optical setup.
This article looks at each of these and, perhaps controversially, points out that in some specific cases particular types of calibration frames may not be required.
Light, bias, dark and flat frames
Imaging software refers to four types of frame which can relates to a sequence of exposures. The first is a ‘light frame’ which is a frame taken of the object to be imaged. The second is a ‘bias frame’ which is a frame which has had zero exposure. It gives a measure of the readout noise or ‘bias current’ contributed by the chip electronics each time the image data is downloaded into the computer. This may vary slightly with temperature but, at any given temperature, will be constant − and hopefully small. The third is a ‘dark frame’ which is a measure of the total noise due to the bias and dark currents when an exposure is made with the camera shutter closed. It will also expose ‘hot pixels’ that become more prominent the longer the exposure. In a cooled CCD or CMOS camera the temperature control electronics will normally stabilize the chip temperature to about half a degree which means that the dark and bias current noise contribution will remain constant. This means that dark frames (which will be averaged by the imaging software) can be taken at any time (providing that the sensor temperature and exposure time are the same) and can be used to correct for all the light images. There is a problem when attempting to take dark frames when using a DSLR or mirrorless camera which will be addressed below. The fourth is a ‘flat frame’ which can correct for vignetting in the image and remove ‘dust bunnies’ should there be any.
Bias frames
As it is obvious that a dark frame will contain the bias current contribution, I was, for some time, confused as to why any bias frames need to be taken. It turns out that they are only needed if the light frame exposure time is different from the dark frame exposure − in which case they allow the imaging software to estimate what a dark frame with the same exposure as the light frame would be. This can work as the bias current contribution remains essentially constant and the dark current contribution increases linearly with exposure time. Let us suppose that the light frame exposure was 10 minutes, but there is only a dark frame of exposure 5 minutes along with a bias current frame. (They must all be at the same temperature.) The software will take the 5 minute dark frame and subtract off the bias frame to give only the dark current noise contribution to the dark frame. The noise in this frame is then doubled to give an estimate of the dark current contribution that there would be in a 10 minute dark frame. The noise from the bias frame is then added back in to give an estimate of the total noise in a 10 minute dark frame. The point to make is that if you make dark frames of the same exposure time and temperature as your light frames − which is always best − there is no need to take any bias frames. I have never taken any.
Flat Frames
Particularly if a focal reducer has been used in the imaging chain, the image may suffer from vignetting in the corners of the field. Adobe Photoshop has a filter (Filter > Distort > Lens Correction) which allows for vignetting to be corrected in post processing, but a better alternative is to take and average some ‘flat’ frames before or after the imaging session. A flat frame is simply an image of a uniformly illuminated field. There are several ways of achieving this. One way is to observe a twilight or pre-dawn sky (when the stars are invisible) at an altitude of about 30 degrees towards the southeast or southwest. A second way is to image a matt-white area which is uniformly illuminated. This could be painted on the inside of an observatory dome or a white sheet held in placed some distance from the telescope. A third way is to make a light box with a uniformly lit background whilst a fourth, similar, approach is to stretch a tight and wrinkle-free sheet or white tee-shirt over the telescope aperture and point the telescope at a diffuse light source. It is important that the flat frames are taken with the same telescope focus and camera orientation as the light frames.
The first owner of my 350mm Maksutov made a telescope aperture cover out of white translucent plastic which is used in just this way. Image processing software will use flat frames to correct for vignetting but their use will also reduce the effect of dust or hairs on the sensor. Again it is recommended to take quite a number of flat frames which are averaged by the imaging software. It is important that no part of the image is over exposed. A peak brightness of ~40,000 would work well when taken with a 16-bit camera which has a range of 0 to 65,535. The second reason to take flat frames is to remove the effects of ‘Dust Bunnies’ in the light frames due to dust on the camera sensor.
CCD or CMOS cameras
If using a CCD or, now, CMOS astro camera there will be a glass cover over the sensor. If this is kept scrupulously clean, then dust bunnies will not be found. Using a Altair Astro 294C PRO cooled, Micro 4/3, camera with my telescopes, I have never found any evidence of them.
DSLR or mirrorless cameras
When I was using a mirrorless Sony A5000 camera, dust on the sensor could cause dust bunnies. These could be a problem and flat frames were of use.
Vignetting
Using my Micro 4/3 sensor camera, vignetting is not a real problem, but using my 8 inch, f/4, Schmidt-Newtonian, there is significant vignetting and so, again, flat frames could be useful. But, to be contentious, if one were imaging a galaxy or globular cluster in the centre of the frame does it really matter if the stars towards the corners of the frame are less bright than they should be? In photography, one often applies a vignette to help concentrate the viewer on the main object.
However, it turns out that one can derive a flat frame from the stacked light frame if there is sufficiently uniform light pollution in the stacked frame.
Making an artificial flat frame from the stacked light frames
If there is significant sky noise in the stacked image and, assuming the sky glow is uniform across the frame (high elevation and not too great a field of view), then this can be used to make a very low noise flat frame so the taking of flat frames may not be needed. If one first linearly stretches the stacked image to make the sky glow obvious and then applies a ‘Noise and Scratches’ or ‘Median’ filter with a radius of ~50 pixels, the stars will disappear. Should there be , as is usually the case, a nebula or galaxy in the frame one can sample the background close to then and paint over it. This frame can be converted to monochrome and linearly stretched to centre the histogram values (peak brightness ~40, 000) before finally converted it back to rgb mode. This is then a really excellent flat frame.
The steps to make an artificial flat frame


It is, by its very nature, a flat field having the precise camera orientation and focus as when the light frames we taken. Three copies of this frame can then be used as flat frames when the data is realigned and stacked. Using a 200 mm f/4 Schmidt-Newtonian with my Micro 4/3 astro camera – a combination which does vignette – I found that the uncorrected stacked frame background varied from 100% at the centre down to 75% in the corners. Having used this to make the flat frames and re-stacked the 225 light frames reduced the brightness loss to 95%. So this does work.
Using my CMOS cooled camera coupled to several of my scopes, including two astrographs, there is no significant vignetting. And, with no dust bunnies apparent, I cannot see how light frames could help and so do not generally have to take or use them.
Dark Frames
DSLR and mirrorless cameras
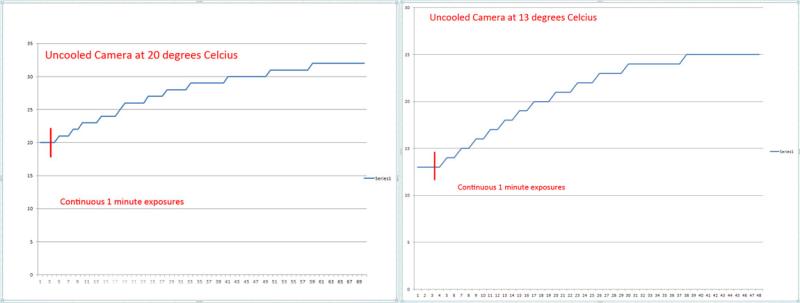
A key reason to use dark frames is to remove hot pixels – which will be most prominent when using uncooled cameras. The problem with taking suitable dark frames with these is that, as the light frames are taken, the sensor temperature will increase. With DSLR or mirrorless cameras I have found, by experiment, that the sensor temperature will slowly rise for around ~45 minutes before stabilising at around 12 degrees Celsius above ambient temperature as seen in the plots below. The problem with dark frames is that they need to be taken at the same temperature as light frames so it is obvious to take them at the end of the imaging session. Perhaps using the dark frames to stack those taken after say, 30 minutes or so.
If several hundred frames are dithered – so that the hot pixels fall on differing parts of the sensor as the frames are taken – then, when the frames are aligned and stacked, the hot pixels will not integrate up – as will the stars – so they may well then be lost in the noise. A simple, but effective way to dither, is to use an unguided mount which is very close to, but not perfectly aligned, on the North Celestial Pole. During, say, an hour of exposures the star field will very slowly drift across the sensor. The drift rate must be slow enough so that stars are not trailed in an individual frame. In this case, the hot pixels will not integrate up but the aligned stars will, so that the relative brightness of the hot pixels will be reduced and may be lost in the noise. If some are still present, they can be ‘colour selected’ and cloned out from the final image but I have recently read that using a ‘Noise and Scratches’ or ‘Median’ filter with 2 pixels radius will also remove them.
Number of Dark Frames
A single dark frame will show noise fluctuations and, as one has no wish to add noise in the final image, a number of dark frames are taken and averaged by the stacking software to produce a, low noise, ‘Master Dark’. The more dark frames are taken, the smother the result. One often sees in the literature what I believe to be an erroneous statement suggesting the, say, 40 dark frames should be taken. This ignores the exposure time of each image. A dark frame whose exposure is 4 times greater than another will have half the noise fluctuations. So what matters is the total time exposure time of the dark frames. One needs more dark frames when taking short exposures and fewer for longer exposures. A total exposure time of 20 minutes should be fine so take, for example, 40, 30 second exposures but only 10 two minute exposures.
Cooled CCD or CMOS astro cameras
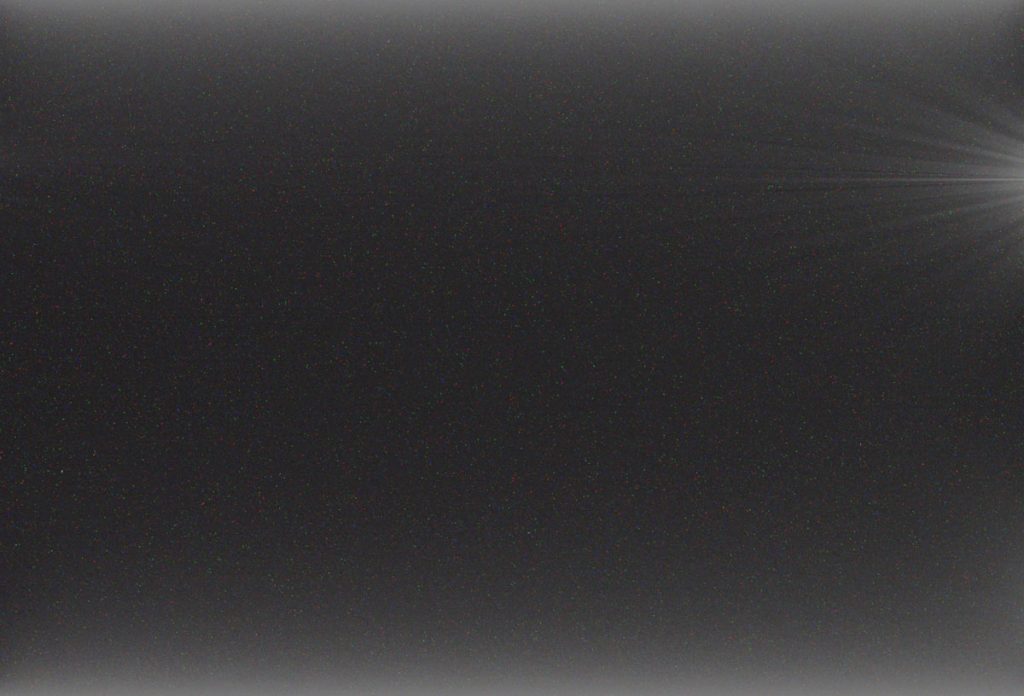
Pleasingly, my 294C PRO has very few hot pixels. As described above, if several hundred frames are dithered they may well then be lost in the noise. Using the 294C PRO, I have never seen any hot pixels in the stacked results when dark frames have not been employed. [Dithering will also remove the effects of what is called colour mottling – an exposure of a grey screen will not be uniformly grey but small areas of the image will show some random colour due to the varying sensitivity of the pixels to red, green and blue.] The camera does , however, suffer from ‘amp glow’ which becomes apparent when long exposures are taken. The figures below show single dark frames with exposures of 20 seconds and 6 minutes. I feel that taking 20 second exposures it will not materially effect the final image.

Using the latest CMOS cameras, the dark current noise is very low when they are cooled to, say, -15C. I image under significant sky glow from a Bortle class 5 location and suspect that its noise contribution is many times that of the dark current noise. If so, correcting perhaps 10% of the noise signal can hardly have any significant effect of the final image. It thus does seem that given significant sky glow when using a very low noise CMOS cooled camera there may be little point in taking and employing dark frames. However, they are easy to take and will remove the effects of amp glow so could well be worthwhile. I tried processing M13 data with and without using dark frames and, when used, found that under extreme stretching some amp glow along the top edge of the frame was reduced in brightness.
Using the Deep Sky Stacker Sigma-Kappa stacking technique
I have discovered that if I use the Sigma-Kappa stacking technique, both hot pixels and amp glow are removed. In this mode, the average value of each pixel in the image is calculated and then, if any pixel in a frame is more that ~2 standard deviation away from the mean value, it is replaced by the mean value. I use this to eliminate satellite or plane trails. But, very pleasingly, I have recently discovered that both hot pixels and the amp glow are also removed. As I have employed a form of dithering, I am not too surprised that the hot pixels can be removed, but am surprised that the amp glow is also removed. Using this technique it may be that Dark Frames might not be required.