MARCH 2021
Choosing a CMOS ‘Astro’ camera for deep sky imaging
[This is just one of many articles in the author’s Astronomy Digest.]
It’s not uncommon for amateur astronomers to want to try their hand at astroimaging and this article is to help you make a good choice of camera should you wish to try yourself. The lowest cost alternative is to use your own DSLR or mirrorless camera and there are many article as to how to go about using them in the Digest. Unless modified, they are sadly not very sensitive to the deep red Hydrogen Alpha wavelength, produced by excited Hydrogen in star formation regions, which adds so much to many astrophotographs. Also on warm nights their sensors warm up as a long sequence of images are taken and their images will suffer from ‘dark current’ noise. So there can be a case for buying a specialised astro camera.
As with digital cameras, most astro cameras now use a CMOS sensor which has an advantage over the earlier CCD cameras in having a far lower read noise which, as discussed below, allows shorter exposures to be used and simplifies the imaging system. The second advantage of a dedicated astro camera is that it will be far more sensitive to the H-alpha emission so enhancing the images of many deep sky objects. The third is that the more expensive cameras have sensors that may be cooled so greatly reducing both dark current and ‘amp glow’ and the effects of ‘hot pixels’ when long exposures are taken.
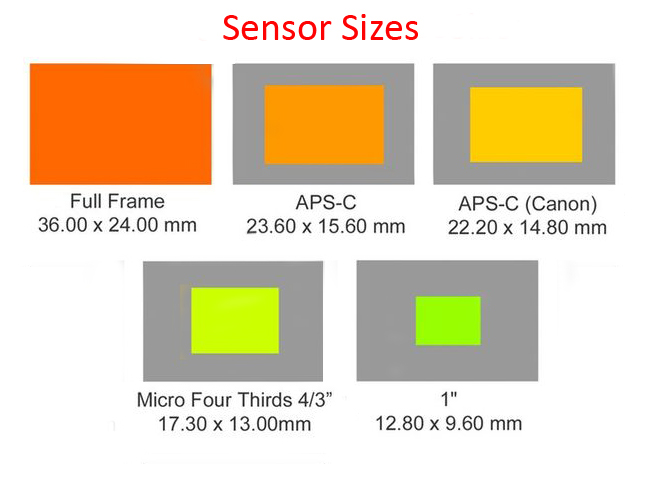
Sensor sizes
Cameras are available with a variety of sensor sizes with largersized sensors being used for deep sky imaging. Three that should be considered are 1 inch, Micro 4/3 and APS-C sensors; 13.2 x 8.8mm, 17.3 x 13mm and 23.6 x 15.7mm in size respectively. At greater cost, cameras with full framesensors, 36 x 24mm in size, are available. Obviously, with a given focal length camera, a larger sensor willprovide a greater field of view. Apossible problem with the larger sized sensors when used with refractors isthat they will show up what is called ‘curvature of field’ so that starstowards the corners of the frame will be distorted and so the use of a fieldflattener will be required.
To cool or not to cool
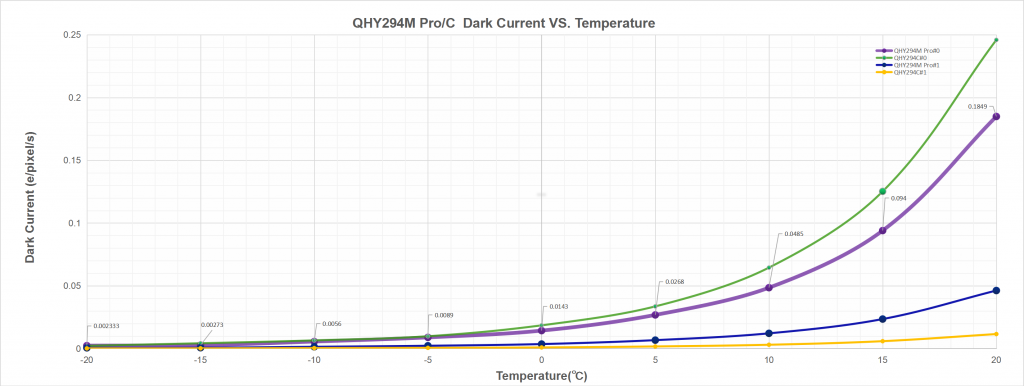
A cameras using a given sized sensor are usually available in three variants; firstly whether they employ a colour or monochrome sensor and secondly whether these either employ a ‘fan cooled’ sensor or a sensor that is ‘Peltier’ cooled down to perhaps 35 degrees Celsius below ambient temperature. The additional cost for the cooled versions is typically £300. As the monochrome sensor cameras are used by more advanced astroimagers, they tend only to be sold in Peltier cooled versions. Due to its simple cooling system even the fan cooled version will perform better than a modified DSLR or mirrorless camera on warm nights. The Peltier cooled versions will have lower thermal noise effects, called ‘dark Current’ and reduce what is called ‘amp glow’ caused by the sensor circuitry and the effects of ‘hot pixels’. However, there are other noise contributions to consider, in particular ‘sky noise’, often called ‘light pollution’. Imaging from a suburban location, as many of us do, this will usually overwhelm the dark current noise and so cooling gives a lesser advantage unless one is able to image from a relatively dark sky location – but it will still help eliminate hot pixels. A 12 volt supply capable of providing 2 amps from a mains adapter or battery is also required as Peltier coolers are not that efficient. One advantage of using a cooled camera is that it can be operated at a specified temperature and one can then take dark frames at the same temperature, gain and exposure time as those taken when imaging. These then enable one to remove the effects of hot pixels and amp glow when included in the aligning and stacking process. As, even when uncooled, the noise level of CMOS cameras is low, not a lot is gained by reducing the sensor temperature much below – 10 Celsius. The diagram below shows the dark current for a number of CMOS sensors including the 294 colour sensor that I have purchased.
Monochrome or Colour
For a newcomer to astrophotography, it makes sense topurchase a colour camera, one will not then need to purchase a set of Red, Green,Blue and Luminosity (full spectrum) filters and, for ease of use, a filterwheel. The result of using a monochromesensor may give a somewhat higher resolution at the expense of far more postprocessing. But there is always thepoint of the British weather. To get afinal image using a monochrome sensor one will typically take 4 separate setsof images and clouds could well arrive before these are all taken. Using a colour camera there will be, atleast, a colour result to observe no matter how quickly an imaging session isterminated.
The latest sensors are ‘back lit’ which I find an odd term. In older sensors, the wiring lay in front of the pixel wells and reduced the sensitive area of the pixel. In these later sensors, the wiring lies behind so giving a higher quantum efficiency of up to 85% at peak wavelengths.
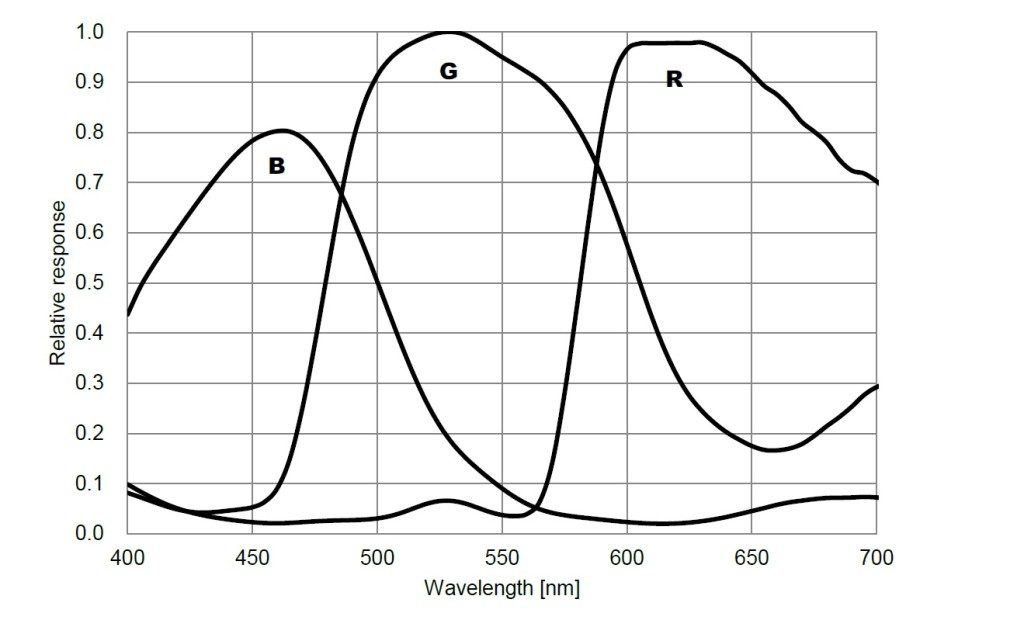
As discussed further below, one can, of course use narrow band filters with a colour camera but the sensitivity will be less as, for the H-beta and OII spectral lines in the green, only 2 out of 4 pixels will be sensitive and, for the H-alpha line in the red, only 1 out of 4 pixels will be sensitive.
Pixel size
A given sized sensor may be available with differing numbers of pixels typically ranging from 11 to 20 Megapixels. Those with a larger number of pixels will thus have smaller pixels, say 2 microns in size whereas on those with fewer pixels they might be 4 microns in size. This affects the “sampling” of the image. To fully sample the image falling on a sensor, their size should subtend one third the angular size of the image formed on the sensor produced by, for example, a faint star. This will be determined partly by the aperture of the telescope where, under perfect “seeing”, an 80 mm aperture would give a minimum angular star size of 1.4 arc seconds and, more usually, by the atmospheric seeing. This might be 2 arc seconds on an excellent night or 4 arc seconds on a bad one. With a 1,000 mm focal length telescope, one micron at the focal plane subtends 0.2 arc seconds, so for a given focal length telescope and pixel size, one can calculate the angle subtended by each pixel with the formula:
Theta= 0.2 x (1,000/FL in mm) x (Pixel size in microns)
For full sampling of an image under good seeing conditions, a pixel should not subtend more than ~2/3 arc second at the objective. A 2 micron sized pixel sensor will achieve this when used with an 500 mm focal length telescope but will over-sample that produced by a 1,000 mm objective. (Not a bad thing and the pixels could be binned 2×2 if desired.) A 4 micron sized pixel sensor will under-sample the image of a 500 mm focal length telescope when the seeing is excellent but not when poor. It will be ideal for telescopes 1,000mm or over.
Exposure times
When CCD cameras are used, their far higher read out noise than that of CMOS cameras means that exposure times of several minutes are preferable and, to prevent ‘star trailing’, autoguiding will be required. Using CMOS cameras it is possible to get comparable results by taking many short exposure frames rather than fewer long ones. Typical, well aligned, mounts allied to a relatively short focal length refractor will allow exposures of up to 30 seconds without trailing so the additional cost and complexity of autoguiding is not required. There is then also less chance of a single subframe being ‘photo bombed’ by a plane or satellite. However, if a long series of exposures is taken the image will move across the sensor (actually a good thing) and the resultant image will need to be cropped down depending on how well the mount is aligned. I have mitigated this problem by, if necessary, realigning the image over the sensor every 20 minutes or so.
Camera Gain
CMOS cameras allow the gain to be adjusted, somewhatanalogous to increasing the ISO in a DSLR camera. Increasing the gain reduces the ‘well depth’– the number of electrons that each pixel can hold – but it also reduces the read noise. The combination of these two factorsdetermine the dynamic range of the sensor. If the read noise reduces as the well depth reduces, the dynamic rangedoes not fall that rapidly. There is noone best value. Many users aim for avalue where each electron corresponds to an increase of 1 in the output of theanalogue to digital converter(ADC) – this is termed ‘unity gain’ – a value of-e/ADU of 1 where each additional captured photon increases the output of theADC by one.
In the SharpCap software package the gain value given is multiplied by 100, so a gain of 1 is 100 and 10, the maximum gain, is 10,000. Manufacturers will sometimes give the required gain to be used to reach unity gain – it is not 1 (or 100 in the case of SharpCap ) and, for the ZWO ASI 294MC-PRO camera, the unity gain corresponds to a value of ~400 in SharpCap. Though the dynamic range is still high, the full well depth is reduced from ~65,000 down to ~16,000 electrons. The unity gain value is a good starting point, but it is not necessarily the best value to use and under differing imaging conditions and higher or lower values may well be better. Taking long exposures with a colour camera using a low f-ratio telescope it can be better to decrease the gain value to allow a greater full well capacity and so avoid overexposing the bright stars which would destroy their colour. On the other hand if one were using narrowband filters, the number of photons received will be lower. As the brightness of each image will be less, particularly if a colour camera is used, one may well need to increase the gain so that sufficient stars are visible in each subframe to enable them to be aligned and stacked. In this case, there is a case for using autoguiding to allow longer exposures to be taken.
My own approach is pragmatic: I set the exposure that is limited by my mount’s tracking and the level of sky glow and then simply increase the gain until I believe there will be sufficient stars visible in each subframe to enable them to be aligned and stacked.
Offset value
The offset valueset for the camera adds a very small signal to each pixel value so there are no‘zero’ values read out of the pixel array. This can allow slightly fainter details to be captured when manysubframes are stacked.
Calibration Frames
When taking an astroimage one will always capture what are called ‘light’ frames and also, perhaps, a set of ~20 ‘dark’ frames (to remove the effects of dark current noise, hot pixels and amp glow) and a similar set of ‘flat’ frames (to remove any vignetting effects). These are included in the post processing using a program such as Deep Sky Stacker. Imaging from a suburban sky little will gained by using dark frames as the sky glow overwhelms the dark current, and, unless a large sensor camera is used, vignetting should not be a real problem however it will remove the effects of hot pixels. Dark frames are most valuable when imaging from a dark location using a Peltier cooled camera so that they can be taken at the same temperature, exposure and gain. As described in the digest article ‘Producing a Flat Frame from a Light frame‘, when sky glow is present, a flat frame can be derived from the light frames following a first stacking process and then used in a second iteration to remove the effects of vignetting.
Live Stacking
There is now a far simpler imaging process that provides aligned andstacked images directly, called ‘Live Stacking’ in SharpCap. As the camera captures relatively shortexposures, each frame is aligned and stacked and gradually a deeper and lowernoise image appears on the controlling laptop screen. This is really nice to watch. At any point one can save either an 8 bit PNGfile or 16 or 32 bit FITS (Flexible Image TransportSystem) files. These FITS files can beconverted into Tiff files using the free program ‘IRIS’. For a newcomer to astrophotography thiswould be an excellent way to start.
Narrowband Imaging
Particularly from an urban location or when the Moon produces much skyglow, astroimagers may employ narrow band filters to eliminate their effects. The filters normally employed are those that select the Sulphur II spectral line in the deep red, the Hydrogen Alpha line in the red and the Oxygen III and Hydrogen Beta lines in the blue/green. Often, a false colour palette is used as, for example, the Hubble Palette where the SII line is used for the red channel, the H-Alpha line for the green and the OIII line for the blue. These can look very beautiful, but as an astrophysicist, I do not really like the red hydrogen emission becoming green in the resulting images. In fact, some of the Hubble images are now being reprocessed to give more natural colours.
RGB and H-alpha Imaging
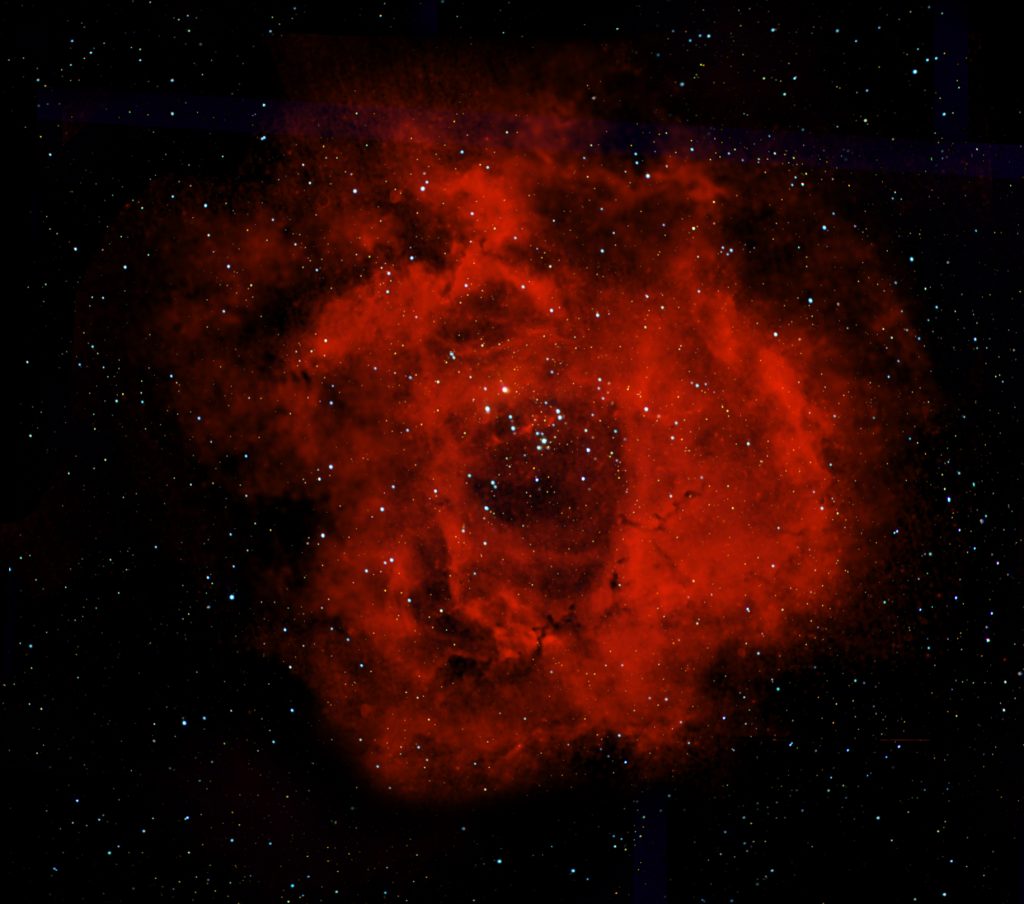
There is a useful imaging technique to use when imaging a region where the red H-alpha emission is present such as the North America Nebula or Rosette Nebula. One will need to purchase a 2 inch (52 mm) Hydrogen Alpha filter, such as the Baader 7nm bandwidth filter. [Sadly, these are very expensive.] First, when the Moon is not bright, a colour camera (astro or modified DSLR) is used to take a standard colour image of a region. Then, even when there is moon light in the sky, the H-alpha filter is added into the imaging train to take a series of H-alpha images. [These will usually screw into the T-mount barrel of a DSLR or mirrorless camera or, as in my imaging system, in the front of my 2″ TS-Optics field flattener.] I have been able to use this technique with great effect imaging both the Rosette Nebula in Monocerous and the Flame and Horsehead Nebulae in Orion and have described it in the digest article ‘Hydrogen Alpha and RGB composite imaging – the Rosette and Horsehead Nebulae‘.
What did I choose?
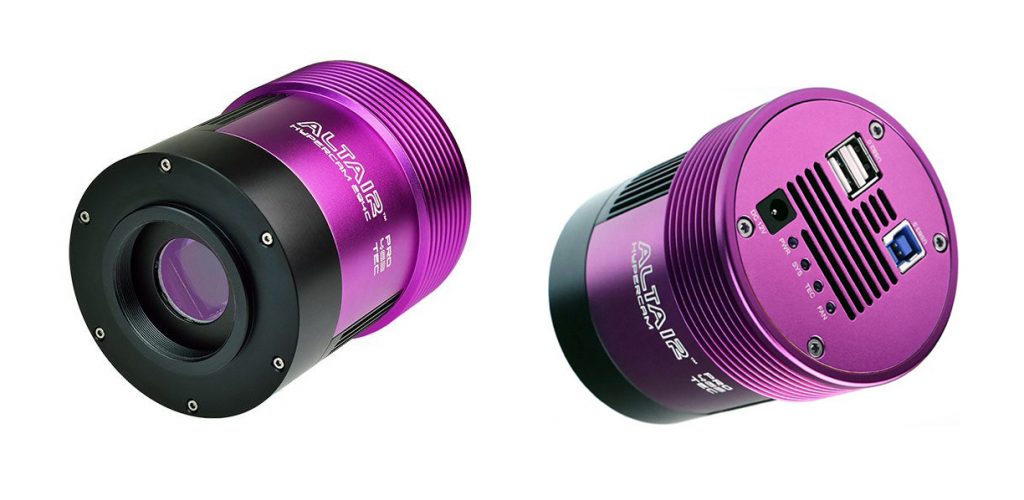
Though having both monochrome and colour APS-Csized CCD cameras, I thought it would be interesting to purchase a CMOScamera. For cost reasons, I had decidedthat a Micro 4/3rds sensor size would be most appropriate and, due to mostlyimaging from a suburban location, had decided on a fan cooled version. However, on the ‘UKastrobuysell’ website Ifound an ‘as new’ cooled version only just greater in price than a new fancooled version and this was obviously a better buy. A description of this excellent camera andits results will be given in a further Digest article. I found that almost identical cameras aremarketed under the ZWO and Altair Astro brands and similar ones under the QHYbrand. As seen in the images of thecooled 294C camera I purchased, these have a UV/IR cut off filter prior to thesensor (square in my example) and at the rear a USB3 socket to transfer data toand from the control computer and a 12 volt input to power the fan and Peltiercooler. [Note: a 12 volt supply will beneeded even when a fan cooled version is used to operate the fan.]
A comparative examples of the cost of a micro 4/3 sensor astro camera:
Colour 294 cameras (Altair Astro)
FanCooled £599
PeltierCooled £899
Monochrome 294 Camera (ZWO)
Peltier Cooled £1,430