JUNE 2017
Combating Atmospheric Dispersion
[This is just one of many articles in the author’s Astronomy Digest.]
Below is a skyscape showing a very thin crescent Moon and Jupiter.
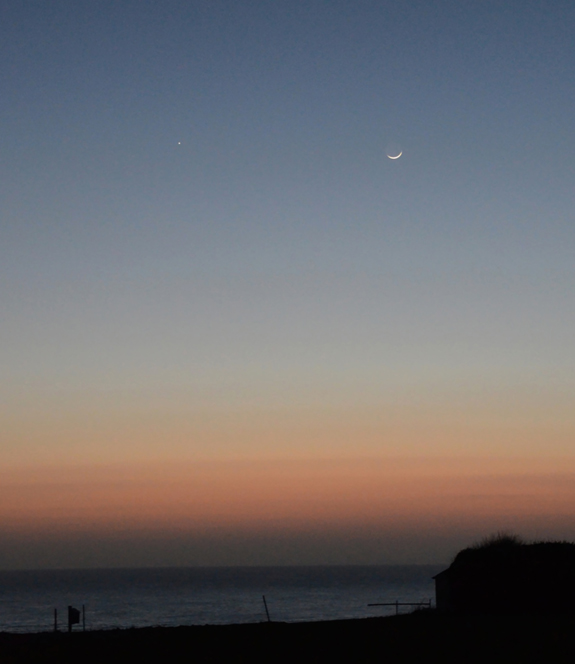
Skyscape taken with a Nikon D7000 and wide angle lens.
Mercury should also have been visible but at a very low elevation. Even using a 102mm refractor it could not be seen but it did appear on an image taken through the refractor as shown in the heavily cropped image below.
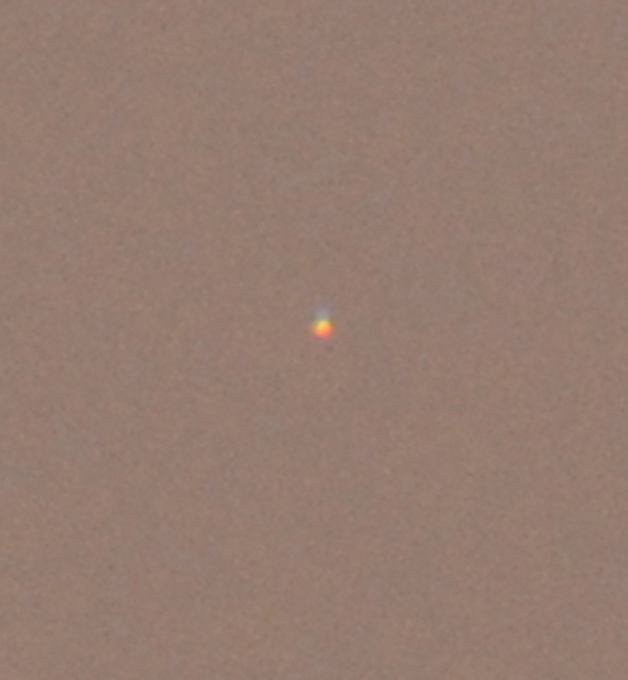
The image of Mercury.
It appears as a vertical spectrum. As blue light is preferentially scattered in the atmosphere, the blue end is less bright. This is an extreme result of atmospheric dispersion – the atmosphere acting as a prism. But it can affect the viewing of planet s at far higher elevations than this example.
Sadly, over the next decade, planetary observations and imaging from the northern hemisphere will become more difficult as the giant planets drop down towards the southerly part of the ecliptic − and so will be at low elevations even when crossing the meridian. Mars at its next apparition will suffer even worse as it elevation at opposition will be close to just 10⁰! The first problem is that we will then be looking through a greater part of the atmosphere so blurring our view whilst the second problem is that a planet as seen in different parts of the spectrum will be shifted in vertical position. Termed atmospheric dispersion, this further blurs the planetary images and produces colour fringes at their limbs. The lower the elevation − and hence the amount of atmosphere the planet is viewed through − the worse the effect. As examples, a stellar image will form a vertical spectrum which is 2.5 arcs seconds in angular size at an elevation of 30⁰ which increases to 4 arc seconds at an elevation of 20⁰. One can easily imagine the effects on an image of Mars, whose angular size was 18 arc seconds and at an elevation of ~18⁰ when observed from the UK in May 2016. In May 2107 Jupiter was at an elevation of ~31⁰ when at transit and the image below shows the obvious colouration at the opposing limbs.
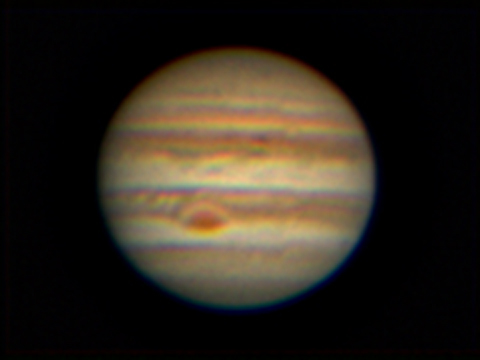
Jupiter in May 2017 showing the effects of atmospheric dispersion
The only solution to the first of these problems is to travel to the southern hemisphere but, happily, there is a solution to the second.
Atmospheric Dispersion Correctors
Atmospheric Dispersion Correctors (ADCs) are devices that can be placed prior to the eyepiece or imaging webcam to correct for the dispersion problem. They are made by a number of manufacturer’s such as ZWO, Pierro Astro and Astro Systems Holland. They use two prisms to reverse the colour separation caused by the atmosphere. When the two are aligned as in Figure (a) below, there is no dispersion correction applied but when, as in (b), the two are rotated equally away from the null position the amount of correction increases.
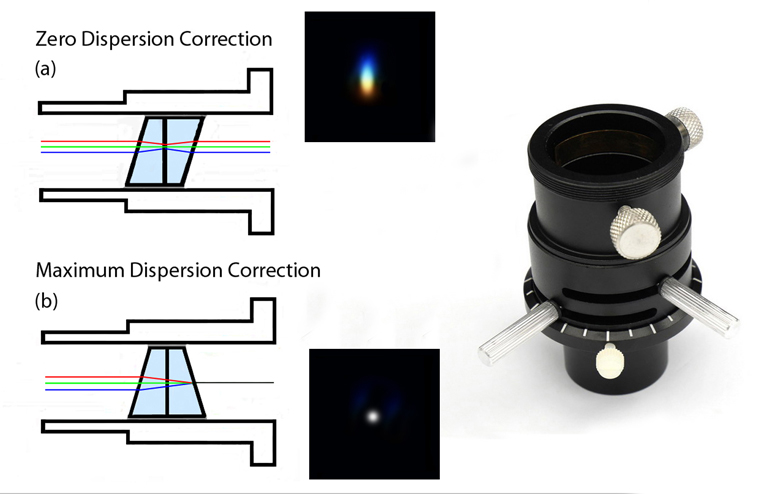
The dispersion correction is adjusted by rotating the two prisms using the control levers as seen in the image of the ZWO Atmospheric Dispersion Corrector.
They work best at long effective focal lengths so should be located between the Barlow lens (if employed to increase the effective focal ratio) and eyepiece or webcam. Atmospheric dispersion always spreads the light out in a vertical direction so the ADC needs to be orientated so its overall dispersion axis is also vertical. Usually, as in the case of my ZWO ADC, this is simply done by ensuring that the mid-point of the two prism adjustment levers is horizontal. To find the optimum setting of the prisms, the ADC levers are moved equally away from the zero point until the planets colour is seen to be even all round the limb. As an (excellent) alternative, a star at the same elevation could be observed first: without correction a vertical spectrum will be seen and the prisms are adjusted until a clean stellar image is produced.
[Note: The insertion of an ADC in the optical path may well mean that if a star diagonal is used to make the viewing easier one cannot bring the planetary image to focus. Though, as Jupiter and Saturn are at such low elevations for the next few years, this is not too much of a problem.]
Partial correction for atmospheric dispersion when imaging without the use of an ADC
There are several ways that a planetary can make a partial (but still good) correction even if no ADC has been used when capturing the video sequence.
Using Registax 6
The figure below is a screen shot is of Jupiter taken when at a relatively low elevation and processed as usual in Registax (I tend to use Registax 4 for planetary imaging). To improve the adjustment accuracy, the image has been exported into Adobe Photoshop (or any other suitable program) and resized upwards by a factor of two. This image is then imported into Registax 6. On the right hand side of the screen are seen a number of function tabs, one of which is called ‘RGB Align’. When clicked upon, this opens up a window which allows the red and blue channels of the image to be moved, pixel by pixel, with respect to the green channel so, as seen in the inset, the effects of the atmospheric refraction can be significantly reduced.
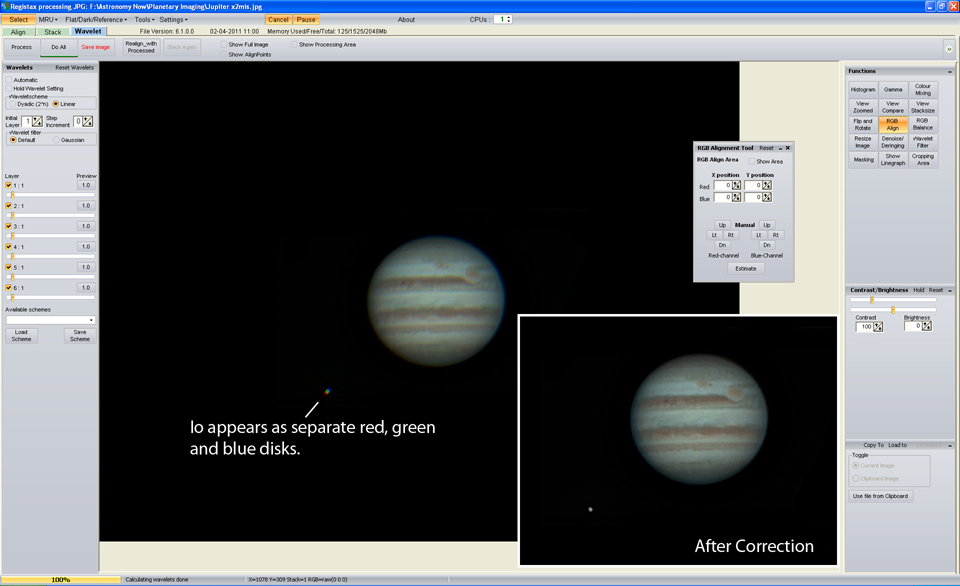
The use of Registax to align the red, green and blue channels to reduce the atmospheric dispersion.
[When using a monochrome webcam and colour filters, the alignment of the red, green and blue individual monochrome images will perform a similar correction to mitigate the effects atmospheric dispersion.]
Using AutoStakkert! 2
If the analysis of the video file is to be processed in AutoStakkert! 2, then all that has to be done is to tick the ‘RGB Align’ box at the right of the opening screen. The alignment is then done automatically for you. Simples. [Note: this word is now in the Oxford English Dictionary.]
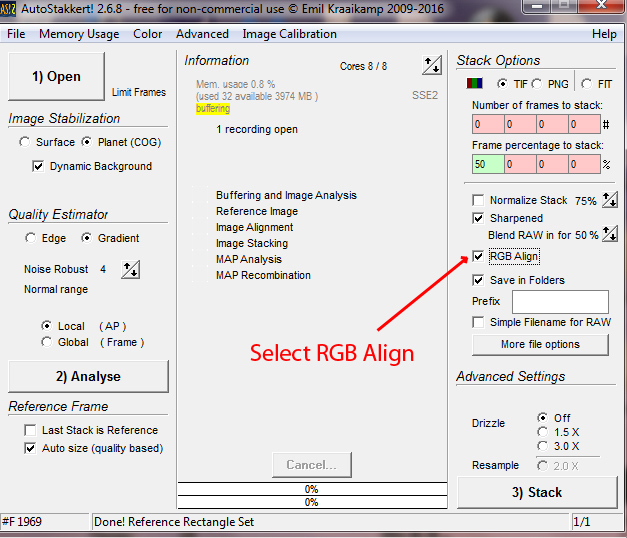
Dispersion correction using AutoStakkert! 2
In Adobe Photoshop
As an alternative to using Registax 6 to carry out the RGB alignment, one can open the image in Photoshop and open up the channels. If the red channel is deselected by clicking on the ‘eye’ and the blue channel is selected (to become blue), the blue channel position can be adjusted using the ‘move’ tool to overlay it over the green channel. In the same way by deselecting the blue channel and selecting the red channel it too can be aligned onto the green channel. With red, green and blue channels selected the full colour image is seen and can be saved.
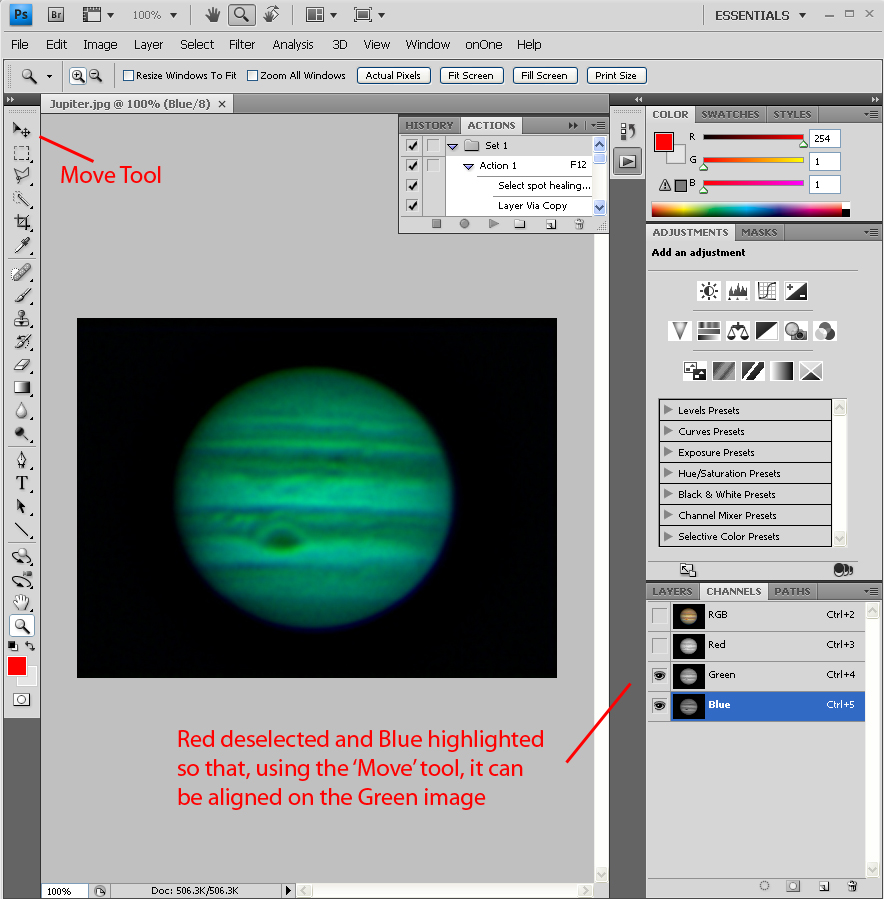
Dispersion correction using Photoshop to align the blue channel over the green channel
These techniques cannot, of course, remove the effects of dispersion across the red, green and blue pass bands, this being particularly significant in the blue, so the effects of the atmosphere can be only partially removed and an ADC could well be a very useful accessory for use in the next few years.
Well worth reading is an excellent and detailed discussion of Atmospheric Dispersion Correction that can be found at https://skyinspector.co.uk/atm-dispersion-corrector–adc.
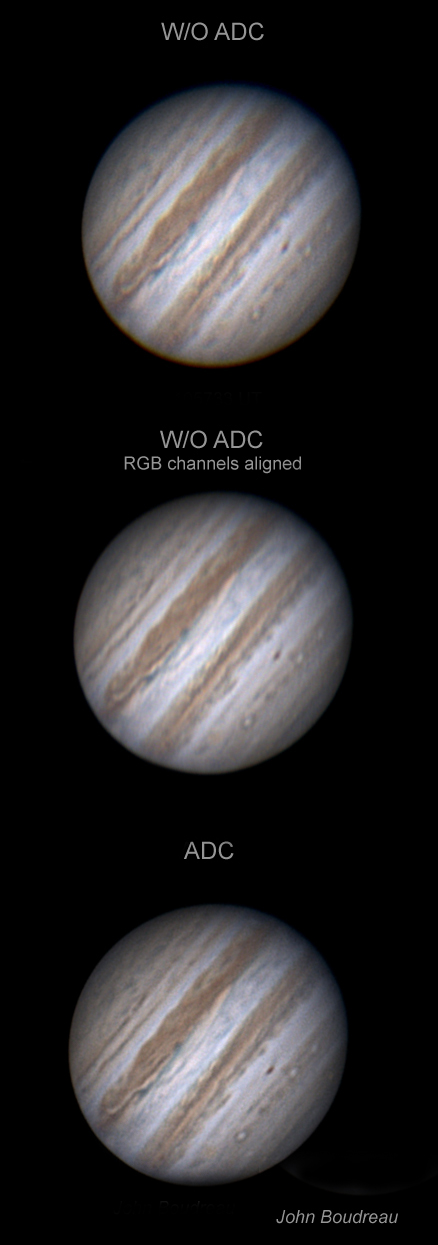
Jupiter imaged by the top planetary imager, John Boudreau: comparing an uncorrected image (top) with that corrected by the use of a ZWO Atmospheric Dispersion Corrector (bottom) and where the red, green and blue channels have been aligned (middle).
Return to Astronomy Digest home page