DECEMBER 2019
Could Jpegs sometimes be better than raw? A test imaging the Hyades and Pleiades Clusters.
[This is just one of many articles in the author’s Astronomy Digest.]
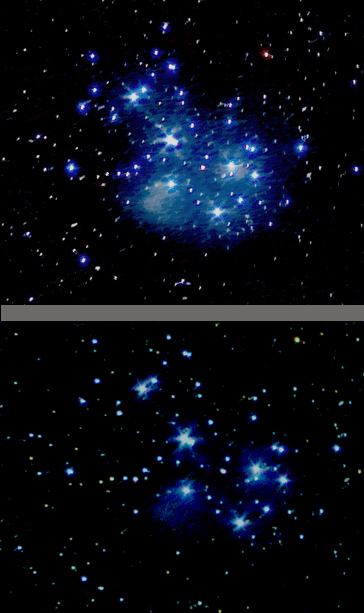
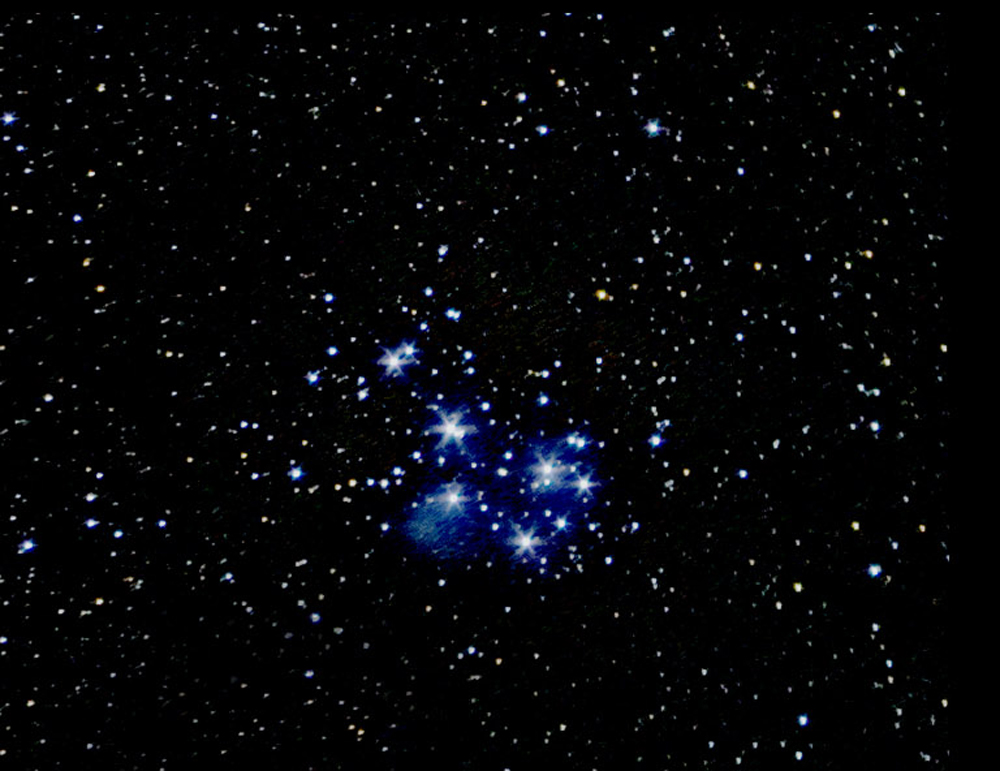
The conventional wisdom is that stackingand aligning raw files – which may have a 12 or even 14-bit depth must bebetter than using Jpegs which have onlyan 8-bit depth and may well show artefacts. Over the years I have beensurprised how well images have turned out when only Jpegs have been taken sodecided to carry out a test processing both sets, raw and Jpeg, of 50, 25second frames, taken with a superb 45mmZeiss Contax G lens (set to f/4) mounted using an adapter on to my Sony A5000mirrorless camera. (See article in the digest about this camera.) An ISO of 350 was used. The frames were taken from an urban location(and sadly over the town centre) but with a reasonably transparent sky and anoverhead limiting magnitude of 5.5. Theframes thus included a significant amount of light pollution. As seen below, I found that the result fromusing the Jpeg frames appeared moreattractive than that derived from the raw frames. In particular, the Jpeg result showed thenebulosity surrounding the Pleiades Cluster far better. Why could this be?
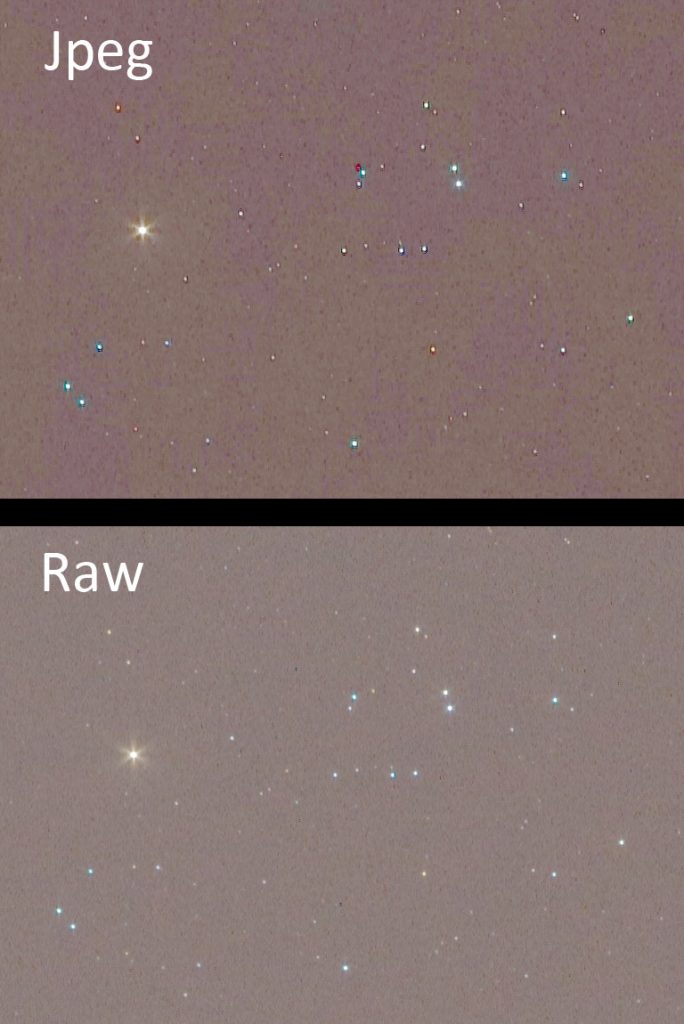
There is absolutely no doubt that a singleJpeg bears no comparison to a single raw image as the crops of the regioncontaining Aldeberan and part of the Hyades Cluster show.
But what if a large number, in this cases50, Jpegs are aligned and averaged? Itturns out that the advantage of raw over Jpeg is greatly reduced.
HowJpegs can rival raw files.
The key point in the description above isthat 50 frames were stacked. As I willtry to explain, this greatly increases the effective bit depth of the result providing noise is present in the image. So this advantage of using raw files maynot be as significant.
The signal relating to each pixel isconverted into a digital number in an analogue-to-digital converter. Consider this scenario. Suppose the actual value of the output of apixel, using a 12-bit converter to digitise the output from a pixelis 221.3. This will be stored in the rawfile. If this value were reduced to8-bits in the Jpeg conversion it could only give integer results of 221 or 222. (The 8-bit range is 0-256.) If there was no noise affecting the output ofthe pixel the A-D would always give the nearest value which is 221. Obviously not as good. However now let’s add some noise into thesignal that is output from the pixel –there will be! The values successivelyread out from the A-D will now vary, certainly giving values of 221 and 222 andquite likely some (but fewer) values of 220 and 223. Because the real value of the pixel output is221.3, there will be more readings giving 221 and 220 and fewer of 222 and 223. If a reasonable number of these 8-bit valuesare averaged – as will happen when a set of Jpeg frames are aligned and stackedusing 16 or even 32 bit-depth accumulators, the average will lie closer to 221than 222 and will likely to be very close to 221.3. So averaging a number of 8 it values wherenoise is present will increase the effective bit depth of the result so eliminatingthat advantage of raw files. I promisethat this is true.
I also suspect that when converting the sensor data into a Jpeg, some ‘stretching’ of the image is carried out to lift up the fainter parts of the image. This is confirmed as, when processing the raw and Jpeg stacked images, I have had to stretch the raw image further to give a similar result. It is possible that when the camera produces the Jpeg, it may also apply some tone mapping and other effects – this could help to bring out some parts of the image. This sometimes appears to be the case when I have compared single raw and Jpeg frames − not just relating to astrophotography − and will depend on the camera being used. Averaging a number of frames could also probably reduce or remove the Jpeg the artefacts that are present and seen in the single frame above. So it is not impossible that stacking a reasonable number of Jpeg frames (say 30 or more) could actually give a better result − as I believe in this image.
Processingthe raw and Jpeg images
Sequator (see article in the Digest) was used – it is very fast. The frames were loaded into Sequator and aligned and stacked without using any of the possible adjustments. The 16-bit Tiff result was then loaded and processed in Adobe Photoshop. However the free program Glimpse could also be used.
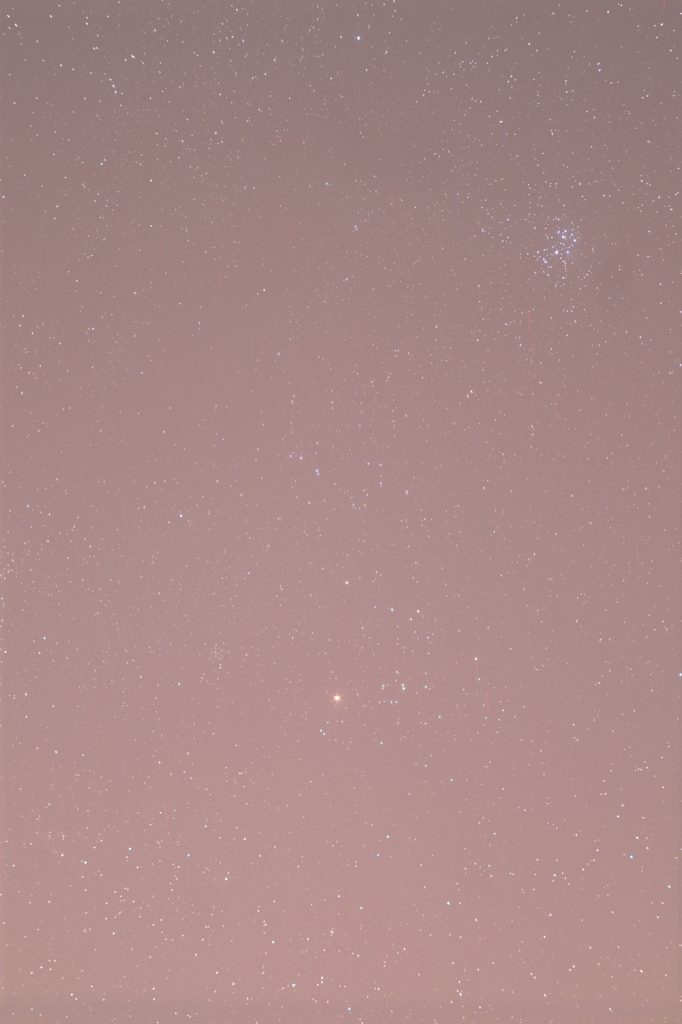
The stacked image below showed, asexpected, significant light pollution.
Removingthe Light pollution
The image was duplicated and the ‘Dust andScratches’ filter applied with a radius of 30 pixels. The filter ‘thinks’ thestars are dust and removes them but the Pleaides cluster and Aldebaran arestill visible.
These were cloned out from an adjacent partof the image (hoping that the light pollution will be similar) and the Gaussian Blur filter applied also with a radius of 40pixels to give a very smooth image of the light pollution which varies acrossthe frame.
The two layers were then flattened usingthe ‘Difference’ blending mode with an opacity (default) of 100%. The light pollution is removed from theoriginal frame.
Stretchingthe image
Either the levels or curves tools can beused. In levels, move the central sliderleftwards to 1.2. This brightens up thefainter parts of the image more than the brighter. After a few applications to suit yourpreference, a further application is used moving the left slider to the right to increase theblack point and so remove the noise from the image.
In curves, lift up the left hand part ofthe curve to have the same effect.
Hotpixels and their removal
I had deliberately slightly misaligned theaxis of the nanotracker on the North Celestial Pole. This was done to eliminate what Tony Hallascalls ‘Color Mottling’ (He is American.) − variations in thesensitivity of different colour pixels on scale sizes of ~20 pixels. This can give the background noise, whichshould be a uniform very dark gray, a random coloured pattern. Because of the misalignment, over the course of the imaging exercise thestars − but not the hot pixels −will move across the sensor. They will thus give a linear track when theframes are aligned and stacked as seen in the image below. Had Iused the ‘In Camera Long Exposure Noise reduction’ when the camera follows eachlight frame with a dark frame, the hot pixels would have been eliminated. But this both adds some noise to each framebut also halves the time imaging the sky! So my Jpeg result showed quite a number of red and blue streaks acrossthe image. I thus had to spend a fewminutes ‘spotting’ them out with a black brush. What I do not understand too well is thatthe result of aligning and stacking the raw frames as described below did notshow them. This, I suspect, is becausethe Jpeg conversion stretched the image and so increased their brightnessrelative to that in the raw frames. Asthe misalignment spreads out their light, it could be that they came below thenoise level in the raw result.
Thefinal Jpeg result
As shown in the image at the head of the article, the six bladed iris of the Zeiss lens gives the brighter stars a 6 pointed diffraction pattern. That of Aldebaran has been ‘softened’ using a local application of the Gaussian Blur filter. There is a small open cluster, NGC 1467 over to the left of Aldebaran. I was really pleased how much nebulosity surrounding the Pleiades cluster had been capture in the Jpeg version.
Processingthe raw frames
The Sony camera produces .arw files whichcan be accepted by Sequator. They canalso be converted into .Tiff files in both AdobeLightroom or Sony’s own raw converter.
I first loaded the set of raw files into Sequator and removed the light pollution and then stretched the result exactly as for the Jpeg result. I was very disappointed with the result. The crops below show the region of the Pleaides Cluster compared to that of the Jpeg version. The nebulosity is not nearly as well delineated in the raw image below.
In another article in the digest, I haveadvocated (as have others) first converting the raw frames into Tiff files andthen stacking these. Theoretically, theresult should be no different, but it is often better. So I did this and aligned and stacked them inSequator with the result shown belowin comparison with the Jpeg result. Better, but still not as good.
I have also aligned and stacked the framesin Deep Sky Stacker and there was noobvious difference.
Conclusion
The results did not totally surprise me asI have had pleasing results when I have only captured Jpeg frames, but thedifference was far more than I had expected. I can see, as explained above, why when averaging many Jpeg frames theirobvious loss of quality can be partially overcome. But that should not make the result betterthan stacking raw frames. I can onlysurmise that the suspected stretching of the image when the camera produced theJpeg version has helped. In principle,one could do a slight stretch of each Tiff file before the stacking process andthat may improve the result. So I triedconverting the raw files in Adobe Lightroom applying a tone curve to lift upthe fainter parts of the image. Theoverall result was better but the nebulosity was still not as well captured aswith stacking the Jpeg files. It must bepossible to get a better result using the raw files – but I do not know how todo it.
The moral is this: build up the sensitivity of the image by taking many (at least 30) short exposures and store both Jpegs and raw files for each frame. Process both and you might find, as in this example, that you prefer the Jpeg result.
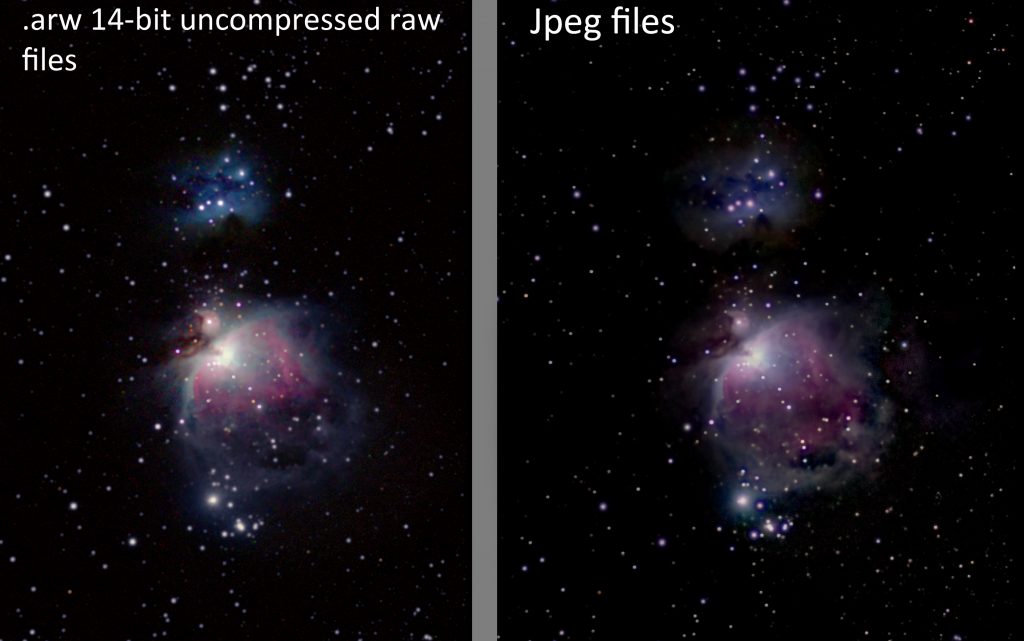
A second example
As an imaging exercise, I used a Sony A7 II and Zeiss (East Germany) 200 mm lens to image the Sword of Orion capturing both raw and extra fine Jpegs. 53, 17 second exposures were taken so as not to over expose the central part of the Orion Nebula using an ISO of 2,000. Both raw and Jpeg stacked images were processed identically save for the fact that I had to employ more stretching of the raw image. The results were virtually identical but, in a very tight crop of just the nebula, the Jpeg version showed the faint nebulosity down to the lower right of the nebula better.