JUNE 2020
Deconvolution Sharpening
[This is just one of many articles in the author’s Astronomy Digest.]
There are many methods of sharpening; those included in Adobe Photoshop or Affinity Photo include ‘Unsharp Mask’, ‘Smart Sharpen’ and ‘High Pass Sharpening’. I would class these as ‘Actuance’ sharpening methods. A further, distinct method is called ‘Wavelet Sharpening whilst a third, and the main topic of this article, is called ‘Deconvolution Sharpening’. Though this might be pedantic, the former do not actually sharpen an image, they merely make it appear sharper. However, the latter does actually attempt to extract more detail out of the taken image and so is a true sharpening method. Ironically, the image resulting from its use, though showing more detail, may well not look sharper and so perhaps a little Actuance sharpening might be applied to give the best overall result. Pleasingly, there are now available three free software programs that can carry out Deconvolution Sharpening.
I think that it is worth briefly discussing the two former methodsas, later in the article, I will try to show some comparisons.
ActuanceSharpening
Though ‘Smart Sharpen’ may be a little more sophisticated than Unsharp Mask Sharpening (and, it is said, applies one iteration of deconvolution sharpening) these effectively add ‘acutance’ to an image by increasing the ‘microcontrast’ at changes in brightness in the image; if at an edge in an image the brightness went from a dark grey to a light grey, at the dark grey side it would be made darker and at the light grey side it would be made lighter so accentuating the difference. The image below shows precisely this; shown at ~400%, Smart Sharpen was applied to the brightness change in the top image to give the result below. [Pleasingly this worked exactly as I had expected.]

High Passsharpening
This is rather similar process to the above but takes a little more effort. The image is duplicated and the ‘High Pass’ filter applied to the duplicate layer with a radius of a few pixels. This layer becomes mid grey except at the edges within the image. The pixel radius used can be adjusted and, with the blending mode is set to ‘Overlay’, the sharpening amount can be controlled with the opacity slider. A nice ‘sharpening’ tool.
There is an excellent video tutorial about the use of Smart Sharpen and High Pass Sharpening with the title ‘Image Sharpening Techniques in Photoshop’. Well worth searching for.
Waveletsharpening
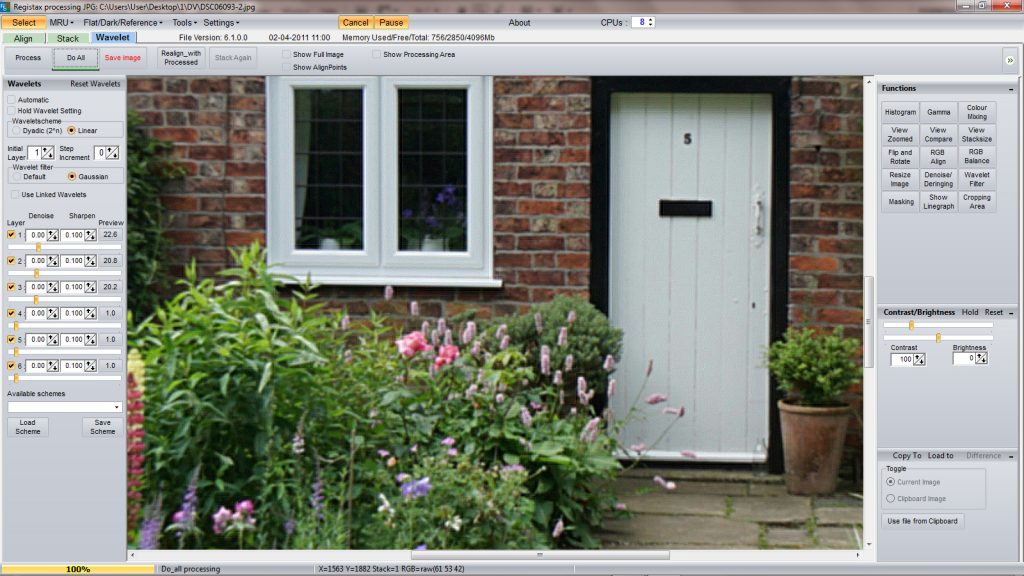
This is a very interesting method of sharpening and is availablein Registax 6, for example. The image is dissected into 6 layers eachcontaining the information in differing ‘spatial frequency’ bands – from largescale features to very fine detail. Thebrightness of each of these layers can be individually adjusted and if, inparticular, the brightness of the three finest layers (1 – 3 in Registax) isincreased, the sharpness of the image will be enhanced. This is very probably a better method thanthe ‘acutance’ methods above, but again I am not sure that this is truesharpening.
DeconvolutionSharpening
Deconvolution Sharpening was developed to improve the images from the Hubble Space telescope before corrective optics were added to compensate for its improperly shaped mirror. It is also said to be used to enhance the images from spy satellites! In my professional career as a radio astronomer, I have used it to greatly improve the images produced by a ‘sparse’ array of radio telescopes.
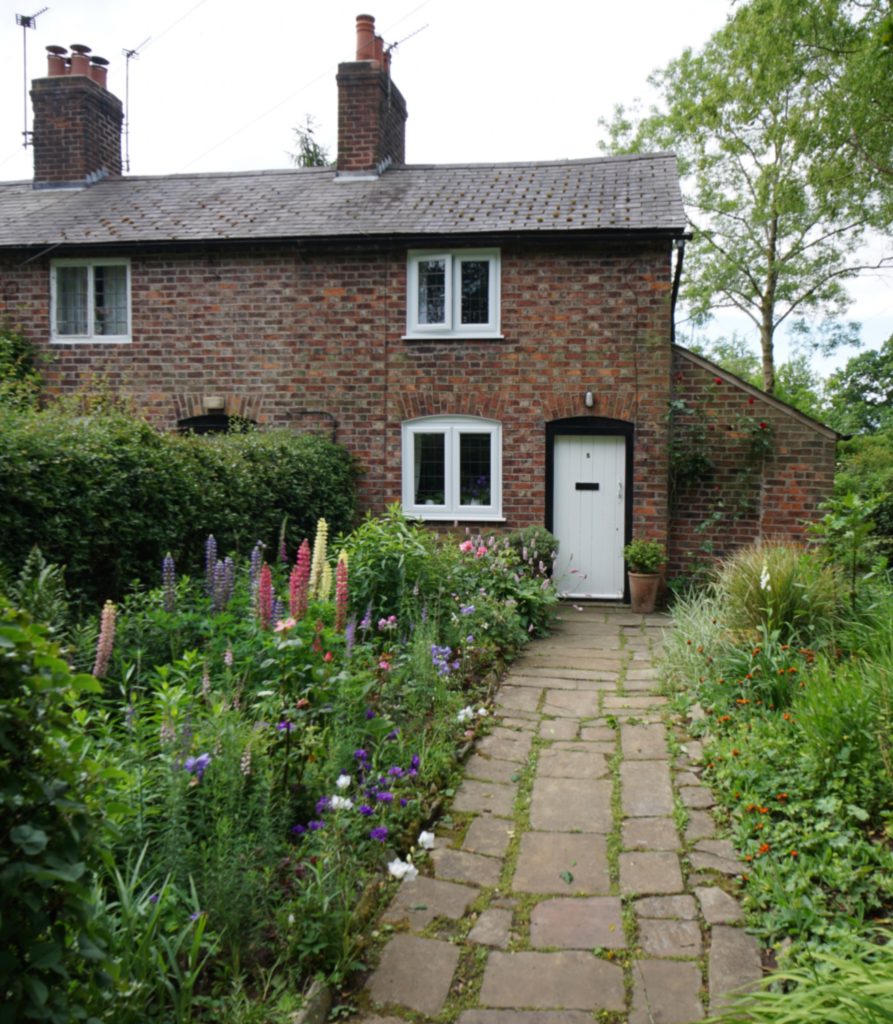
Let me try to explain how it works in relation to an astronomical image of the Moon, Let’s assume that one is using a 127mm aperture telescope to image and there is no atmospheric turbulence (we wish). The image that would be captured would be the actual image ‘convolved’ with the diffraction effect of the limited aperture – an Airy disk with a diameter of ~1.2 arc seconds surrounded by lower brightness rings. The central disk would have an approximate Gaussian shape. If the deconvolution sharpening software ‘knows’ what this shape of is – called the ‘point spread function’ (as this is what would be seen if a point source were imaged) – then the software attempts to deduce what the original would be like. Usually a Gaussian point spread function is used – which works pretty well when a telescope is used. It is an iterative process and, having spent a little time setting the appropriate parameters, will actually take quite a while to produce the final image; using an i7 processor, sharpening a 24 megapixel image took over a minute with three of the programs that I have used. But, having said this, RawTherapee, one of the three free programs that can carry out deconvolution sharpening, is exceedingly quick even when it is said to be carrying out 100 iterations.
Softwareto implement Deconvolution Sharpening
For some years I have been using the excellent program Astra Image to sharpen my images and, for $42, it includes several additional image enhancement tools. A very nice feature of Astra Image is that a small area of the image can be selected and, fairly quickly, adjustments, such as the number of iterations to be employed, can be made whilst observing the result. Having found the best combination, the process is then applied to the whole image.
There are now three programs that can implement deconvolution sharpening available for free download.
The first is found in the astroimaging package ImagesPlus. Having opened up the ‘Smooth Sharpen’ menu, the tool ‘Adaptive Richardson – Lucy Restoration’ is selected. This brings up a control window. The initial default settings work well but one can alter both the ‘Point Spread Function’ size and the number of iterations applied. I do select the ‘Reduce Artifacts’ box. Again trial applications are needed to give the best result. (But these are applied to the full image, so take some time.)
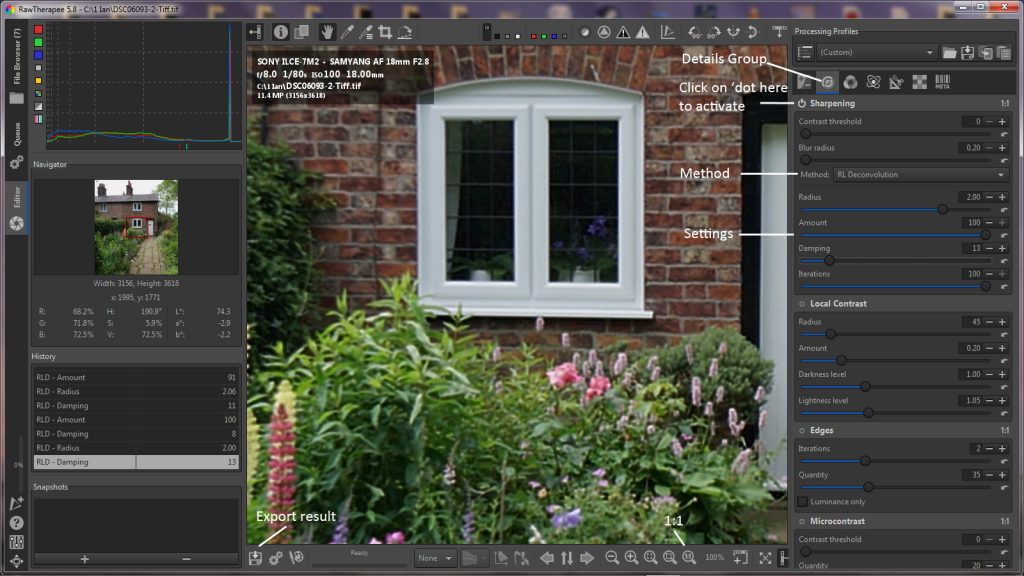
A second deconvolution sharpening tool is found in the program RawTherapee. Having loaded the image, the detail tab at the top right set of 7 tabs is selected and the small circle to the left of ‘Sharpening’ clicked upon to activate this specific tool. The ‘RL convolution’ method is selected and, with the image scale set to 1:1, the effects of adjusting the three sliders can be seen. The screen shot shows the required controls to be used and the image exporting tab when one is satisfied with the result.
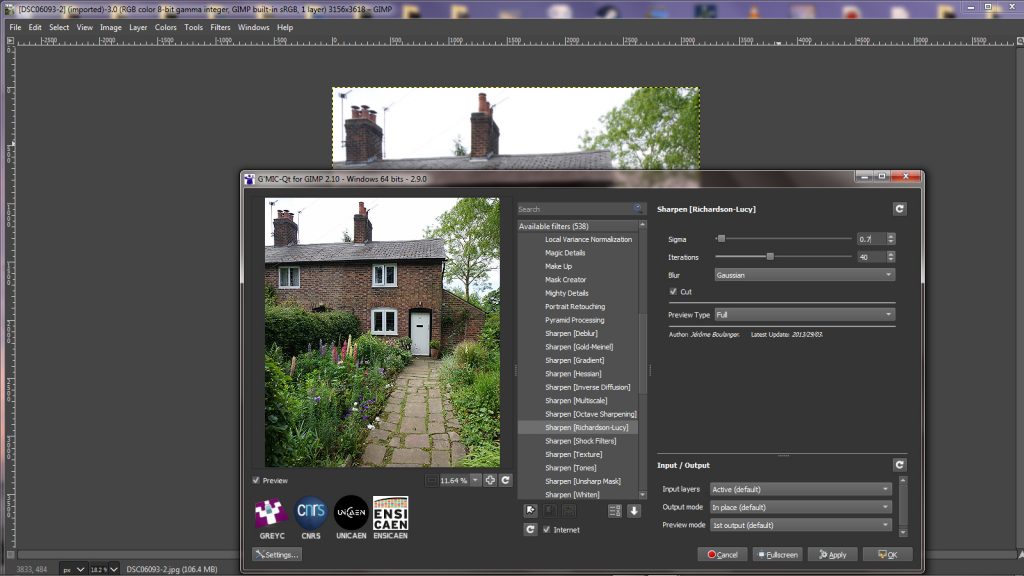
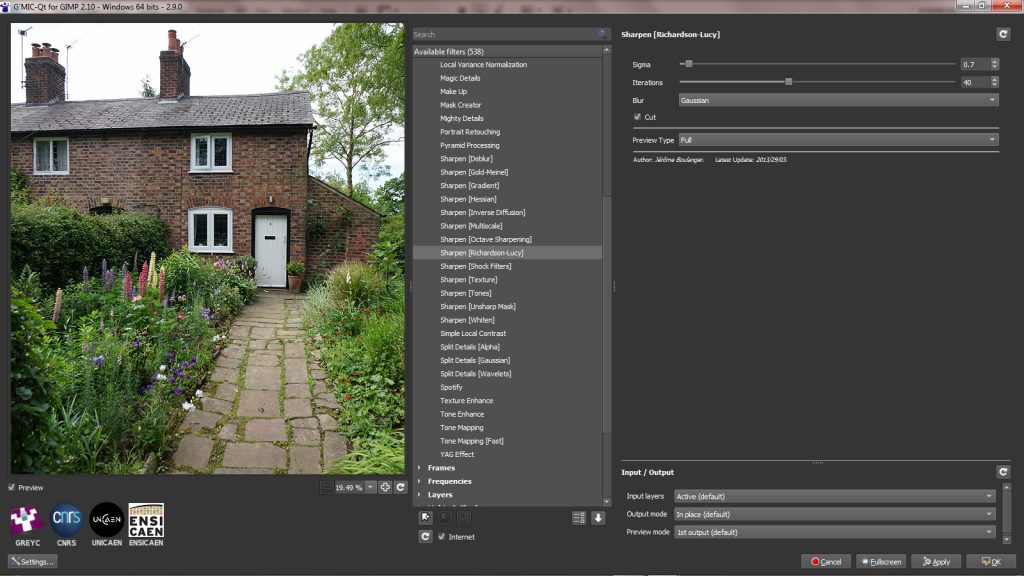
There is a further alternative available within the free program, GIMP, (which can now handle 16 bit-depth files) once a set of filters has been downloaded from gmic.eu/download.shtml. This collection of filters is free but a contribution would be appreciated. It has an excellent control window which, like Astra Image allows one to immediately see the effect on a small region of the image as the sharpening parameters are changed before committing to the overall result.
Having installed the GMIC filters, at the bottom of the GIMP included filter set should be seen ‘G’MIC-Qt..’. Clicking on this brings up a image window with a list of the filters at its right. The magnification should be adjusted so that an interesting region of the image is seen well. The ‘Details’ sub menu should be opened up and the ‘Sharpen [Richardson-Lucy]’ filter should be selected at which point the appropriate control sliders appear to the right.
The GMIC window can be made full screen.
ADeconvolution Sharpening Test
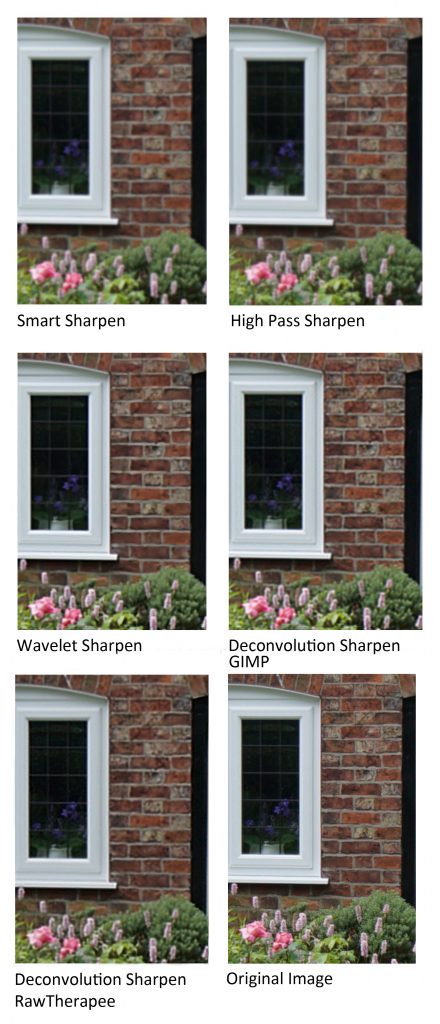
I took a test shot to compare the results of the differing sharpening methods. To this end I produced a slightly blurred (2 pixel radius Gaussian Blur) version of the image, as seen below, to see what the sharpening tools could do. I would then have an essentially perfect image (the original) with which to compare them.
To this I applied Smart Sharpen, High Pass sharpening, Wavelet sharpening and Deconvolution Sharpening and compared the results to the original and blurred images. The test images below are a very tight crop of the cropped image above. I tried to get the best results as I could using the different methods. In the case of Smart Sharpen and High Pass Sharpening, I used a radius of 2.5 pixels and adjusted the amount to give the best image (Opacity is used in the case of High Pass Sharpening) and for Wavelet Sharpening, I set the top three sliders to 20.
Devolution sharpening using GIMP
Deconvolution sharpening is a little more complex. ‘Gaussian’ was used as the point spread function. Observing the result when applied to the small area of the image, the value of Sigma and the number of iterations to be applied can be adjusted and the sharpened result can be immediately seen. There has to be a balance between them. Either increasing the value of Sigma or the number of iterations too much, the image will ‘blow up’ and become very noisy. It appears that using a smaller value of Sigma with a larger number of iterations gives a better result than a larger Sigma and few iterations. Having tried out many combinations, I chose 0.7 for the value of Sigma and 40 for the number of iterations. When satisfied with the result of sharpening the small area of the image, the OK button is clicked upon and the devolution iterations are applied to the whole image, taking some considerable time. When finished, the sharpened image appears in the main GIMP screen and is saved (actually ‘exported’ in GIMP).
I also chose a suitable combinations of the control parameters with RawTherapee which can be seen in the screen shot above.
The results of the differing sharpening tools are shown with the original image to the bottom right.