OCTOBER 2018
Imaging the Perseus Double Cluster with a One Shot Colour Camera or DSLR.
[This is just one of many articles in the author’s Astronomy Digest.]
There may come a time when a beginner might consider a cooled CCD or CMOS camera. Their great advantage lies in the word ‘cooled’ as, by reducing the sensor temperature to typically -20 Celcius, (and so perhaps 40 degrees below that of a DSLR sensor) the dark current made up of thermal electrons is reduced by a factor of more than 100 and its noise level by a factor of ~10. Images will thus contain far less noise and longer exposures are made possible as the greatly reduced dark current will not fill the pixel wells so quickly.
CCD cameras can use either monochrome or colour sensors. If monochrome, a further advantage over an unmodified DSLR is that the sensitivity to the deep red H-alpha emission will be significantly greater provided (as is usual) that the red filter of the LRGB set allows full transmission at the H-alpha emission line. However, of course, a set of four images need to be taken: R, G and B to provide a colour image with, usually, a higher resolution monochrome (luminance) image which is coloured using the RGB image.
Colour cameras employ a Bayer matrix of red, green and blue filters above each set of four pixels so that colour images are immediately captured. Many web discussions relate the relative merits of the two types and advanced imagers will tend to use monochrome cameras but there is no doubt that a colour camera is simpler to use and will cost significantly less. One great advantage is that a colour image can be acquired in a single imaging period and so, even if clouds roll in after an hour or so, one will still have data to process into a colour image.
The sensors used in colour (often called one-shot colour) CCD or CMOS cameras are usually those that have been employed for DSLR cameras − that in my QHY 8L was used in the Nikon D50. The Bayer matrix used will thus have the standard red filters and so, as with unmodified DSLR cameras, will only transmit ~25% of the deep red H-alpha emission. Dependant on what is being imaged, this can be a disadvantage.
‘One Shot’ colour cameras
Having perhaps been used to capturing images with a DSLR having an APSC sized sensor, one is unlikely to want a camera with a significantly smaller sensor. The lowest cost ‘One Shot Colour’ (OSC) camera currently on the market with an APSC sized sensor is the QHY QHY8L costing around £900 as shown in Figure 1. (This is available from Modern Astronomy : https://www.modernastronomy.com/) They also sell a 10 megapixel version, the QHY10 for ~£1,160.
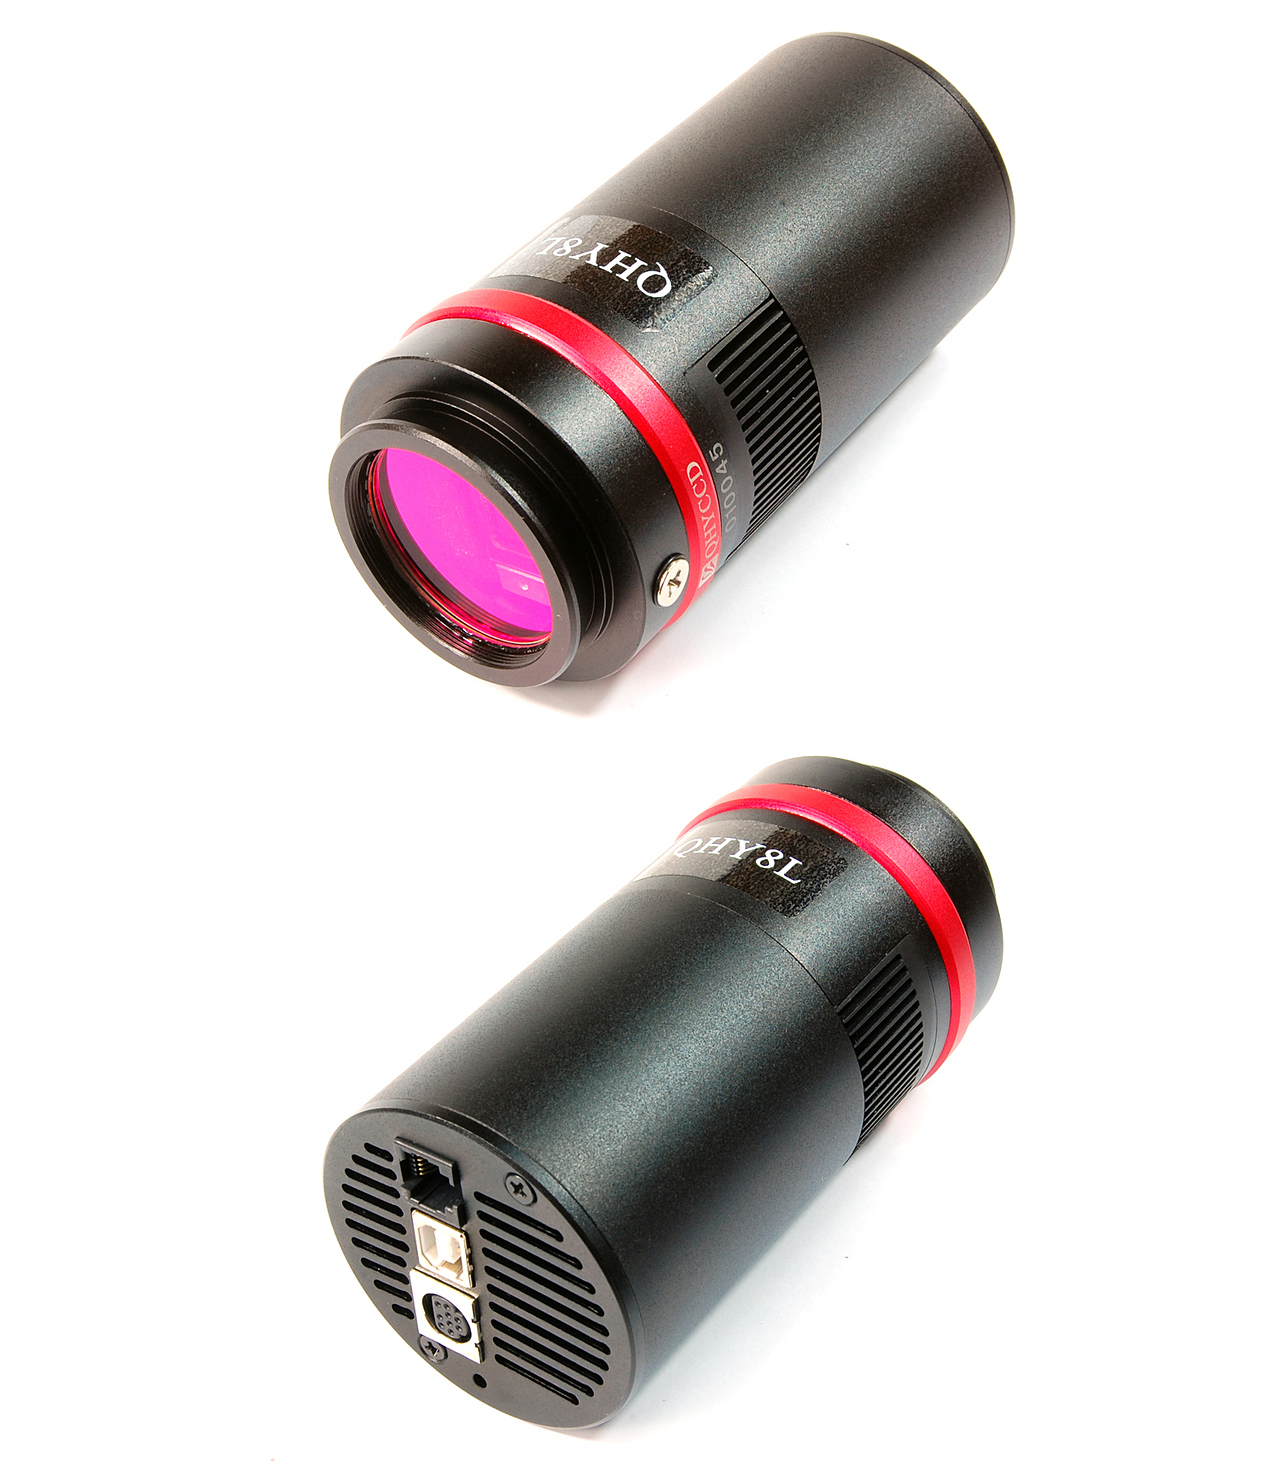
The QHY QHY8L 6 megapixel, one shot colour, cooled CCD camera.
A further one shot camera is the ‘ZWO ASI071MC Pro Cooled Colour APS-C 1.8″ One Shot Colour Deep Sky Imaging Camera’. This employs the superb 16 megapixel sensor that was used in the Nikon D7000 camera. (A camera that I have used for much of my astroimaging.) Its cost is ~£1,600 from Rother Valley Optics in the UK
The QHY QHY8L
The camera uses a 6 megapixel Sony sensor employing 7.8 micron square pixels and, most importantly, incorporates ‘set point cooling’ to cool the sensor to a specified temperature such as -20 Celsius. This makes the taking of dark frames at the same sensor temperature as the light frames far easier. The camera uses 16 bit digitisation and provides for 2*2 and 4*4 (monochrome only) binning modes. The 4*4 mode, which averages over 16 pixels, is significantly more sensitive and is used for rapid initial alignment on the selected object.
The EZcap capture software provided allows a sequential set of exposures to be taken which must be un-binned (1*1) to allow for colour capture. Though these can be exported in the JPEG format, only 8 bits per colour will then be saved and in order to retain the full 16 bits of data per pixel, images must be saved using the FITS format. This is a raw file format which saves a 16 bit word for each pixel but contains no colour information. The software processing the data must thus be told the format of the colour filter matrix in order to ‘deBayer’ the raw data to produce a colour image.
Using Deep Sky Stacker (DSS) to align and stack the captured frames
When a set of FITS images to be aligned and stacked is loaded into DSS (https://deepskystacker.free.fr/), the ‘FITS Files’ section within the ‘Raw/FITS DPP settings’ window must be opened and the appropriate Bayer matrix employed by the sensor selected (‘GBRG’ in the case of the QHY8L). DSS (then appropriately debayers the monochrome images to give each colour a 16 bit depth in the output TIFF file.
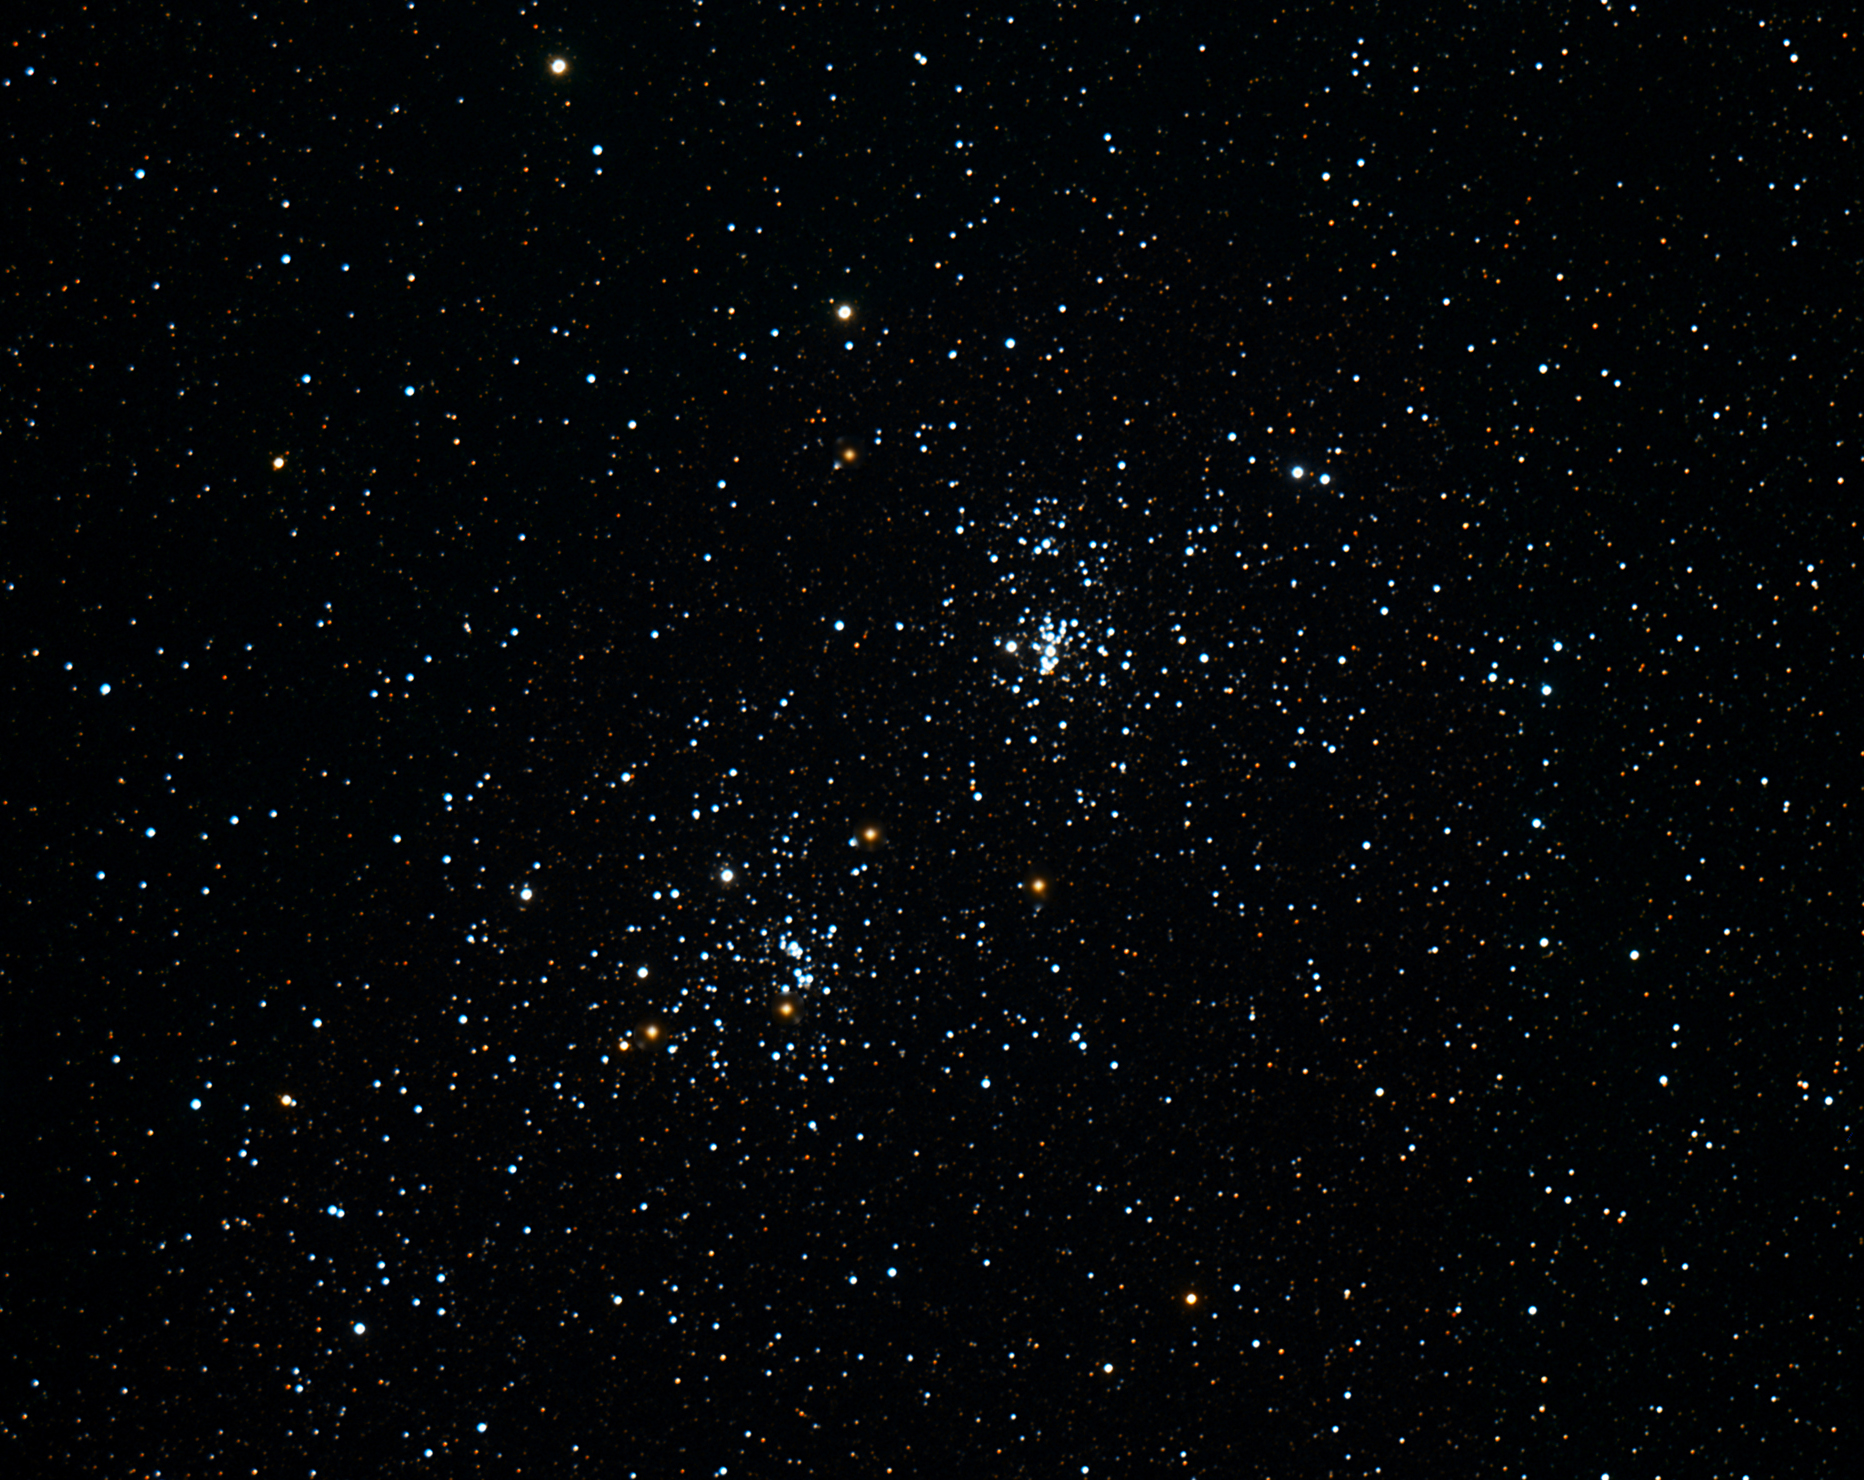
Imaging the Perseus Double Cluster
One advantage of having a number of telescopes of differing focal lengths is that an appropriate one can be chosen so that the field of view given with it and the chosen camera nicely frames the subject. A program, such as the Sky at Night field of view calculator (https://www.skyatnightmagazine.com/astronomy-field-view-calculator) will allow one to select a telescope and camera from a very wide selection and show the field of view that will be imaged when a particular object is selected. The Perseus Double Cluster does not have a single formal name but comprises the two open clusters, NGC 869 and NGC 884. Putting NGC 869 into the field of view calculator along with my Wiliam Optics Megrez 72 refractor and QHY8L camera gave the field of view shown in the image below. This shows that if the field is centred between the two, both will be nicely encompassed.
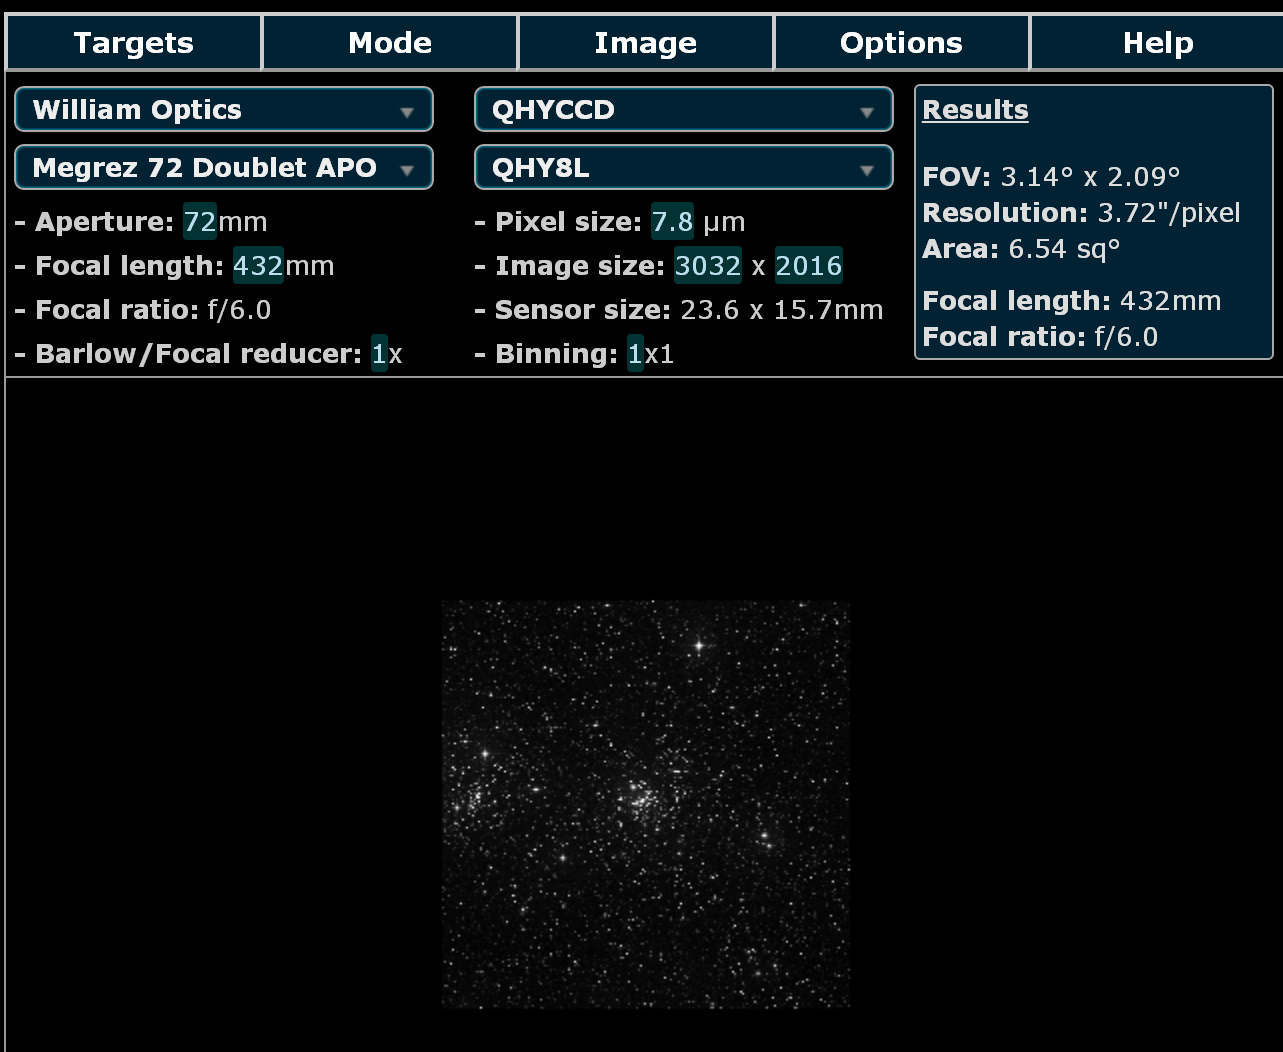 Screenshot of the field of view calculator output
The 72mm William Optics Megrez refractor (having a focal length of 432mm) was used with a Teleskop Service 2inch field flattener and Astronomic CLS light pollution filter. It was mounted in parallel with an 80mm f/5 refractor and QHY6 guide camera to apply guide corrections (using PHD guiding software) to an Astro-Physics Mach 1GTO mount.
These star clusters are relatively bright and so, if using a cooled colour camera, a total exposure time of ~30 minutes is sufficient. Using the QHY8L, the EZcap software was set to take 6, 6 minute, exposures to give a total exposure of 36 minutes. It is always useful to view the individual images to check for any faults such as guiding errors and hence trailed stars. This can be done with the free program IRIS (https://www.astrosurf.com/buil/us/iris/iris.htm) which will produce a monochrome image when a FITS file is loaded. The set of FITS files were imported (with the appropriate GBRG debayer matrix selected) into DSS for alignment and stacking along with a set of dark frames. These, taken with the same sensor temperature and exposure time, allow hot pixels and some amplifier glow in the extreme top left of the image to be removed. A total of 10 dark frames were taken.
Imaging with a DSLR
The Double Cluster can also be easily captured with a DSLR but then I would take short exposures (~30 seconds) to account for the higher dark current and increase the total exposure time to 60 minutes. The article ‘The use of Dark Frames when using a DSLR’ will, I hope, give some useful advice. As described in the article ‘A wide field imaging exercise – the Cygnus region’, I would be inclined to first convert the raw files produced by the camera into Tiff files as I suspect that most raw converters use a better de-Bayering algorithm than that does DSS.
The aligned and stacked image, seen in the image below, was exported as a 16-bit TIFF file into Adobe Photoshop. Now that the latest version of the free program GIMP can handle 16 bit data, this could be used in exactly the same way.
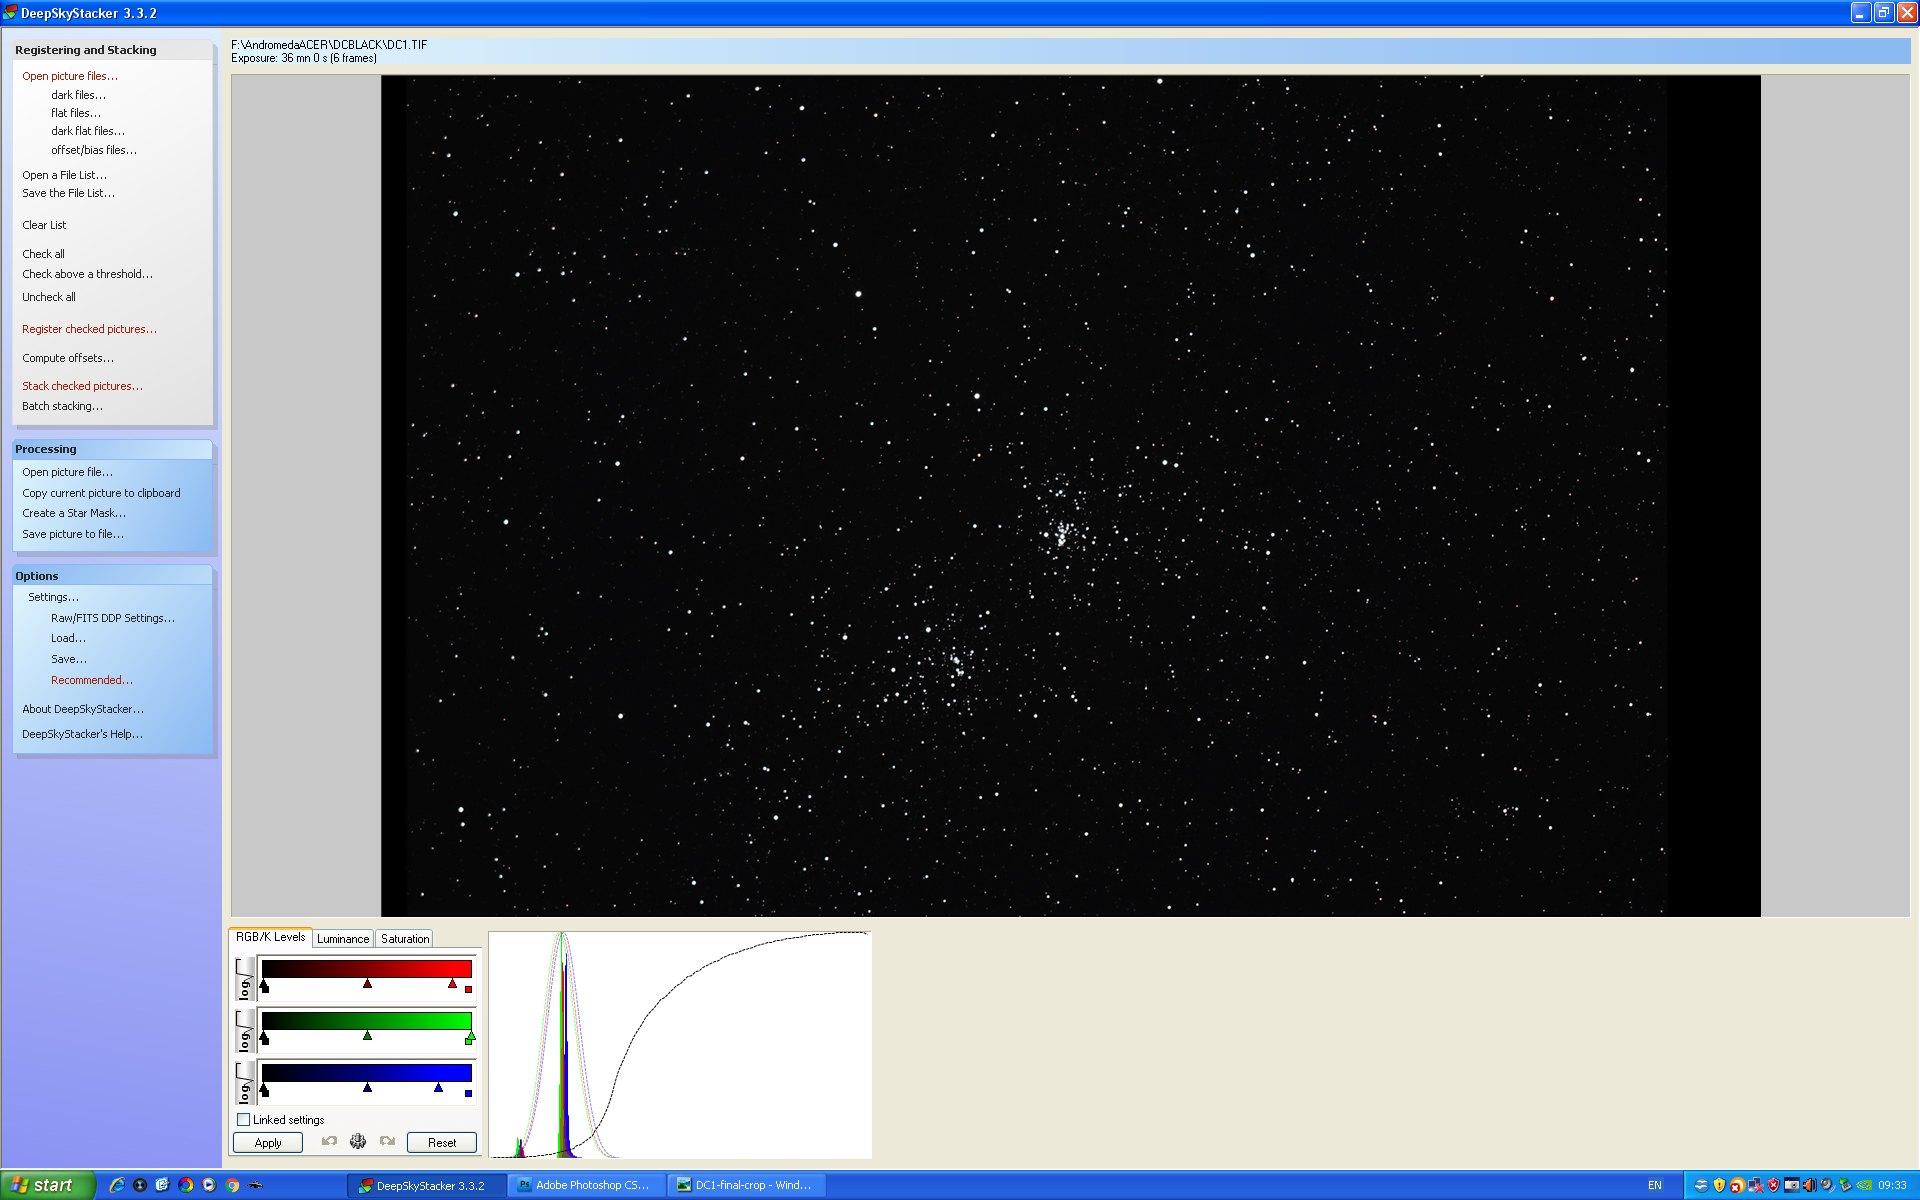 The output from Deep Sky Stacker having stacked 6, 6 minute, guided exposures.
It was then stretched using 4 applications of the curves function as shown below. This lifts the brightness of the fainter stars but not that of the brighter ones.
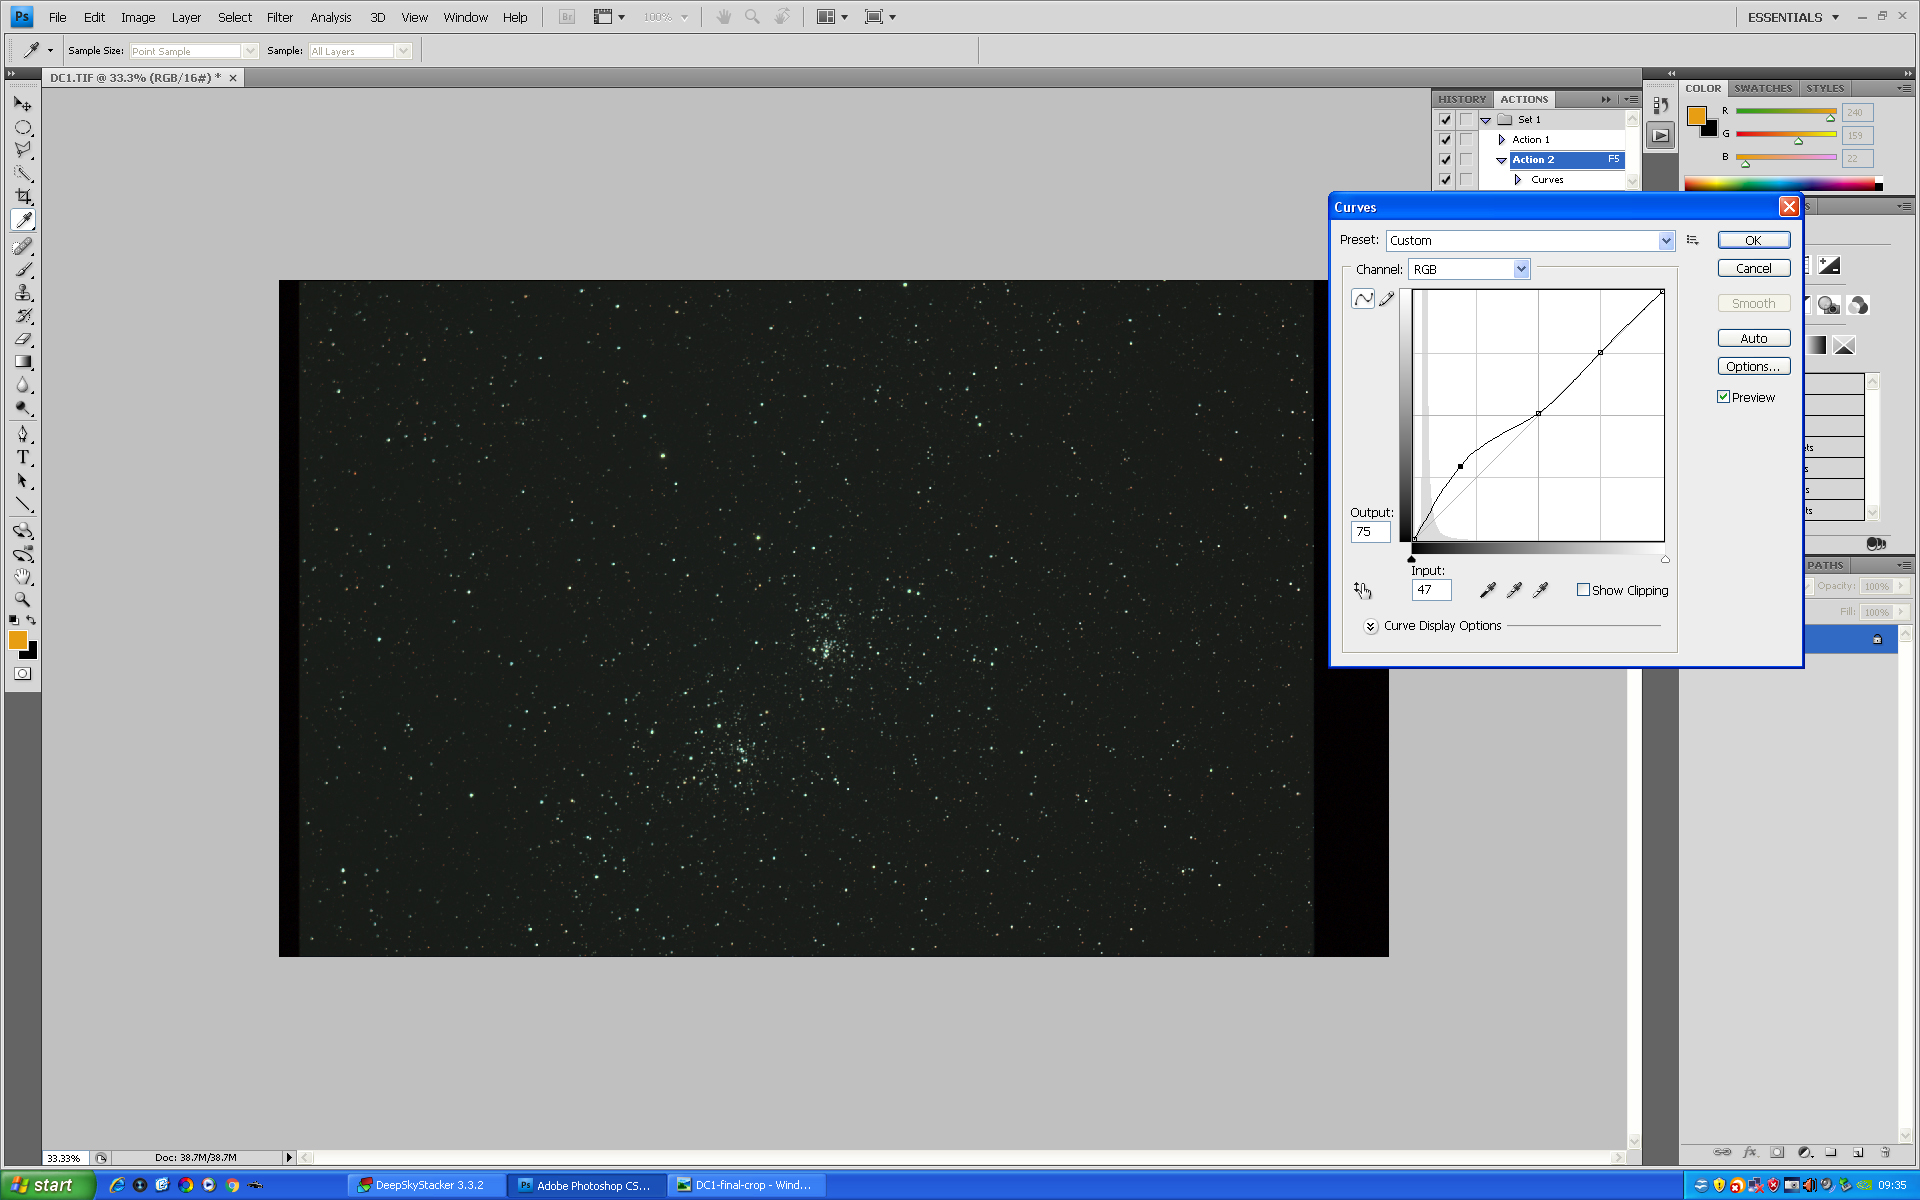 The image was stretched in Adobe Photoshop using 4 applications of the curves function.
To reduce the background noise in the image, the levels command was then used to bring up the black point.
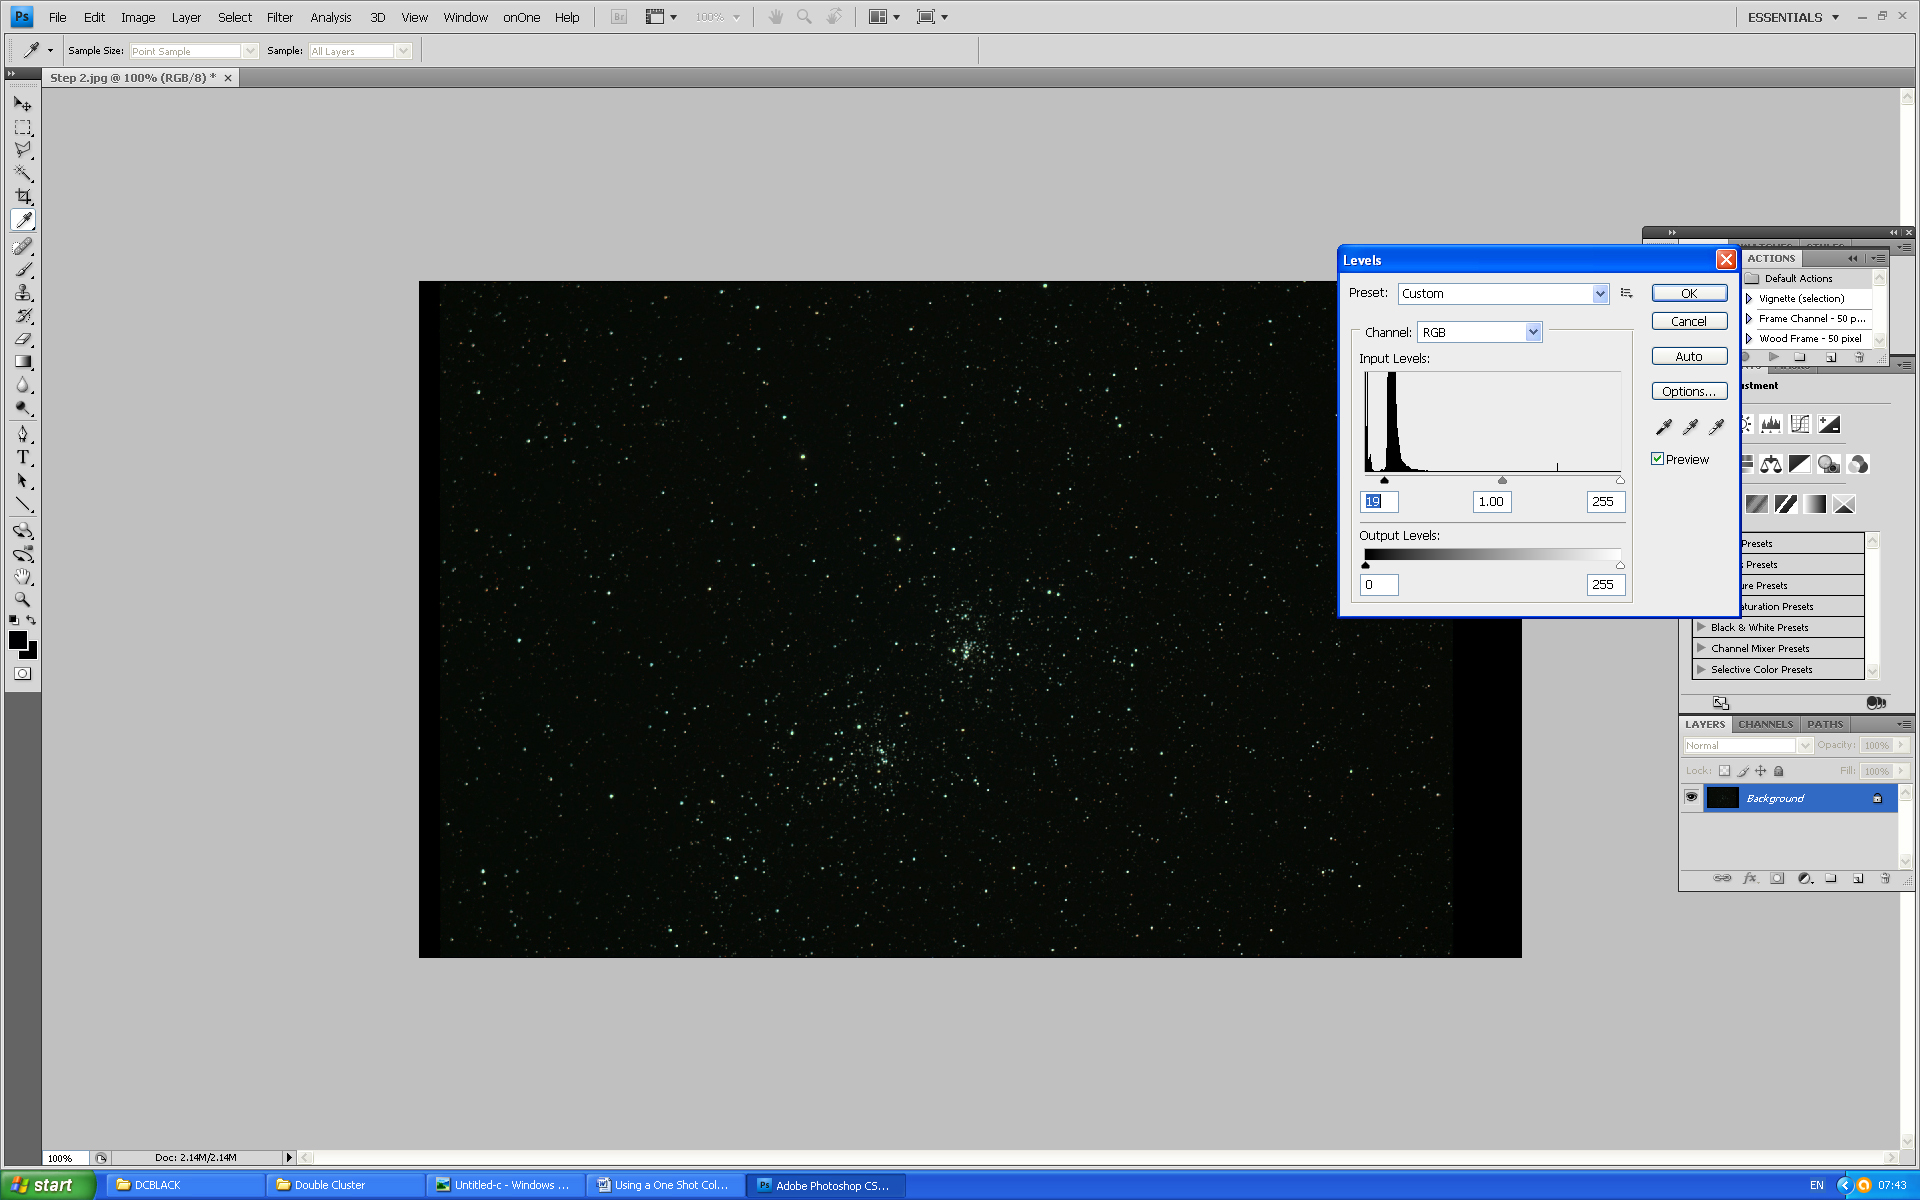 In the levels function, the black point was increased to reduce the background noise level.
Perhaps due to the greater sensitivity of the sensor to green, bright stars showed a green cast. This was removed by an application of the filter ‘Hasta La Vista, Green!’ as seen in the screenshot below. This filter is a free, downloadable, filter for Adobe Photoshop which can be found at https://www.deepskycolors.com/archivo/2010/04/26/hasta-La-Vista-Green.html.
 The ‘Hasta La Vista Green!’ filter was applied to remove the green cast shown by the brighter stars.
The final image of the Double Cluster was cropped to show the two clusters better. A number of red giant stars (which are actually orange) show up well.
Return to Astronomy Digest home page