Repairing Stars

[This is just one of many articles in the author’s Astronomy Digest.]

Sadly, stars are the worst possible objects to image with a lens or telescope – they will highlight every one of the aberrations exhibited by the camera lens, telescope objective lens or mirror!  There essentially two types of problem; that of chromatic aberration (false colour) which can apply across the whole image (but will not be a problem with Newtonians or Catadioptric telescopes)  and misshapen stars which tend to become prominent towards the corners of an image such as ‘coma’ which can be a problem with short focal length Newtonians.  This article gives some advice as to how these problems can be rectified using Adobe Photoshop or Affinity Photo (see article in Digest).  There is one further problem that is not a fault of the lens or telescope – that of slightly out of focus stars so appearing larger than desired.  This can also be corrected if not too pronounced and the technique, described at the end of the article, may even be used to enhance the quality of an astronomical image.

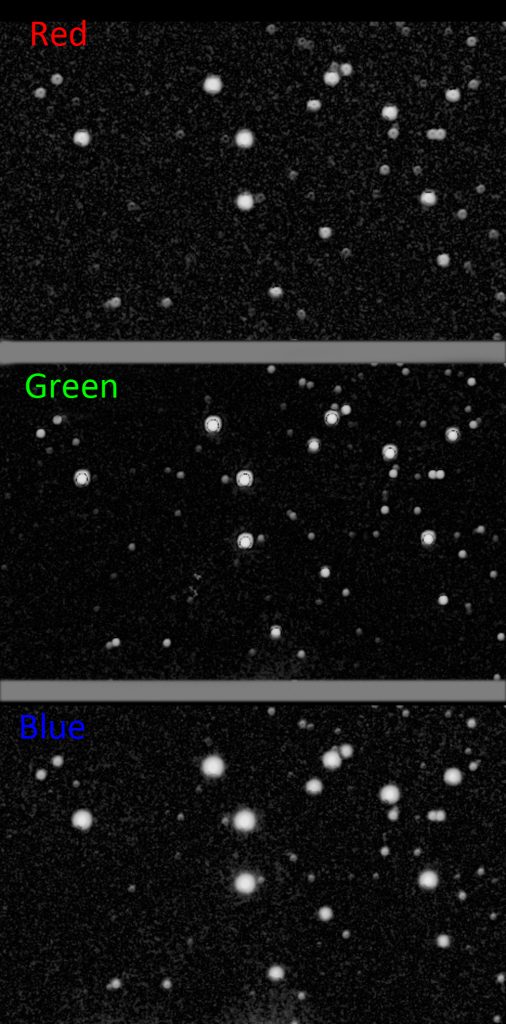
Chromatic Aberration.

This can even show up in the central parts of an image and, if so, can be eliminated as described immediately below.  A different form can appear towards the extremes of an image and requires the same method to be used as when correcting for ‘seagull’ type coma described in the third part of this article.

If the lens/refractor is not perfectly corrected for chromatic aberration then, assuming the focussing has been achieved in the green part of the spectrum, the red and blur channels can have slightly larger star images as they will be a little out of focus.   The image below illustrates this.

The result is that the central part of the star will be white, but the outer parts of the stellar image will be largely made up of the red and blue channels and their combination would give rise to a purple halo surrounding the central part of image.  Dependant on the design of the objective, the red and green parts of the spectrum may be better corrected than the blue when, as commonly seen, a blue halo results.  The images in the three channels  may even be slightly offset  as one moves away from the centre of the image and so the halo can be red on one side and blue on the other as seen in the crop of an image shown below which includes the Orion Nebula.

Correction

The first task is to select the stars within the image.  There are two ways to do this.  In Adobe Photoshop,  if the ‘Channels’ window is opened up, the RGB combined channel, above the red, green and blue channels, can be ‘dragged’ down to the dotted circle at the left of the symbols at the bottom of the window. (In Affinity Photo ‘Select Highlights’ has the same effect.)

This will select all parts of the image brighter than 50% of the peak white value and this will include all of the brighter stars where the problem will be most obvious.  In the example which includes, M42, the Orion Nebula, this also selected the central part of the nebula.

The alternative method in Photoshop is to use the ‘Select Colour Range’ and select the centre of a bright star adjusting the ‘fuzzyness ‘ to suit.  Again the central part of M42 will have been selected so this area needs to be removed from the selection.

Clicking on the ‘quick mask’ symbol at the bottom of the tools menu (which makes the image appear red except where the areas have been selected) the Nebula can be painted with the brush tool (which will have a red colour) to remove it from the selection so now only the stars are selected when the quick mask symbol is clicked upon again. 

Using the ‘Select> modify>expand’ tool with a radius of a few pixels (found by trial and error), the selections are increased in size to cover the full diameter of the star and coloured halo.

The saturation slider in the ‘Hue Saturation’ tool can then be used to desaturate the coloured halo to become white.  In this case, the green channel showed a thin circular dark ring which was apparent in the brighter stellar images and this was removed by applying a ‘Gaussian Blur’ filter with a small radius. 

[Whilst the stars are selected, one could reduce their size should one wish as described at the end of the article.]

Correcting elongated stars towards the corners of the frame

If the coma is in the form of stars elongated radially* away from the centre of the frame then there is a simple solution.  The affected corner areas are individually selected and the layer duplicated.  The blending mode is set to ‘darken’ and, with the move tool selected the mouse is clicked on the upper (visible) layer – importantThe arrow keys can then be used to shift the upper layer over the lower one and you will see how the distortion is removed before flattening the two layers. [See the short article ‘Removing Star Trails’ in the Digest.]

One might first select a large area in a corner where the innermost stars are only slightly extended and apply the technique – those stars nearer the corner will not then be fully corrected – and then select a smaller area towards the corner and apply the technique again with, perhaps, a third iteration required.  (*) It could be tangentially if a focal reducer has over corrected the outer stars.

Correcting ‘Seagull’ type coma or offset chromatic aberration

Brighter stars near the corners of the image can show a form of coma making them look like little seagulls and chromatic aberration may well add colour.  The ‘classical’ coma form is in the form of a wide tailed comet, hence the name, and which may also show chromatic aberration.  To correct for this, it is possible to make a brush tool which keeps the central part of the distorted star present, but overwrites the surrounding ‘wings’ or chromatic extension.

Making a star repair brush tool in Adobe Photoshop:

  • Make a new blank image 500 x 500 pixels in size.
  • Use the elliptical selection tool to make a circle ~300 pixels in diameter centrally within it and paint its interior black.
  • Remove the selection and apply a Gaussian blur with a radius of 15 pixels to blur the black disk edges.
  • At the centre of the black disk make a circular selection of ~80 pixels across and paint its interior white. Remove the selection.
  • Make a circular selection surrounding this of ~150 pixels across and apply a Gaussian blur of ~12 pixels. This blurs the edges of the white disk and will define how ‘sharp’ the repaired stars will appear.  If too sharp, the blur radius should be increased. Remove the selection.
  • Under ‘Edit/ Define Brush Preset’ make this into a brush called ‘coma’.

If the coma brush is selected (with a double click so that the left and right square bracket ([ ]) keys can be used to control its size) one can copy from a blank region of the adjacent sky and paste over the star with an appropriate size to remove all but the central, white, part of the stellar image.  The image below shows the result of applying the star repair brush to particularly bad examples of both types.

Reducing star sizes

This can be achieved in Adobe Photoshop by applying the ‘Minimise’ filter to the image (Filters>Other> Minimise) with 1 pixel selected as the radius.  The effect can be too great and if so, the image can be increased in size by 200%, the filter applied and the size reduced by 50%.  This give the effect of using a half pixel radius.  This technique can also be used if, as can happen, perfect focus has not been achieved and the stars are larger than would be desired.

It is now possible to freely download the program Images Plus.   In the drop down ‘Special Functions’ menu a window ‘ Star Size, Halo, Shape Reduction’ can be opened which allows the star sizes to be reduced.  This can operate on either the RGB image or the individual RGB channels as seen below being applied to the image processed in Photoshop above.