SEPTEMBER 2021
The Celestron 9.25 inch Schmidt-Cassegrain telescope
[This is just one of many articles in the author’s Astronomy Digest.]
The foremost reviewer of telescopes in the USA, Ed Ting, hasa website that gives short reviews of a large number of telescopes but he also nowprovides superb videos on YouTube. Inone he gives a list of his favourite telescopes. His top scope was an Dobsonian – my first scope was like this butis now little used as I am mostly using my scopes for astroimaging. The first two ‘premium’ scopes that I boughtmany years ago were a Takahashi FS102 flourite doublet refractor – which washis number 3 – and a Celestron 9.25 Schmidt-Cassegrain having StarBright XLTcoating – which was his number 2. So Ifeel I am in good company.
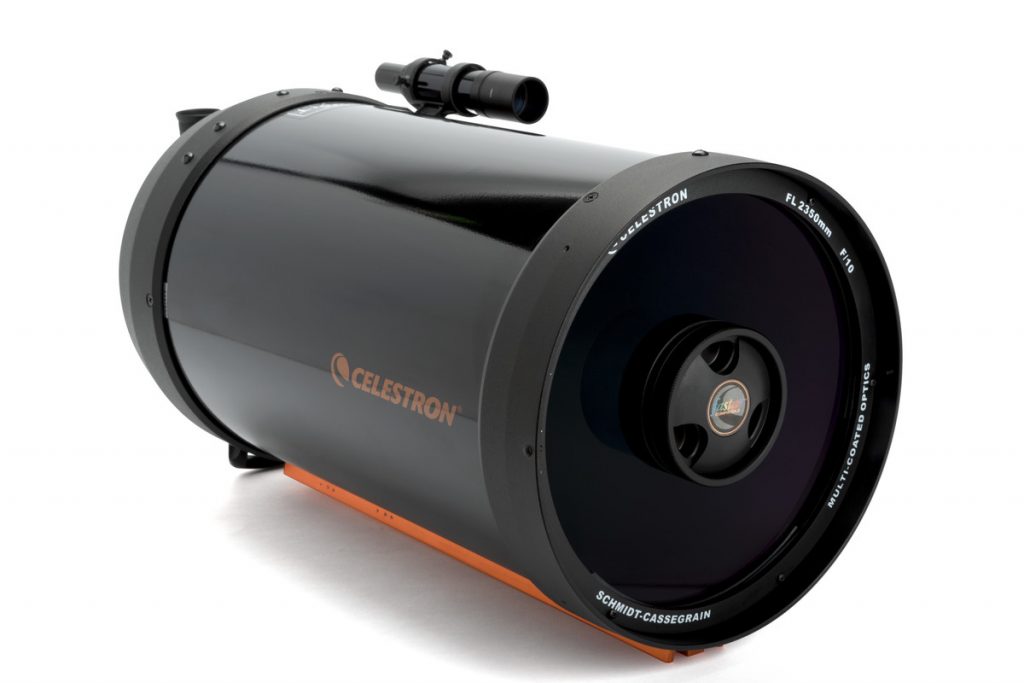
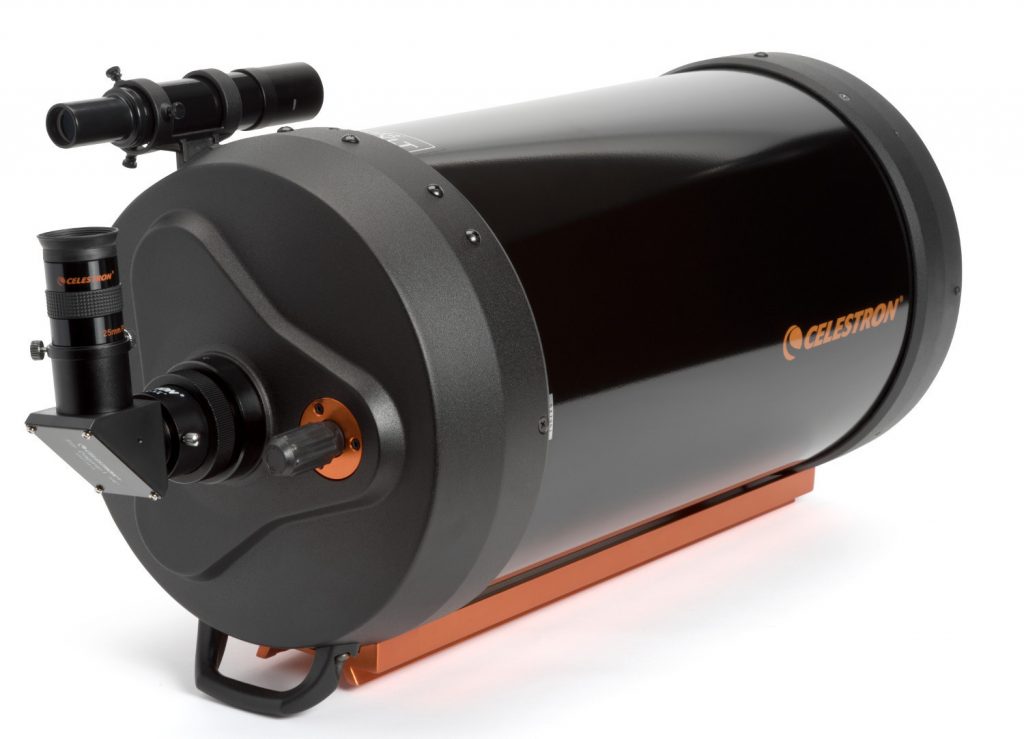
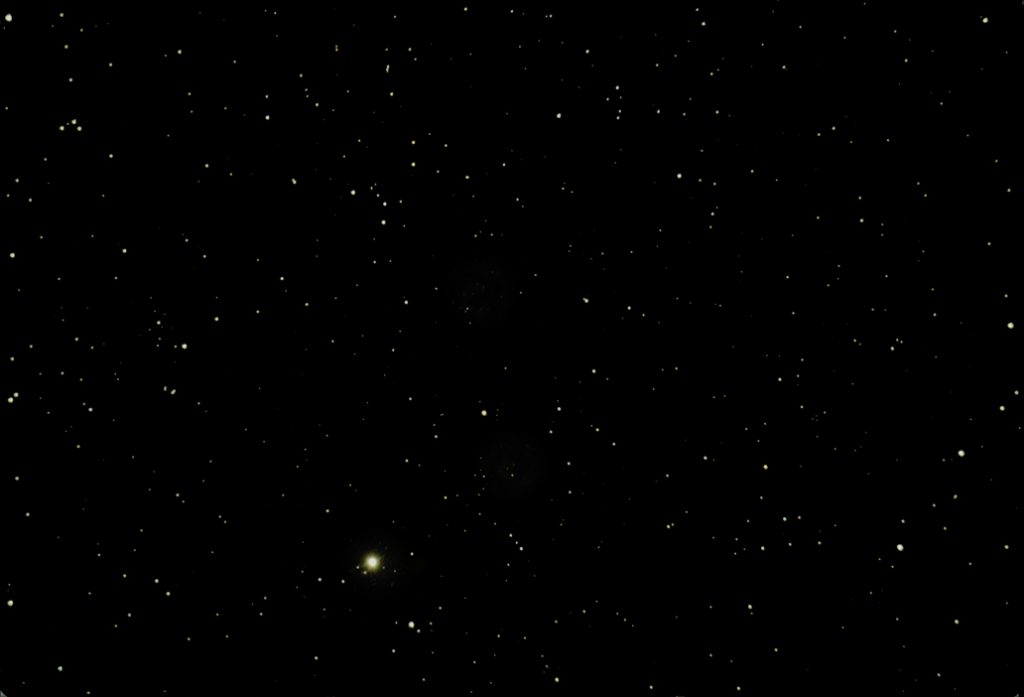
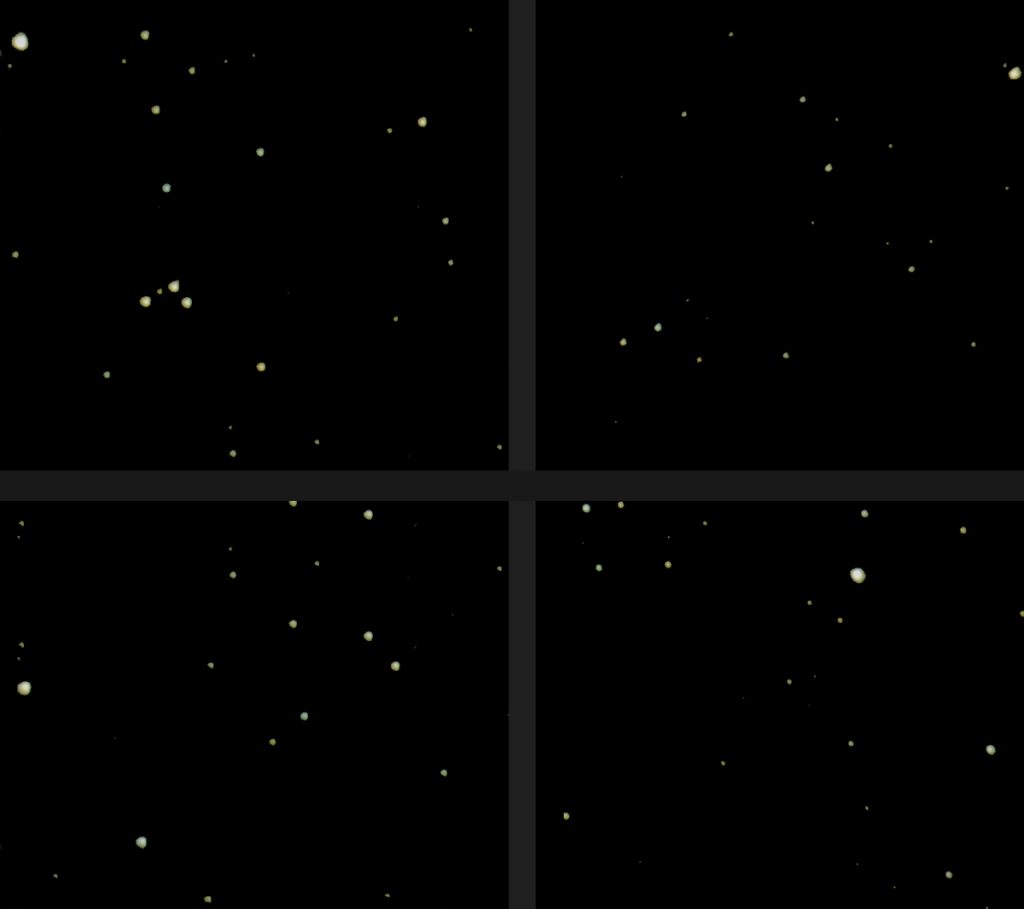
The 9.25 has been said to be the ‘jewel in the crown’ of the Celestron range and also ‘the SCT for those who do not like SCTs’. There are two reasons why these quotes might have an element of truth. Firstly as it uses an f/2.3 rather than an f/2 primary mirror as used in their other SCTs it might thus be easier to make to high standards. Secondly this eases the curvature of the secondary mirror and so the combination increases the percentage of the field of view unaffected by coma. The images given by this telescope could thus be actually slightly better. The tube assembly currently costs ~£1,760 pounds. It should be pointed out that there is now a ‘EdgeHD’ version that incorporates some lens elements within the baffle tube to provide a flat, coma free, field of view which would be an advantage for astroimagers using larger APS-C or even full frame sensor cameras. This, however, costs £3,000. The star field below was taken with my ‘standard’ 9.25 using a camera having a Micro 4/3 sized sensor. Below it is an image of the four corners showing that the stellar images are still quite reasonable. Both types can be equipped with focal reducers; for the standard SCT this 4 element x0.6.3 design costs £125 but, for the EdgeHD, the 4 element x0.7 design costs £429.
The downside of using an f/2.3 primary is that, in comparison to the other SCTs, it has a longer and relatively heavier tube assembly – not that much shorter than their 11 inch SCT. Its size and weight puts it in a somewhat difficult category as regards the equatorial mounts that might be used with it. It is often coupled to mid range mounts such as Celestron’s ‘Advanced VX’ mount. Whilst this should be fine for visual observing, astroimagers will find that it is better suited to couple with a heavier mount such as the SkyWatcher HEQ5 PRO.
Mine is mounted on a large and very stable Astro-Physics Mach-1 mount but with a large dew shield increasing the telescopes effective size, the mount can not prevent wind gusts producing distorted stars so that frames have to be eliminated from a stack of frames. [ Deep Sky Stacker removes frames having distorted stars from a stack. When once imaging in gusty conditions it removed nearly 100 frames from a total of 520.]
Vignetting
At f/10, using a Micro 4/3 sensor, vignetting is not an issue. I have taken flat frames using a APS-C and Full Frame cameras. That taken with an APS-C sensor is quite acceptable.
That taken with a full frame sensor does show more vignetting, as expected. This suggests that the use of a full frame sensor is, perhaps, not ideal but a crop may well give a wider field than if an APS-C sensor were used.
Optimal position ofthe eyepiece and camera sensor
Celestron state that the ‘back focus’ of the telescope is 5.475 inches or 139 mm. Using the 1.25 visual back that is supplied, I believe that the eyepiece field stop when focussed will be closer to the back of the telescope than this. Using a 2 inch star diagonal will help somewhat. This means that to get to focus by adjusting the primary mirror the spacing between the primary and secondary mirrors will not be optimal. How much this affects the image quality is not obvious and I can find no real reference to this on the internet. One could use an short extender to get the exact distance, but in either case the eyepiece will be rather close to the back of the telescope tube making its use a little awkward. Both problems can be solved by the use of a suitable spacer placed between the telescope back and star diagonal. One device that could do this is the William Optics 2″ Rotolock Adaptor for SCT (at a cost of £99) which screws onto the telescope back plate and accepts a standard 2 inch star diagonal.
Whenused with a camera, extension pieces will be needed to achieve the optimalspacing. I happen to have a StarlightInstruments ‘Crayford’ focuser to attach to my SCT. I bought it to provide a fine focusadjustment so that final focus could be made without adjusting the primarymirror – and eliminate any image shift though the 9.25 SCT is actually quitegood in this respect. Using this with a2 inch diagonal and eyepiece will make the field stop of the eyepiece considerablyfurther away than optimum. (Though it nicely brings the eyepiece away from thetelescope back.) It does, however,provide almost perfect spacing when used with my CMOS astro-camera and, using itto get precise focus when imaging, is very helpful.
A superb Lunar and planetary imager
The telescope aperture reacts with the atmospheric turbulence in an interesting way. The ‘cells’ that make up the turbulent airflow have typical sizes of 50 to 100 mm but can reach up to 250 mm under superb conditions in the UK and even up to 400 mm at the Paranal ESO observatory in Chile. If the telescope aperture is less than the cell size, then the image will move about but remain sharp – so lucky imaging can work well. If, on the other hand, the telescope aperture is greater than this, the result will be a blurring of the image that lucky imaging cannot overcome. Thus on a given night the best images may well be made with smaller aperture telescopes. It is thus said that, in the UK, the 235 mm aperture Celestron 9.25 is probably the largest that can sensibly used on occasions when the seeing is good.
The nominal resolution of the 9.25 telescope is ~0.6 arc seconds. However, one effect of the central obstruction to slightly increase the effective resolution as the central Airy disk is narrower than that of an unobstructed aperture. It turns out that the 9.25 inch is no worse than a 6 inch unobstructed aperture when imaging broader details on, say, the surface of a planet and even slightly better than an unobstructed aperture 9.26 inch telescope for resolving fine details. It is thus not surprising that the very best lunar and planetary images have been made using SCTs up to 14 inches in aperture
The final consideration is the angular size subtended by the pixel size of the webcam. The Nyquist theorem states that to fully sample a surface this should be ~1/3rd of the hoped for resolution determined by the telescope aperture. (Not 1/2 as is correct for sampling a waveform.) For the 9.25 inch SCT, this is ~0.6 arc seconds. We would thus like the pixel size to subtend ~0.2 arc seconds. A typical astronomical webcam will have a pixel size of ~3.5 microns. Given the 2,350 mm focal length of the 9.25 SCT each pixel will subtend 0.3 arc seconds – quite a good match. Though my mono camera has a pixel size of 3.75 microns, my two colour webcams have pixel sizes of ~4.6 microns and so the image will not be fully sampled if the seeing is very good. One could then use a Barlow Lens to effectively increase the telescope’s focal length. [Or the use of ‘drizzle’ in Deep Sky Stacker when aligning and stacking the captured frames.]
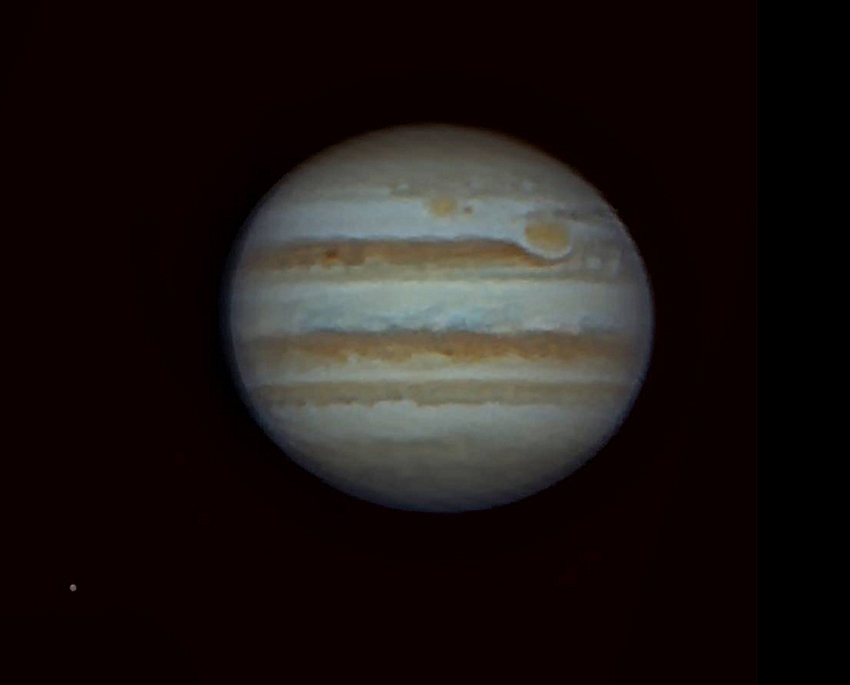
This image of Jupiter was taken when Jupiter was higher in the sky than it has been for a while
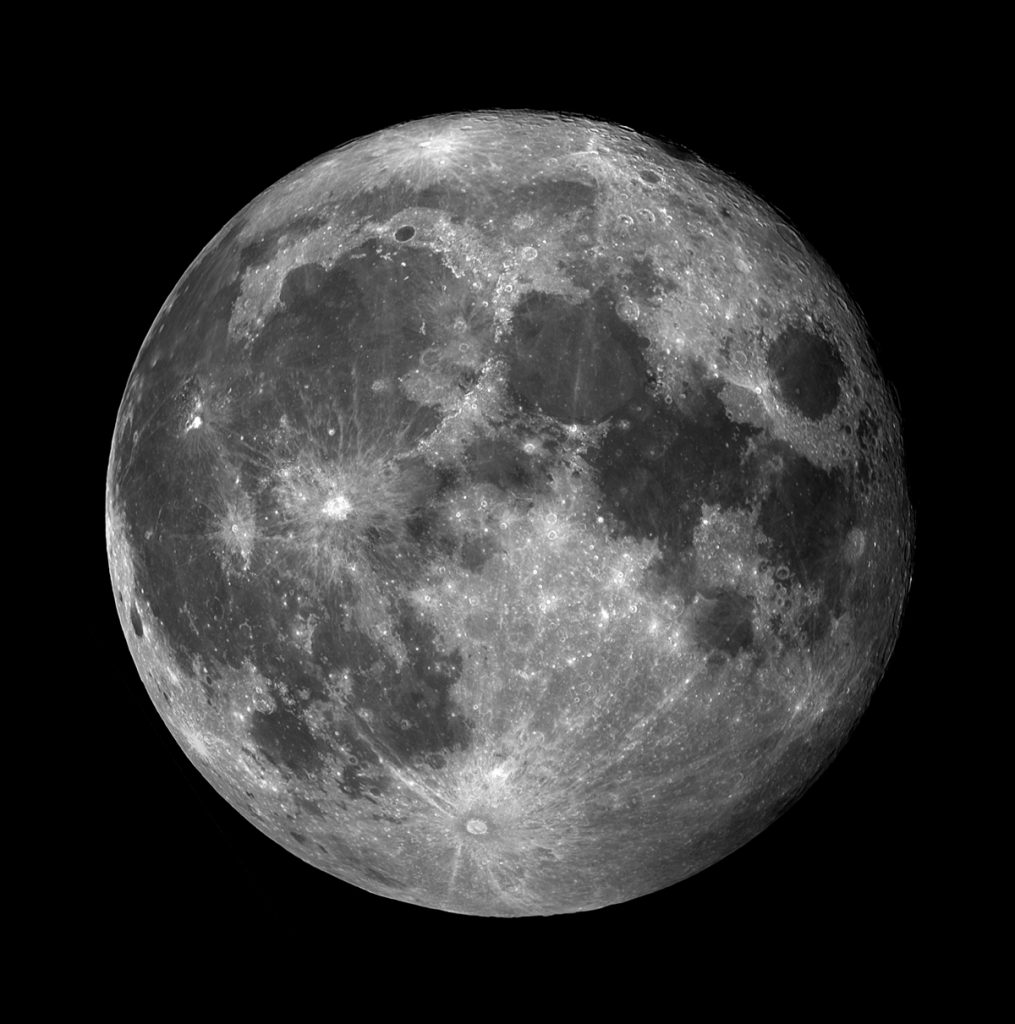
This image of the Moon was taken on Sept 15th 2021 when the Moon was at a very low elevation but the seeing was extremely good.

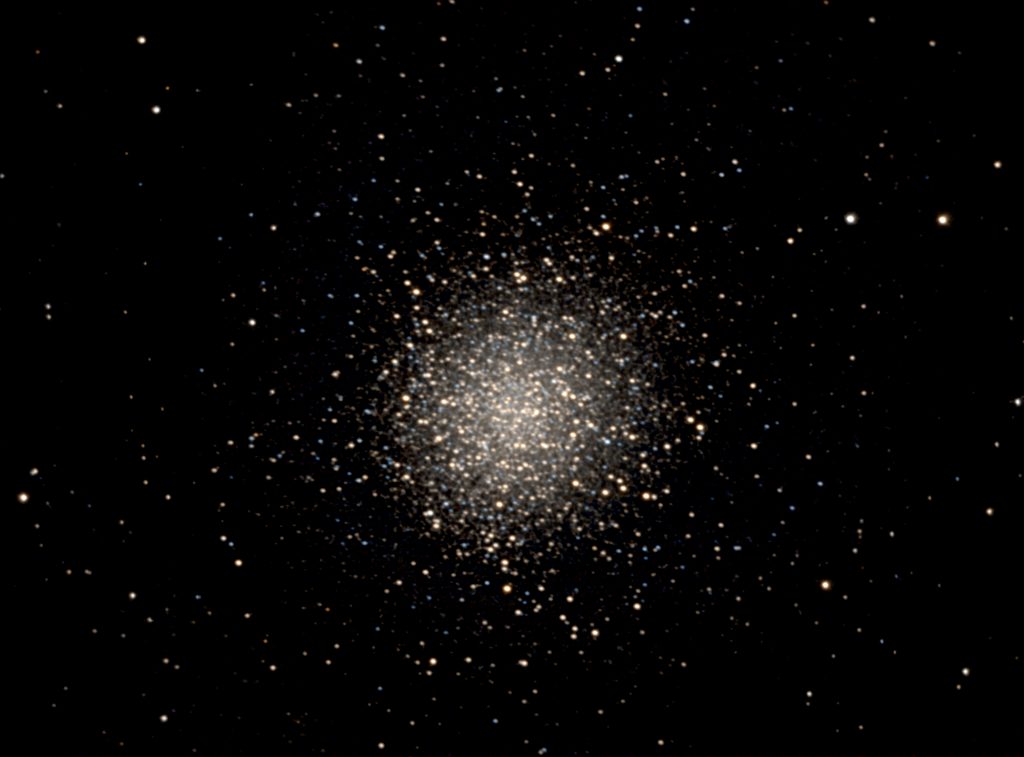
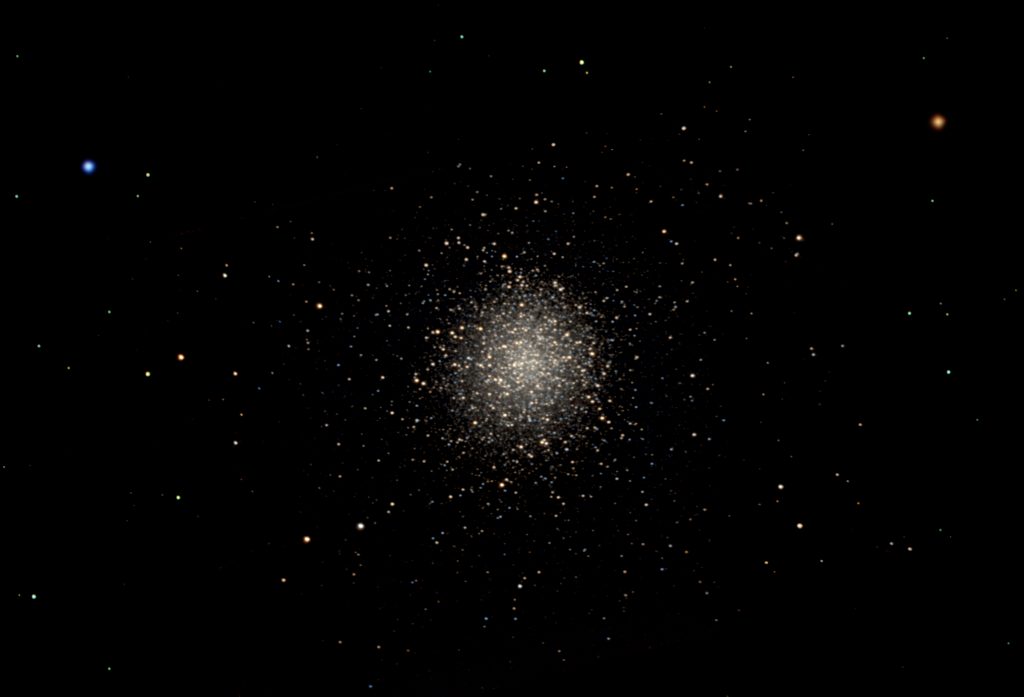
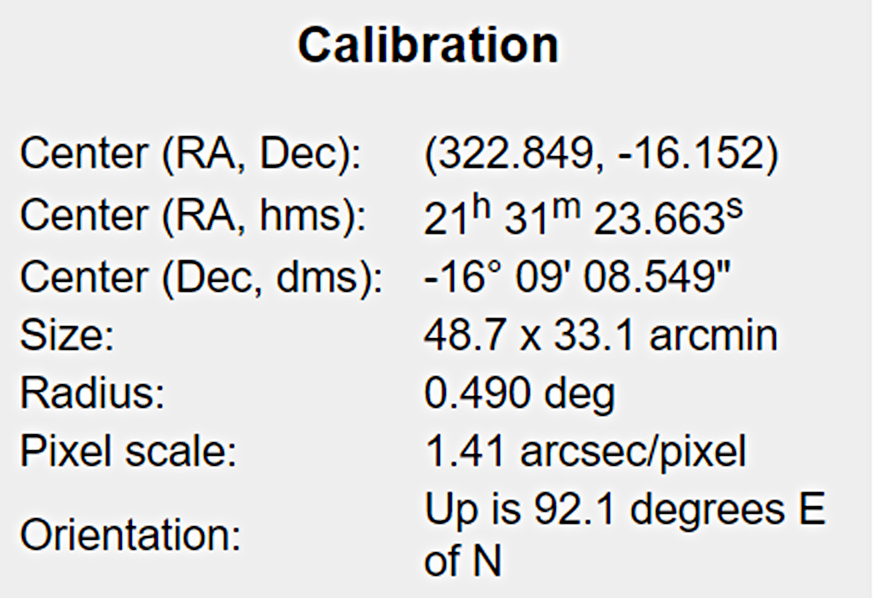
M13 Globular Cluster
On the 30th September 2022, I used the telescope at f/10 to image the globular cluster, M13, using my Micro 4/3 sized sensor astro-camera. Though taken from a light polluted location, I was pleased with the result, the central stars of the cluster being nicely resolved.
A ‘nicer’ picture results when this image is overlain over a wider field image, taken with a Vixen VC200L telescope, showing two colourful stars. [Using the 0.6x focal reducer on the 9.25 SCT will give an even wider field of view.]
Use with theCelestron f/6.3 focal reducer/corrector
For around £125 (Amazon) one can purchase the Celestronf/6.3 focal reducer/ corrector, a 4 element, fully multi-coated accessory forall their standard Schmidt Cassegrains. [The Edge HD versions require specific reducers for each of the range atconsiderably higher prices.] It is verycompact and simply screws into the back plate before then screwing in the diagonal,additional focuser or imaging setup.

The use of the reducer obviously increases the field of view and will reduce exposure times by about 2.5 times if astroimaging.
Celestron state that the required back focus is 105 mm. This should be the distance to the field stop(I think) of an eyepiece or the sensor of an imaging camera. With the Starlight Instruments focuser in theimaging train, I can set the correct back focus and then use the primary mirrorfocus control to achieve focus, then making very small minor corrections usingthe focuser. If imaging, one shouldinclude the distance from the front of the camera to the sensor (6.5 mm in thecase of my 294 Micro 4/3 sensor camera.
The field of View
When imaging, one can easily find the true field of view by submitting an image to Astrometry.net. As seen from the calibration data given by the field solution, when used with my 294 camera the true field of view is 48.7 x 33.1 arc minutes.
This is interesting in that it will just encompass a full moon – as I found on the night of the Harvest Moon in September 2022 when the Moon had an angular size of 32.25 arc minutes. I was thus able to take a single video sequence of the Moon using the camera as a webcam to give a 6 Gigabyte file! This meant that no stitching of lunar ‘panes’ was required to give the lunar image below. [One does need a computer with a 16 Gbyte memory to process such a large video file.] The image, when the Moon was still at a low elevation, was quite pleasing.
Vignetting
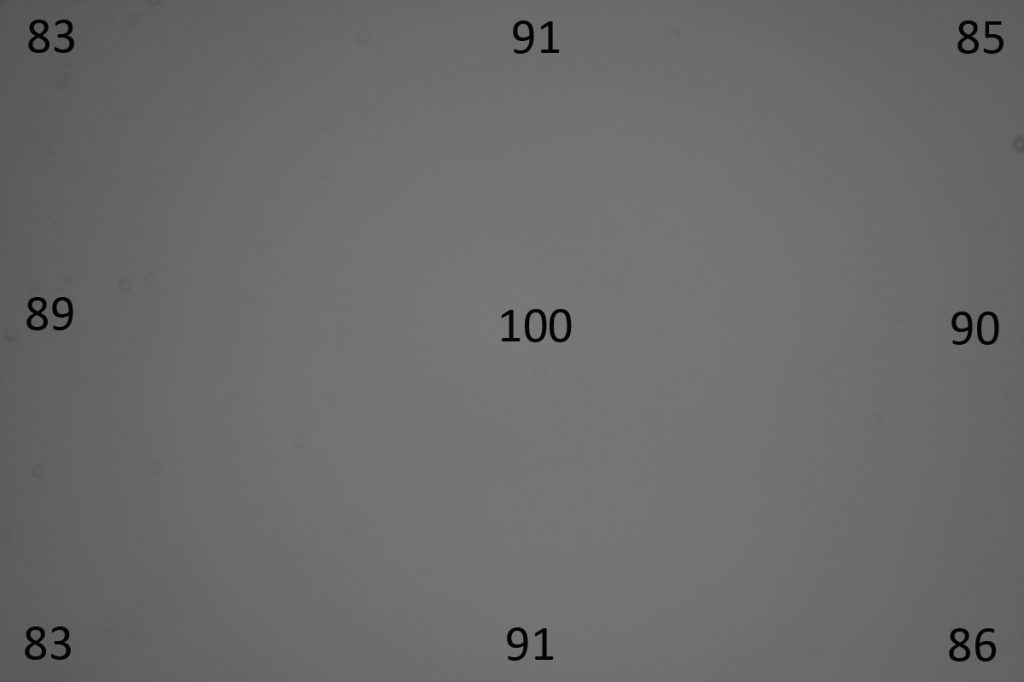
These telescopes were designed when 1.25 inch eyepieces were the norm. An eyepiece with about the largest field stop is the Televue 32 mm plossl which has a field stop diameter of 27 mm. This close to that of my 294 camera which has a diagonal of 23.1 mm. Below is a flat frame taken using the focal reducer with the brightness adjusted so that the central brightness was 100.

The centres of the long edges of the frame were essentially unvignetted, that of the short edges ~80 and that of the corners ~66. Thus the vignetting with a Micro 4/3 sensor is not extreme. In Photoshop a vignette correction of +27 will correct for this in the stacked image or, better, the use of flat frames will carry out the correction when the frames are aligned and stacked. (To be honest, as the correction is small with this sensor size and easy to correct if necessary later, I am not convinced that flat frames are required.)
Using an APS-C sized sensor the vignetting will become significant and flat frames will be required. But imaging the majority of astronomical targets such as planetary nebulae, globular clusters and distant galaxies only the central part of the frame is employed so there is no real problem.
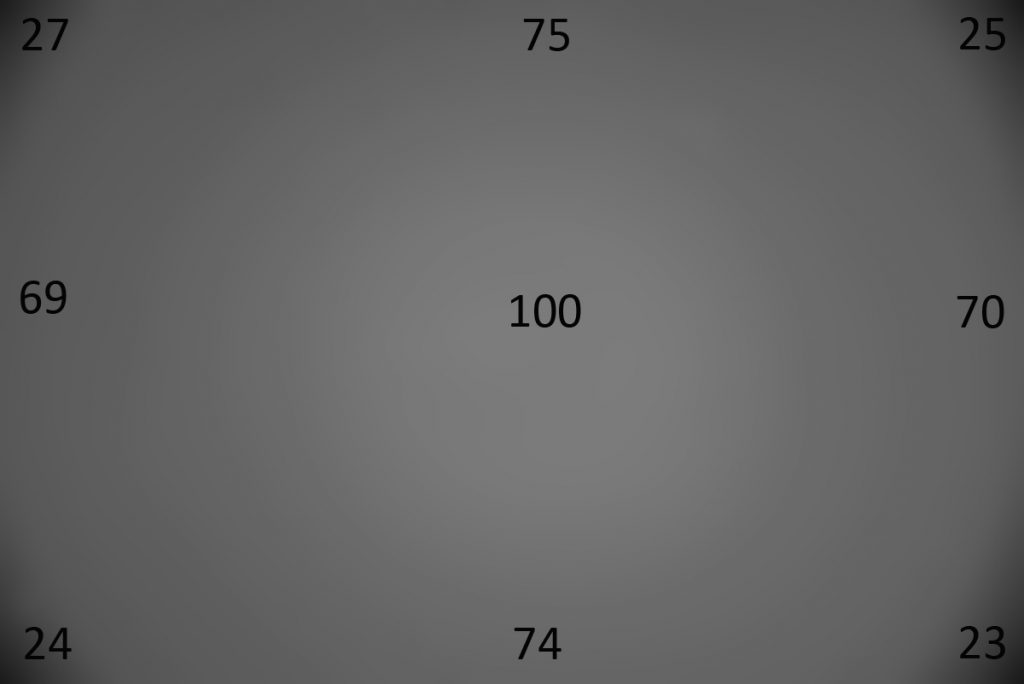
Using a Full Frame camera at f/6.3, the vignetting does become more extreme as seen below and so I do not believe that it is worth using one at f/6.3.
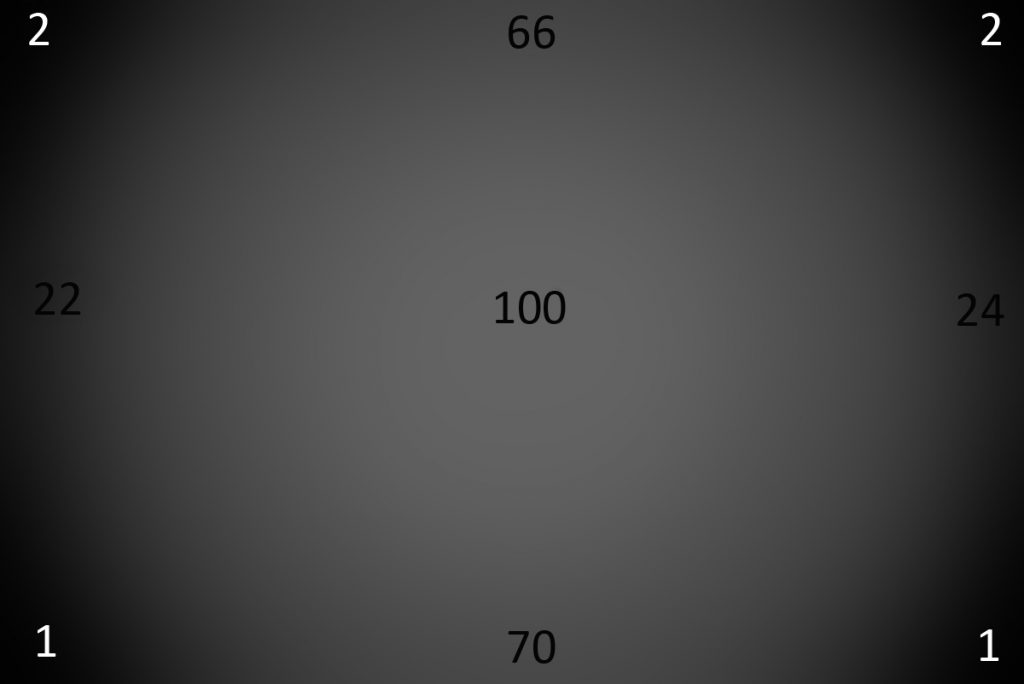
Image quality
Below is an aligned and stacked image of a star field. The image quality across the frame is pretty good. (As also indicated by the full frame lunar image above – there is no obvious degradation towards the lunar limbs.)
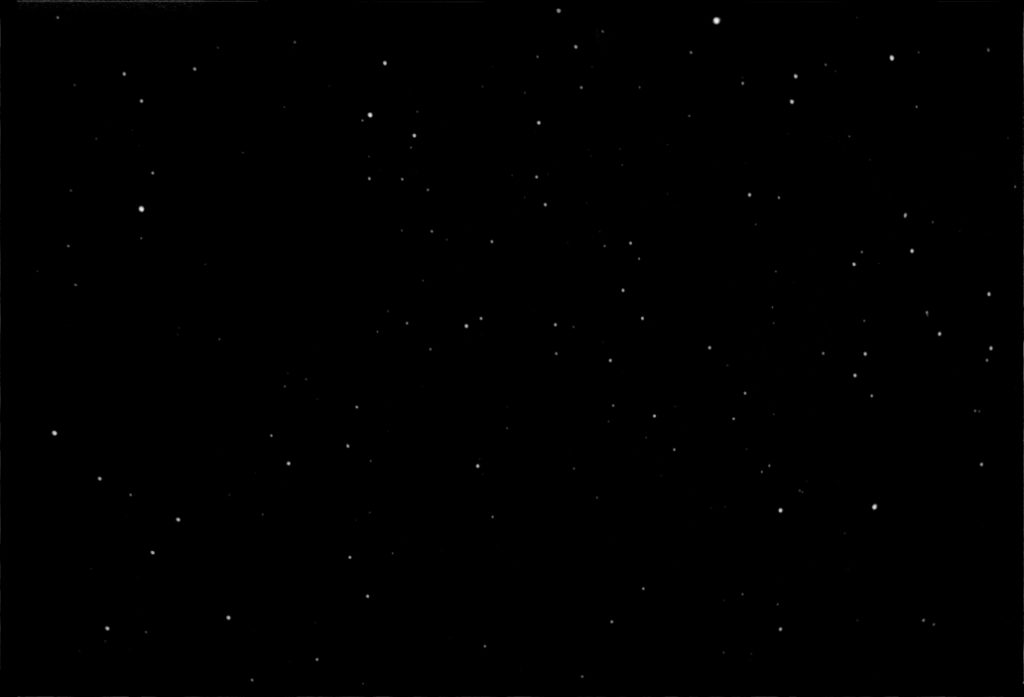
The stars towards the corners of the frame were very slightly elongated – by no more than a pixel or so – and this is easily corrected in post processing if desired. (See my article ‘ Removing Star Trails’ as the effect and solution is the same but one has to first select the areas of the image where correction is to be applied.) The first image below show a corner region at 100% showing some elongation of the stars. The second shows the corrected star field – with single pixel ‘Darkening’ adjustments left and up.


Some users state that reducing the back focus to give afocal reduction of 0.7 rather than 0.63 and then focussing on the stars midwayacross the field can give an overall improvement to the image. It might well be worth experimenting.
Final Point
I think a standard C9.5 coupled to a Micro 4/3 sensor is asuperb combination and, including the focal reducer, would be a far cheaperpurchase than the Edge HD and its reducer/corrector. I do not believe that an APS-C camera – whichis also more expensive than a Micro 4/3 sensor camera – will, in many cases,allow for better images as many targets tend to be circular so the extra widthof an APS-C sensor does not really add a great deal.