JANUARY 2018
The use of Dark Frames when using a DSLR
This is one of ~60 illustrated articles to be found in the author’s Astronomy Digest.
This is a very tricky subject and the article suggests how a portable hair dryer could be a help!
[This article is both long and somewhat complex and beginners to using a DSLR may find it somewhat daunting. So some simple advice:
If imaging on a cold winter night, just spend all the imaging time taking ‘light’ frames. Do not use the ‘in camera noise reduction’ feature. Do not worry about taking dark frames.
If imaging on a warm summer night, use the ‘in camera noise reduction’ feature to take individual dark frames which are applied to each ‘light’ frame in camera.]
When taking long exposure images, many DSLRs or CSCs (compact system cameras) will follow the taking of the ‘light’ frame with a second exposure of equal length having the shutter closed to produce what is called a ‘dark’ frame. This is then subtracted from the light frame to remove hot pixels but also the pattern of low brightness ‘warm’ pixels produce by the dark current within the sensor. It is often not well noted that a single dark frame is actually quite noisy and will add noise into an image. This is why, when using a cooled CCD camera, it is recommended to take quite a number of dark frames and average them. The image below shows a single dark frame and an averaged stack of 20. Both have been ‘stretched’ identically.

A stretched crop of a section of dark frame taken with a Panasonic GX1, 16 megapixel, camera: top, single frame, bottom, an average of 20 frames.
It is important that dark frames have the same exposure length and ISO and are taken at the same temperature. (Incidentally, if this is true, no bias frames are needed as the bias current is included in the dark frame.) When using a cooled CCD camera with ‘setpoint’ cooling there is no problem taking sets of dark frames at the same temperature as the light frames and this can even be done at any convenient time. The problem when using a DSLR is that the sensor temperature will be changing during the taking of a set of long exposures.
Canon EOS cameras include an internal camera temperature in the EXIF data and, for example, the camera control software ‘Astronomy Photography Tool’ (APT) can include this temperature in the title of each frame. Perhaps incorrectly, my early version states that the ‘CMOS’ temperature can be added to the filename, rather implying that this is the temperature of the sensor. However, it is thought to be the temperature of the digic processor and it could be that it would take some extra time for the sensor temperature to stabilize after the temperature given in the EXIF data has stabilized.
Experiments described in my astronomy books showed that as a series of long exposures are taken, the EXIF temperature increases by up ~12 degrees Celsius above ambient temperature. It is likely that the sensor temperature will increase in step and one might hope that the sensor temperature might stabilize when the EXIF temperature stabilizes but given the caveat above this is unlikely to be true.
(If one has a camera whose rear screen lifts up or to the side so allowing a shorter ‘thermal’ path from the sensor to the outside, this temperature rise should be less.) It turns out that for every 6 degree Celsius rise in sensor temperature the dark current doubles and so a 12 degree rise will double the noise in the light frames. (A root 2 increase for each 6 degrees.)
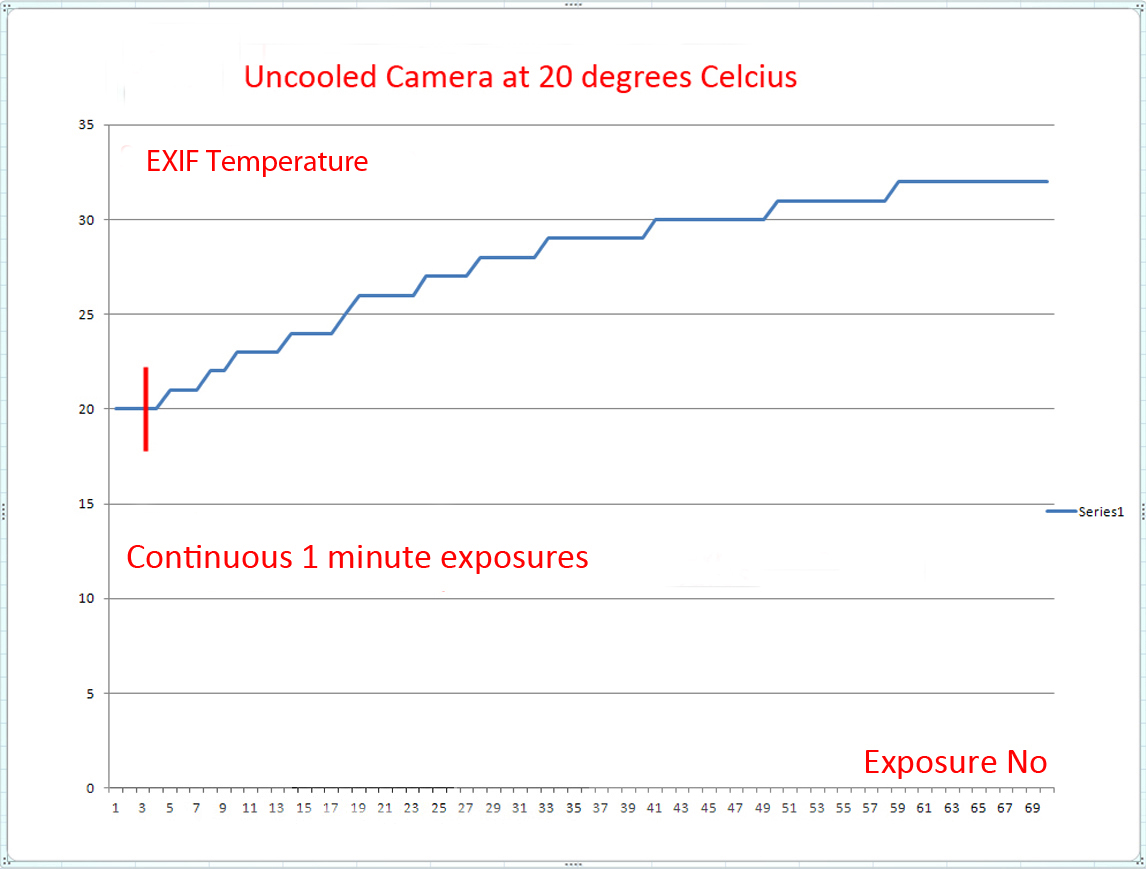
The result is that if one begins taking a series of long exposures the EXIF temperature will increase over a time that extends up to one hour as seen in the diagram below. Astro Photography Tools (APT), when controlling a Canon camera producing raw files, enables this temperature rise to be easily monitored.
If the night is cooling, then the sensor temperature may then slowly drop so that if one were to attempt to take a series of dark frames to be averaged there is the problem of taking them at a suitable temperature.
What are the possible strategies?
When taking constellation images with a DSLR or Compact System Camera there are two ways in which dark frames can be used. Alternatively, the third possibility is that one might choose not to employ them.
Using the long exposure noise reduction in the camera.
As described above, this exposure mode takes a further, identical length, exposure with the shutter closed (a dark frame) after taking the light frame and then differences the two. There is one good thing when using this mode, but two that are not so good.
Good – actually very good:
The dark frame is taken at exactly the same temperature as the light frame – which is exactly as it should be.
Not so good:
The total imaging time is halved.
The dark frame adds noise into each frame.
One result of not using ‘in camera noise reduction’ is that hot pixels would not be removed from each light frame. There are, however, two other ways of removing them. The first is to set the ‘hot pixel removal’ option in Deep Sky Stacker when it is used to align and stack a set of light frames. The second is a ‘hot pixel removal’ tool that can be accessed from the menu of many cameras. This takes a dark frame and then maps the positions of hot pixels. The camera will then replace them when processing each light frame with an adjacent pixel value or, better, the average of the surrounding pixels.
So this method is not really recommended but it is, of course, the easiest strategy to employ – and is really the only one where one is sure that the dark frames are taken at the same temperature as the light frames. It could well be the approach to employ on warm nights when the dark current noise can become a problem. This avoids the problems when using a set of dark frames that are described below.
Take a series of dark frames with the same exposure at the end of the nights imaging.
Why at the end? The temperature of the sensor should have stabilized so the dark frames are taken (with the same exposure and ISO) at the same temperature as the majority of the light frames. It is a good idea to take a reasonable number of ‘dummy’ exposures first and so let the sensor temperature increase to its stable temperature when taking the light frames. (I find that I often take quite a number to nicely frame the region being imaged.) The problem is that, as shown below, it can take up to an hour or more for the EXIF temperature to stabilize and perhaps somewhat more for the sensor temperature to stabilize.
A thought – which has appeared to be reasonable.
If the EXIF temperature can be monitored, as when using APT to control a Canon camera, then one could perhaps blow hot air from a hair dryer over the rear of the camera to speed up the time the camera’s internal temperature takes to stabilize. From tests, one can find the increase in EXIF temperature over ambient for the camera being used (12 C in the case of my Canon D1100) and so judge when to stop warming the camera – at some temperature, say 3 degrees, before it reaches its expected stable temperature. A 12 volt hair dryer can be bought for under £10. If the ambient temperature remains roughly constant during the imaging session, then the taking of dark frames at the end of the imaging session should work pretty well. Should, after the temperature has stabilized, a cooling night causes the EXIF temperature to slowly drop, a little heat could be applied to keep it approximately constant.
Setting the camera to ‘Live View’ also heats up the sensor and interior of the camera, however APT does not appear to allow the camera to be in live view. I have also read that Nikon do not like live view to be used for more than 9 minutes.
Experiments to test this thought
Three experiments have been done. The first experiment, carried out some time previously, was made at an ambient temperature of 20 C. The plot below shows that with no applied heat it took ~60 minutes for the EXIF temperature to reach a stable temperature.
The second two experiments were made using continuous 30 second exposures with a 4 second gap between each one. I used APT to make 80, 30 second exposures, saved as raw so that the EXIF temperature could be included in each file name. (These will warm the sensor just as continuous 1 minute exposures would. ) In the first, made with an ambient temperature of 20 C, I expected the stable EXIF temperature to be ~32 C, a rise of 12 C above ambient as shown in the plot above (and confirmed at other ambient temperatures). I stopped applying heat when the EXIF temperature reached this value expecting there to be an overshoot as I wanted to get an idea of how much. As you can see in the plot below the overshoot was 3 degrees, up to 35 C at which point it fell back to the expected 32 C where it remained.

So in this experiment it took ~23 minutes to reach a stable temperature but I am sure that dark frames would not vary too much over a 3 degree range of temperature so one could have started with taking light frames at an appropriate EXIF temperature after ~11 minutes.
In the third experiment, at which time the ambient temperature has increased to 22 C, I stopped applying heat at an EXIF temperature of 29 C, perhaps 2 C less than optimum as this was 5, rather than 3, degrees below the expected stable temperature of 34 C.
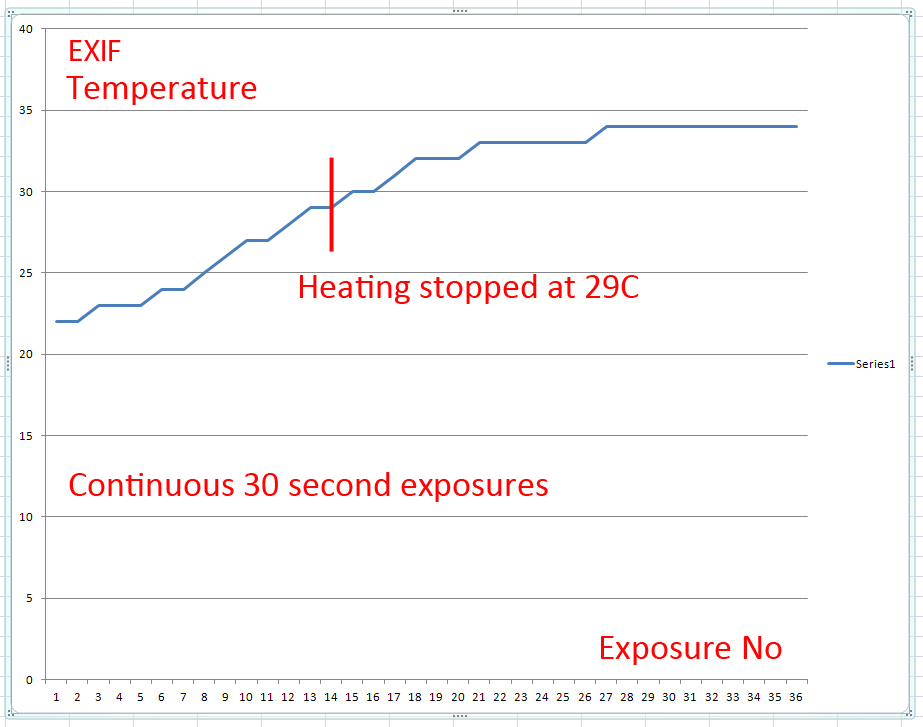
In this case I think one could start taking appropriate light frames after just 9 or 10 minutes – which is vastly better than 1 hour!
The more dark frames that are taken following the light frames, the less will be the noise in the averaged ‘master dark’ frame. Around 20 is a good number so that the resulting noise in the master dark frame will not add significantly to the noise in the aligned and stacked light frames. These dark frames do not actually have to be taken as described above. It is only important that the exposure time, ISO and sensor temperature are the same.
This is by far the best approach. (But there is a caveat discussed immediately below and some heretical advice at the end of the essay.)
A problem: how can you tell when the sensor temperature has stabilized?
If, as it is believed, that the sensor temperature will continue to rise after the EXIF temperature has stabilized how could one tell when the sensor temperature has stabilized? This question is, of course, also of interest to owners of Nikon cameras which do not output an internal temperature in their EXIF data.
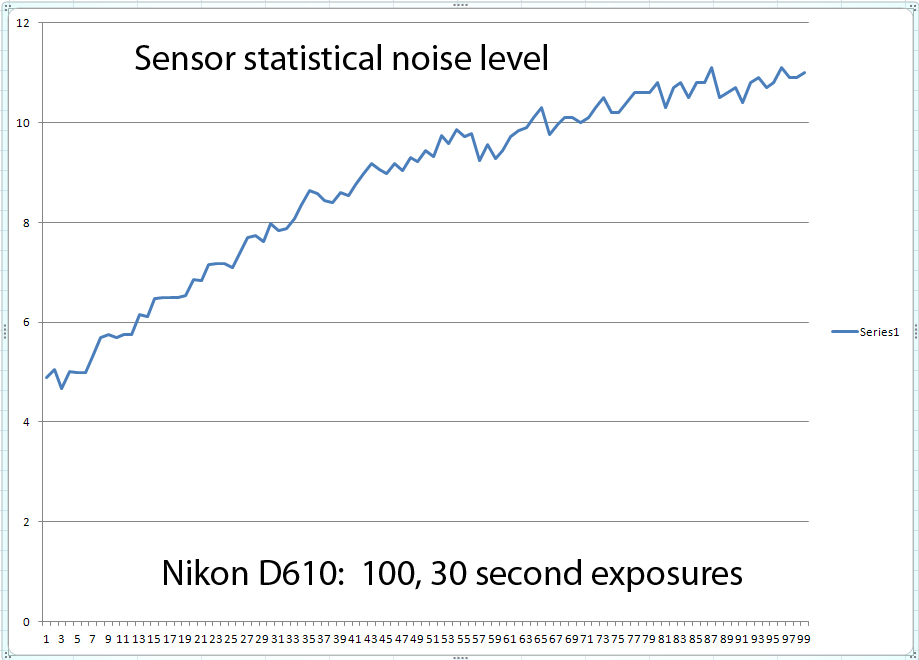
Currently, I only know of one, somewhat complicated, solution that will work with all cameras. This is to measure the standard deviation in the dark frame noise. The dark current and hence overall brightness of the dark frames increase as the sensor temperature rises. However, as this happens the statistical noise in the dark frames also increases. If this can be monitored as the sensor temperature increases one can find when this is no longer changing significantly – telling us when the sensor temperature has stabilized.
Measuring the ‘noise’ in the dark frames
One could, for example, take a continuous set of dark frames and analyse them in a program such as ‘Raw Digger’ which can be trialled for a while. With this program, the first dark frame should be loaded and the ‘Black Level’ box at bottom left clicked on when a window appears. In the window the ‘Subtract Black’ small square box should be un-clicked so that at the bottom left the Black Level box says ‘Off’ and the ‘Black Level Settings’ set to manual with 0 as the number in the box to its right. A small ‘window’ (~400 pixels across, 300 down) should be set up on the dark frame using (shift, left click) to drag it into position and size. This should be away from the edges where amplifier noise might dominate over dark noise.
Above the display in the second set of figures – which relates to area in the window – note the standard deviation (sigma) to the right of the ‘red’ data which is indicative of the noise level in the image. If the same is done with a set of dark frames as the temperature increases, this will increase as should be expected. With a test experiment one can see how long this takes and how much longer this might be than the time it takes for the EXIF temperature to stabilize if logged when using a Canon Camera.
The plot below shows the EXIF temperature and the standard deviation of the dark fame noise as a function of time as a continuous sequence of 2 minute dark frames were taken. One can see that it takes ~ 20 minutes beyond the time when the EXIF temperature stabilizes for the sensor to stabilize.
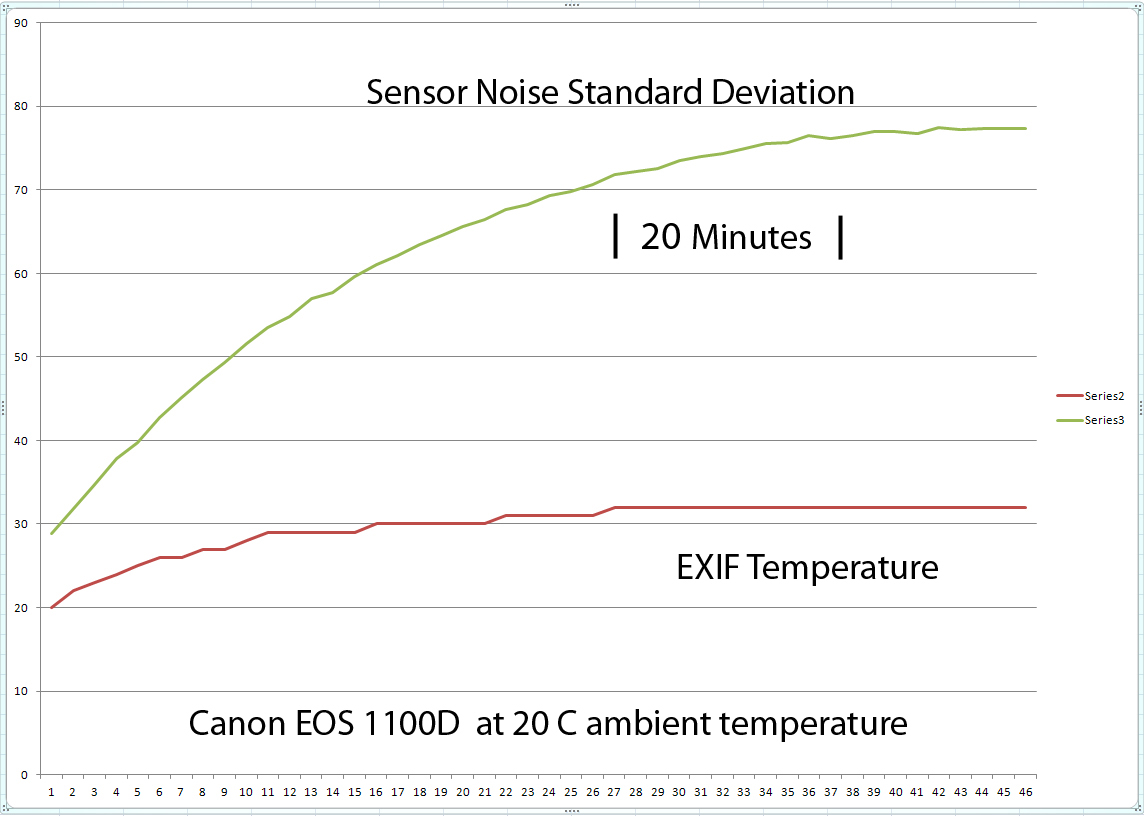
I have described the reduction in time to reach equilibrium by heating the camera whilst observing the EXIF temperature and the plot below shows that the sensor temperature can reach equilibrium in ~ 22 minutes instead of ~72 minutes. Heating was stopped when the EXIF temperature reached 30 C.
The use of Nikon cameras
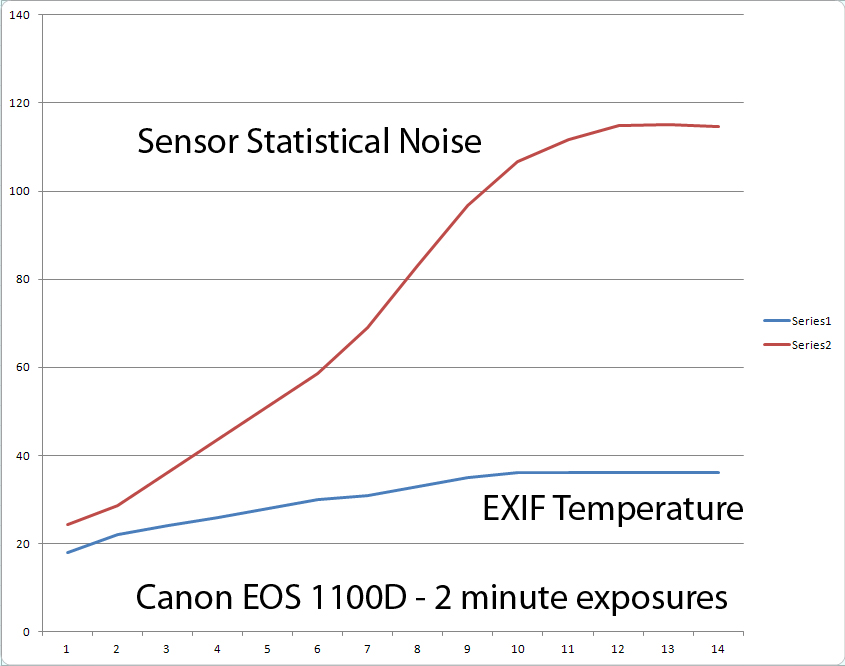
These do not output an EXIF temperature, but one can still measure the statistical noise in the dark frames as the camera warms up as the plot below shows. Note that this Sony sensor is vastly better than the older Canon sensor! The sensor noise has essentially stabilized after 1 hour.
So how could one proceed?
Take some test data and analyse it as above to get a feel as to how long it takes the sensor ‘noise’ to stabilize. (One can try out Raw Digger for a while.) If a Canon Camera is being used, monitoring the EXIF temperature until it stabilizes and then allowing some time (~20 minutes in the case of my Canon) for the sensor to stabilize. By applying some heat to the camera as described above, these times could be reduced.
[The taking of the data that is used in the examples below is described in the Astronomy Digest article ‘A Beautiful Southern Hemisphere Skyscape’.]
I advocate not perfectly aligning the tracking mount so that the image moves across the sensor whilst taking the series of ‘light’ frames. There are two good reasons for doing this; the first is that any dust motes on the sensor will become less apparent and the second is that what Tony Hallas calls ‘colour mottling’ is eliminated.
An example of Colour Mottling
The effect is due to the varying sensitivities of the pixels and gives rise to small ‘sploges’ of colour in the image background. If the star field is allowed to move across the sensor, when Deep Sky Stacker aligns the stars within the image, the background is moved relative to the stars which results in these blotches being averaged out so giving a neutral grey background.
[Note: by not having a perfect alignment on the celestial pole so that the image moves across the sensor, the allowed length of exposures before star trailing becomes obvious is reduced, but I prefer to take many short exposure images, say 30 to 60 seconds, rather than fewer longer ones.]
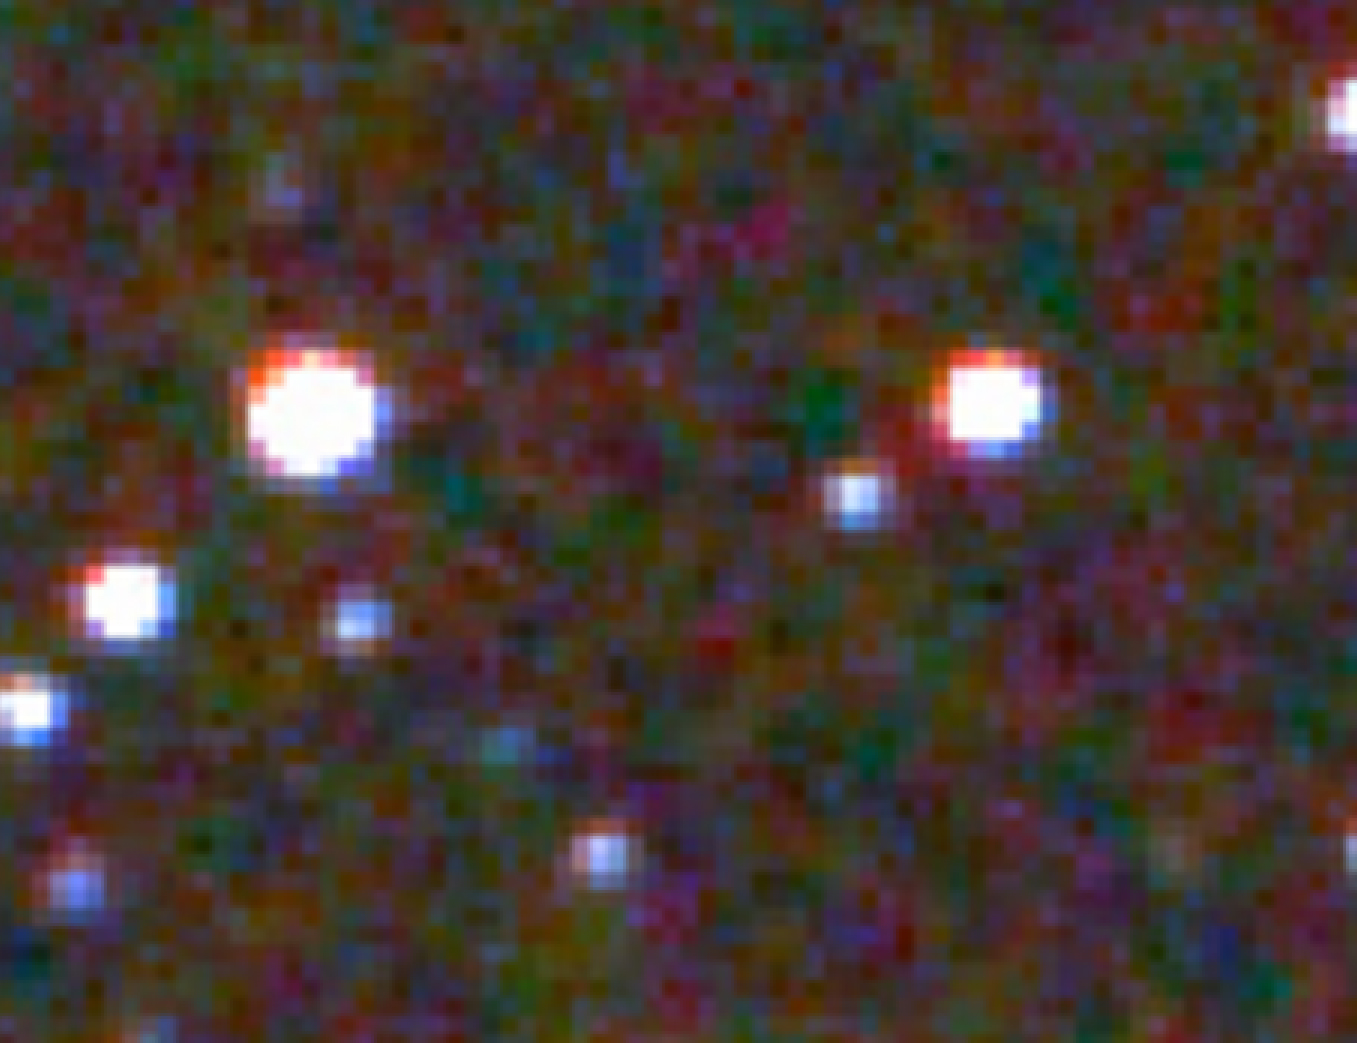
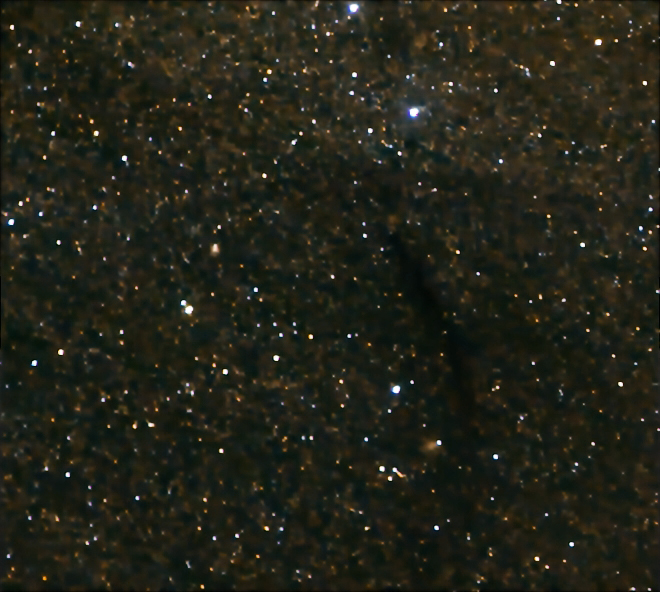
The result, however, is that warmest pixels, the more prominent being red, can give rise to low brightness linear streaks (called ‘walking noise’) across the low brightness parts of the image. These are visible in a stretched image as seen in the crop below. In this image a procedure has been used to correct the stellar images for a little movement during the exposures. This has blurred the red pixels making them a little less obvious.
This an extreme crop of the above image where no correction for star trailing has been made. The individual red pixels marching across the image are very obvious. The eye is very sensitive to linear features so dithering as described below can help make them less obvious if dark frames are not used.
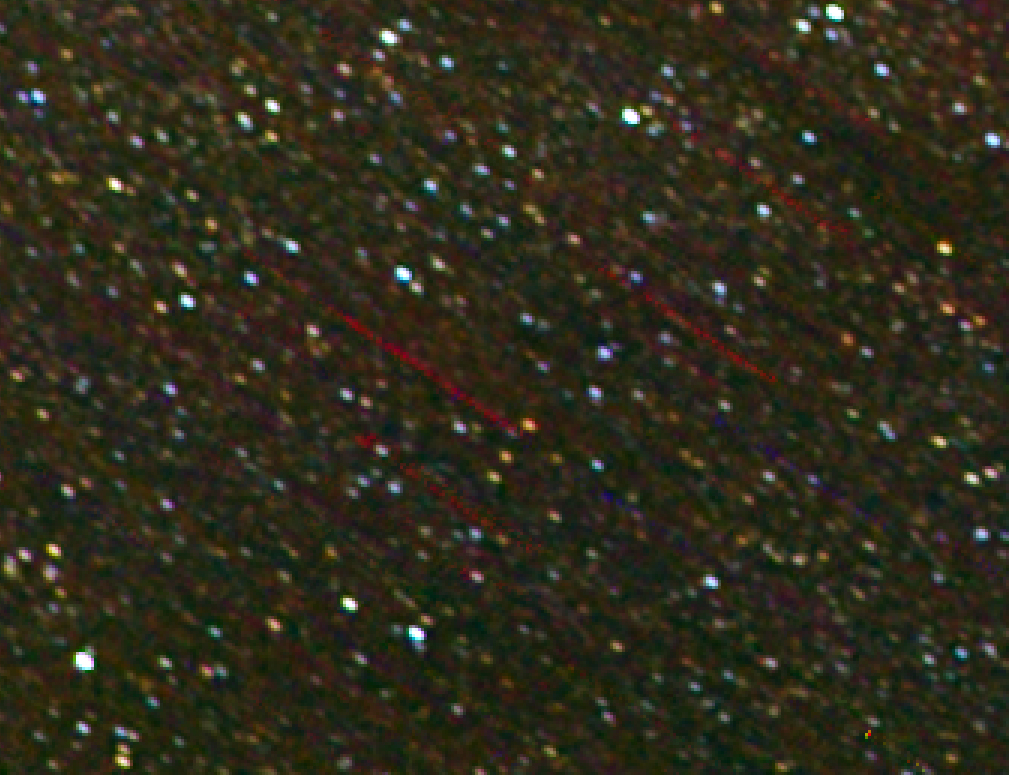
However if a reasonable number of dark frames (same exposure, ISO and temperature) are averaged to produce a ‘master dark frame’ which is then subtracted from each light frame before they are aligned and stacked, the linear streaks are eliminated.
 The crop of the same region when the master dark frame has been used by Deep Sky Stacker. (The set of 25 dark frames is imported into DSS which first produces a master dark frame before aligning and stacking the light frames.)
The effects of colour mottling and walking noise can also be reduced or eliminated by ‘dithering’ the pointing during the taking of the images. A Manfrotto Junior Geared Head 410, if supporting a tracking mount when doing some wide field imaging, can be used to very slightly move the image over the sensor by rotating the azimuth and elevation fine adjustment knobs by small amounts. If the camera is being controlled by APT, the image capturing can be paused whilst the slight changes in pointing are made whilst allowing a little time for the mount to settle. This makes a case for using a geared head rather than an equatorial wedge.
The other possibility – do not take any dark frames.
The one good thing is that the maximum time is spent imaging the source which will, in principle, give the minimum noise level in the resulting image. If one took 25 light frames and 25 dark frames the noise level in the image will be the square root of 2 (1.4) times more than if 50 light frames were taken instead. However, if the night is warm, the sensor dark current pattern will appear in the image. On the other hand, if the night were cold the best option might well be to spend the whole imaging time taking light frames. But I suspect that the taking of dark frames, if done well, would generally give a better result.
So not taking dark frames is not really recommended either- but seeing that taking them is somewhat problematical this could well be a good approach, particularly on cold nights when the dark current – and hence its noise – will be less.
A test of this thought
From my four nights imaging of the Milky Way from New Zealand I have produced two images. One, taken on the first night, was taken without taking any dark frames whilst the second, taken on the following night, stacked a set of 44 light frames along with with a set of 25 dark frames taken after completing the light frames. These are shown below with both having been ‘stretched’ and enhanced to the best of my ability by the Photoshop methods described in my CUP book ‘The Art of Astrophotography’.
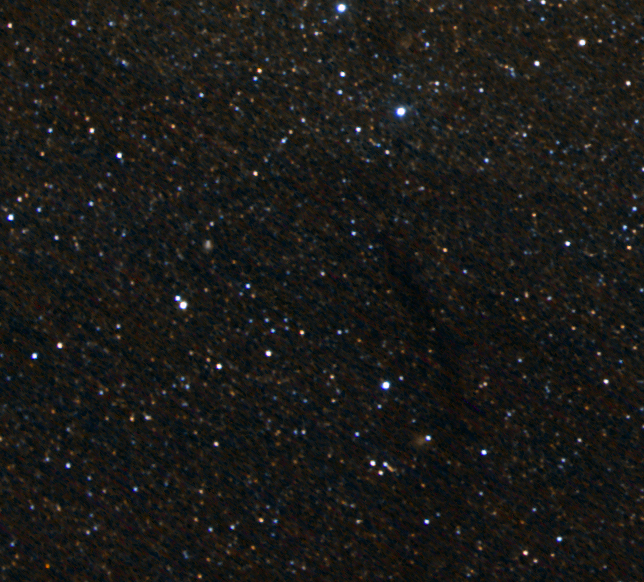
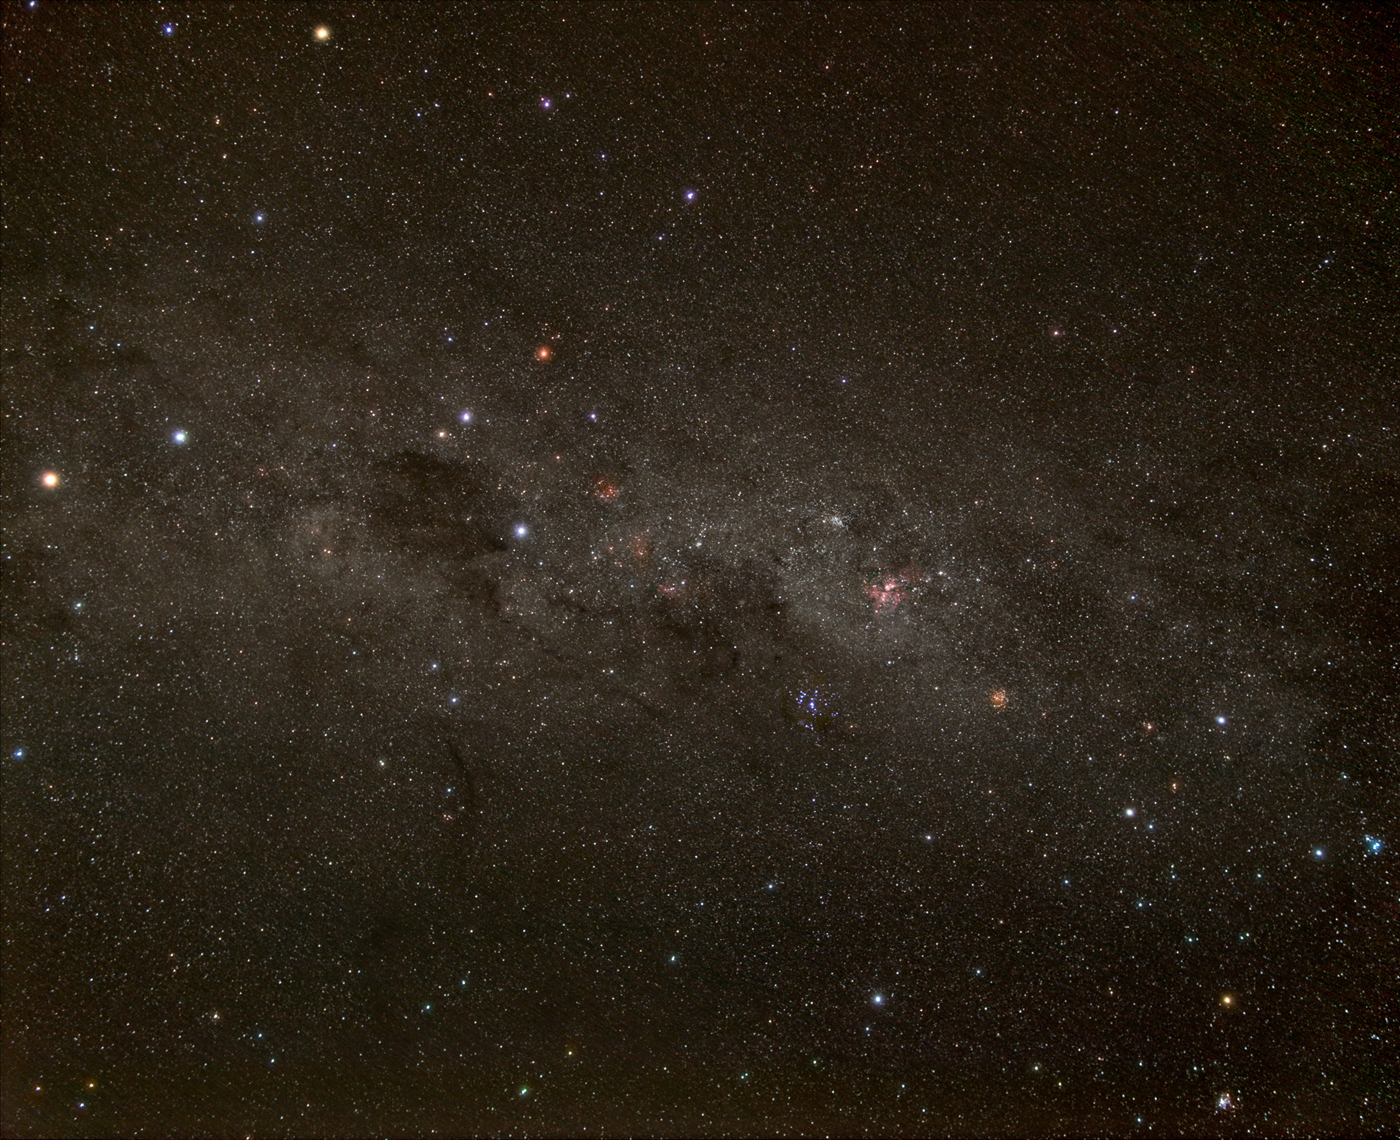 Not using dark frames
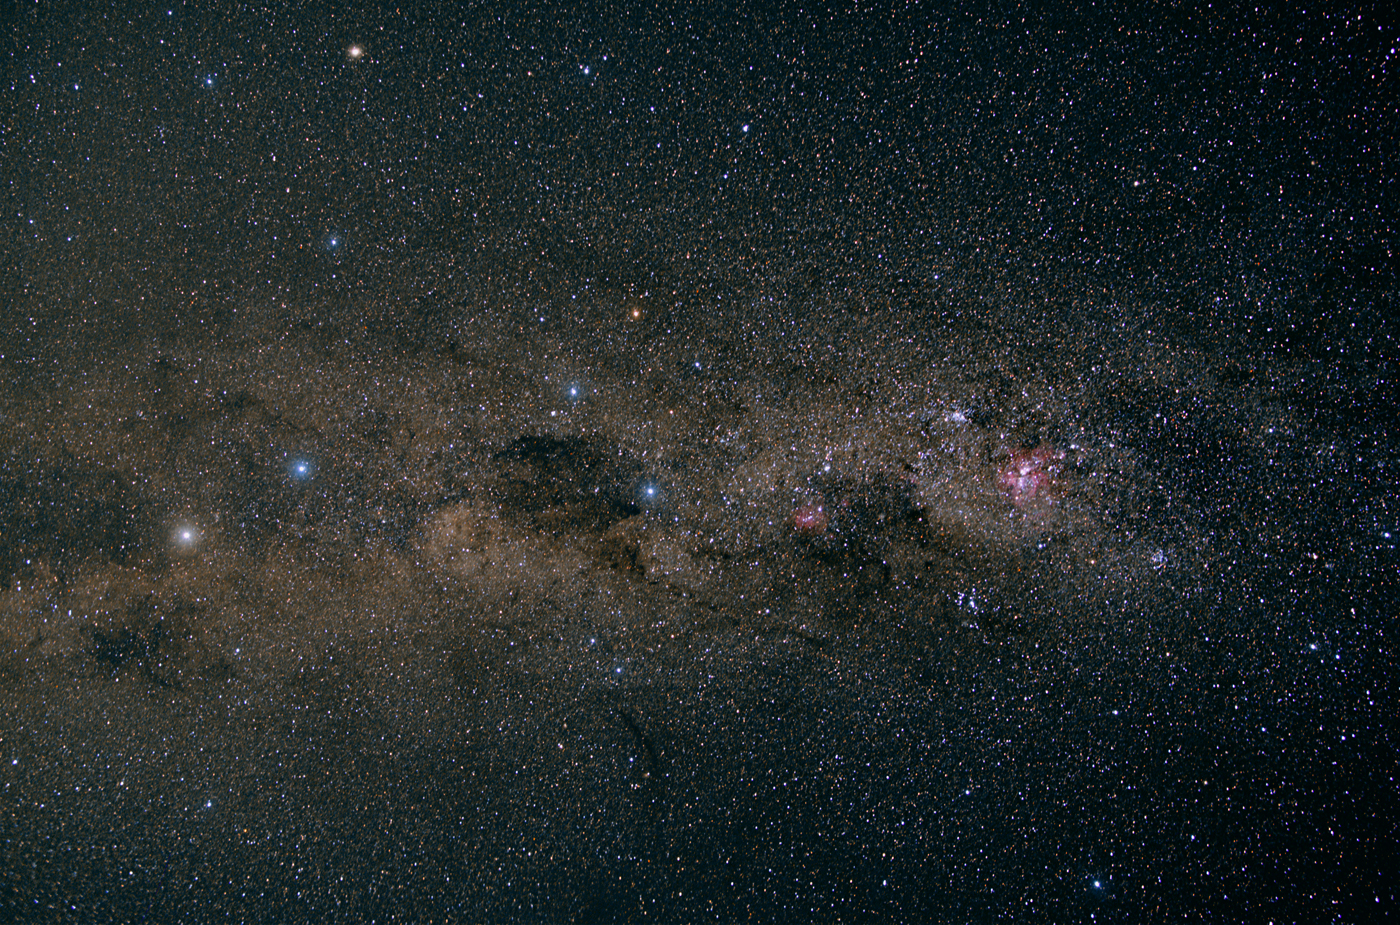
It may be hard to judge at the small scale size of the images (using a tablet I find they can be expanded) but I actually prefer the ‘feel’ of image 1 − that is the one produced without using dark frames. This may be because the low level background noise that would have been eliminated by the use of the dark frames has ‘lifted’ the fainter levels of the Milky Way nebulosity. Note that the ‘blackest’ part of the ‘nodarks’ image is not as dark as in the ‘dark’ image.
So, an approach that can only cost one a little time* is to align and stack in DSS with and without the use of dark frames and see which appears the best.
*[Even using an i7 processor based computer, with the dark frames included, the DSS processing of 44 light frames and 25 dark frames took 12 minutes. So a reasonably fast computer is a useful astrophotography tool. However, a second DSS processing without dark frames only took 5 minutes as no dark frames had to be averaged and the alignment data for all of the light frames has already been calculated and stored as .ifo files along with each light frame.]
Return to Astronomy Digest home page