JANUARY 2021
Aligning and stacking software: Sequator, Deep Sky Stacker (DSS), Siril, Astro Pixel Processor (APP), Images Plus and Affinity Photo
An article in the author’s Astronomy Digest – https://www.ianmorison.com
There are two further articles on this topic in the digest: the first is a discussion of the program Sequator and Deep Sky Stacker and the second as to whether it might be worth first converting raw files into Tiff files before using them within an alignment and stacking program. Here is a further look at the topic comparing the results of stacking the same data with 6 programs. It includes two free programs, Siril and Images Plus, a third, either ‘rented or purchased’ program, Astro Pixel Processor and the updated version of Affinity Photo. [Affinity Photo is a superb alternative to Adobe Photoshop at a very reasonable price – there is an article about it in the digest.]
DeBayering raw files
This is usually the first step and there are quite a numberof deBayering methods ranging for the very fast, but crude, ‘nearest neighbour’method to some quite sophisticated methods. Two of the better are said the be the ‘AMAZE’ method used by the Raw Therapee raw conversion program andthe VNG (Variable Number of Gradiants) method used by Siril. Astro Pixel Processor uses a proprietarymethod developed by its author called ‘Adaptive Airy Disk’ that it is stated ‘will reduce green/magenta cast in your RGB data, will improvesharpness and will make stars rounder when compared to the well-known AHD andVNG algorithms’. I was thus veryinterested in comparing its results with those obtained by the other softwareprograms.
Neither DSS nor Sequator state what debayering method is used so I have also included a test with DSS where Raw Therapee has first been used to convert the raw files into Tiff files. So the same set of 45 raw files of the Sword of Orion region was processed seven times; with DSS processing both raw and Tiff files. [In the digest article ‘Deep Sky Stacker: could it be worth first converting raw files into Tiffs?’ I found that Raw Therapee gave the best raw to Tiff results on an image of the open cluster M35.]
Aligning and Stacking the files
The program obviously has to locate the brighter stars in each frame and some of the programs may do this more accurately than others. For instance, APP say that ‘it uses very high precision star location using Intensity Weighted Centroiding’. Some of the significant differences in the program execution times may relate to how the various steps are carried.
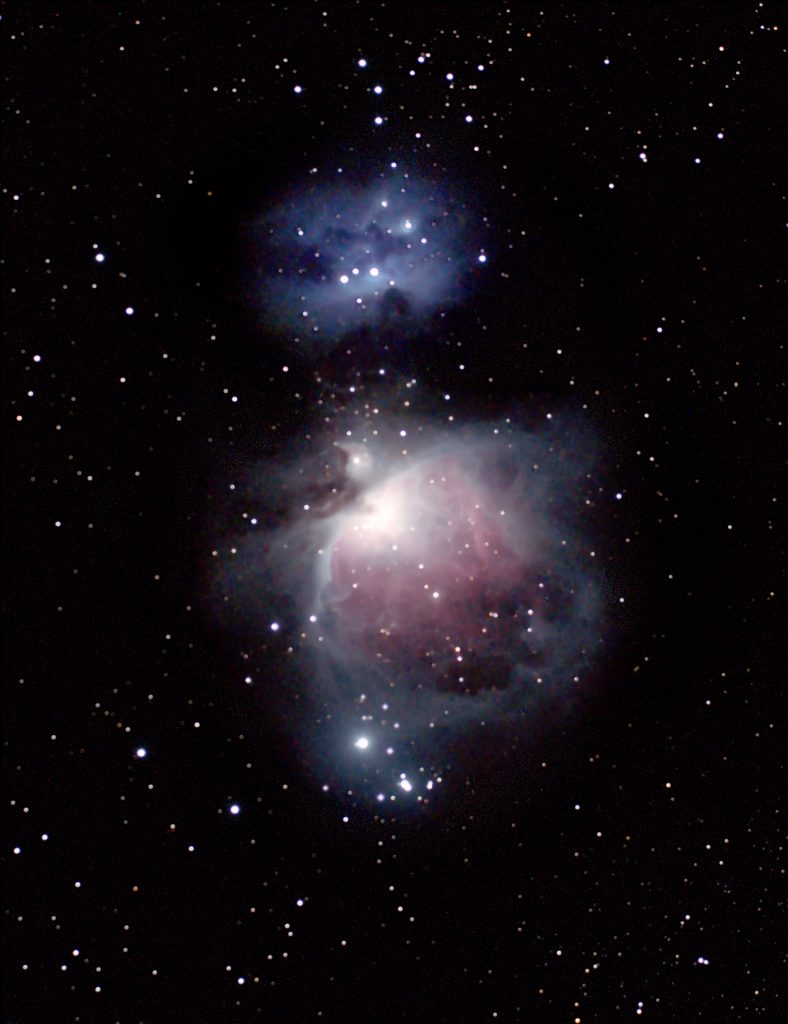
The first data set : a wide field image of the Sword of Orion
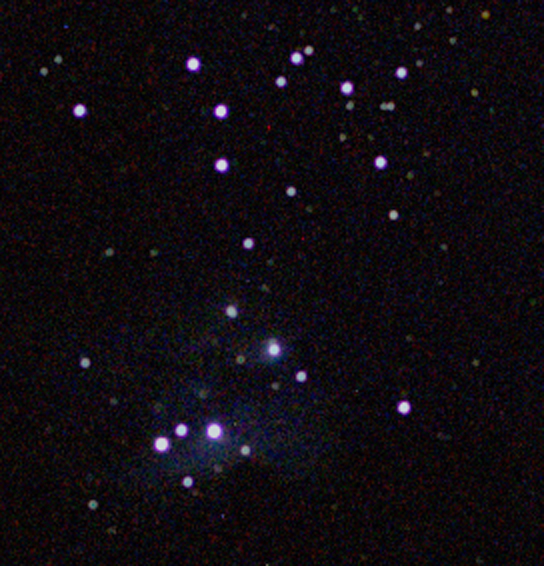
I took 45, 15 second, raw frames exposed at an ISO of 2,000 from an urban location using a Sony A7 II, 24 megapixel, camera coupled to a Takahashi FS 60 refractor and Televue 0.8 focal reducer to give an effective focal length of 284 mm. Though termed a fluorite apochromat, it does suffer from a little chromatic aberration. Long exposure noise reduction was not used. A single raw frame, converted to a Tiff file, is shown below and is seen to suffer from significant light pollution. This is easily removed in post processing of the stacked image as will be shown below.
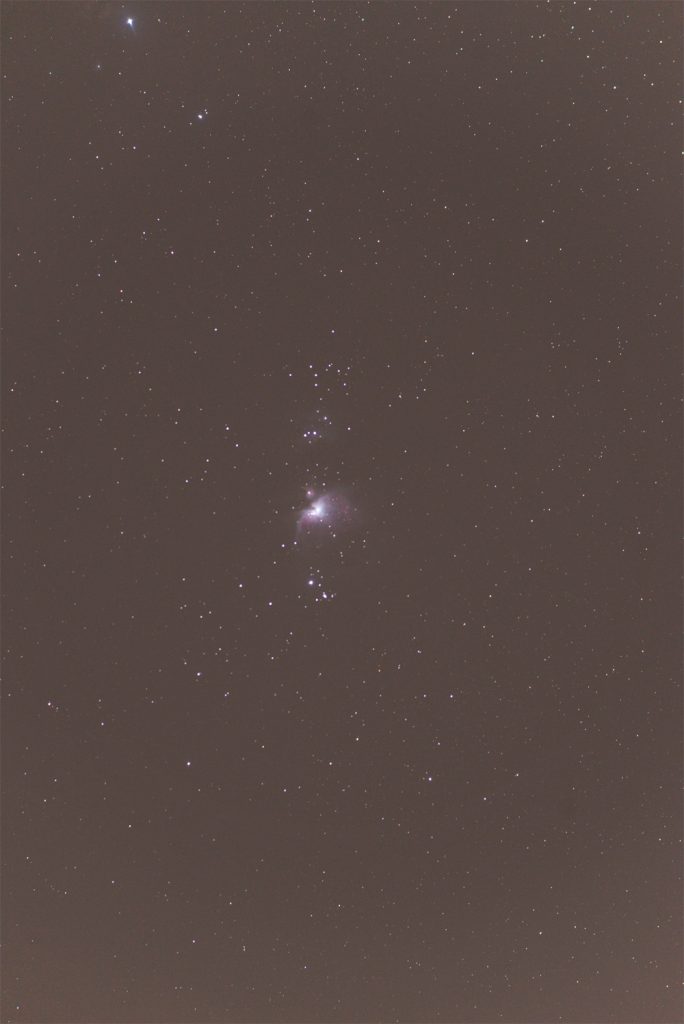
When the light pollution is removed from this frame, the chromatic aberration surrounding the brighter stars is obvious – in this respect the FS60 is not one of Takahashi’s best refractors though it has superb sharpness and contrast.
Post processing in Adobe Photoshop
In every case I processed the resulting stacked images as well as I could in Adobe Photoshop. The light pollution was easily removed. The base image layer was duplicated and the ‘Dust and Scratches’ filter applied with a radius of 30 pixels. This removed the stars leaving just bright regions around the Orion and Running Man nebulae. These were the cloned over from neighbouring parts of the frame to give a uniform measure of the light pollution background which was smoothed further with an application of the Gaussian Blur filter with a radius of 40 pixels. The two layers were then flattened using the ‘Difference’ blending mode. [For an image where the nebulous regions (in this case the Orion and the Running Man nebulae) are relatively small in the frame this is the perfect way to remove light pollution.] The images were then stretched using applications of the ‘Levels’ command; shifting the middle slider to the left to ~1.3 and adjusting the left (black point) slider to the right as required to reduce the noise levels in the image. In each case I have included a crop of the stretched image and a second, to its right, having corrected the colour balance and saturation levels to give the best possible result.
Sequator raw files
This is by far the fastest executing program. The resulting stacked image had the highest colour saturation of all the software packages and this could be seen even when a single frame was shown before the stacking process was undertaken. The stars above the ‘Running Man’ nebula had purple/magenta circular fringes – so the stacked result faithfully reproduced the single frames. Unless Sequator had the ‘High Dynamic Range’ mode selected, the centre of the Orion Nebula was drastically over exposed. The ‘Remove Dynamic Noises’ mode was also selected and this was helpful in removing the effects of hot pixels.
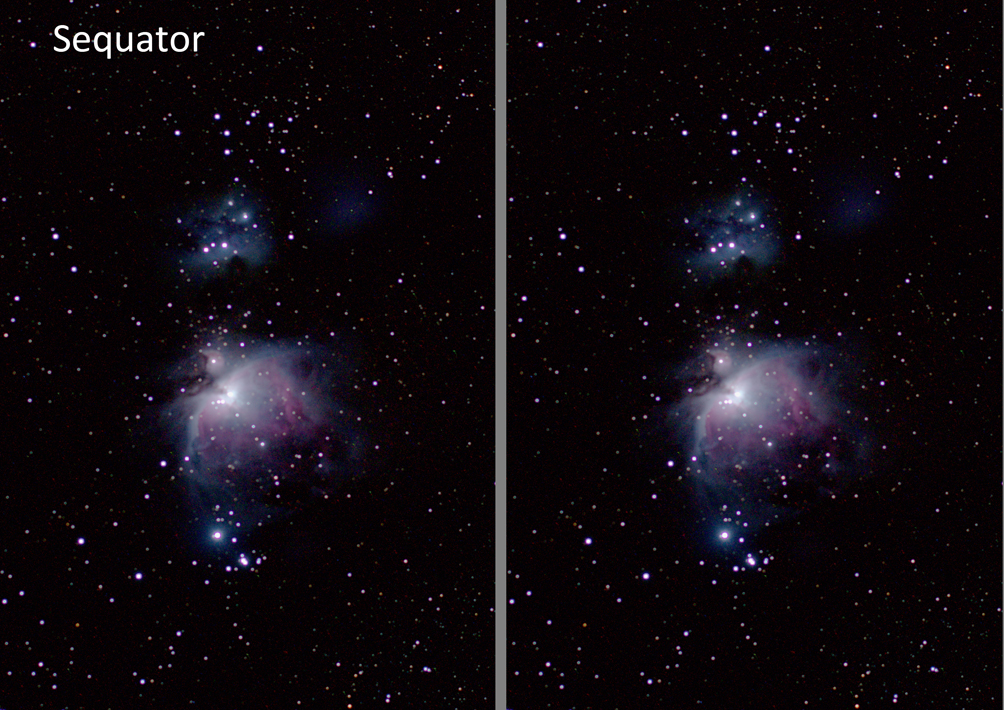
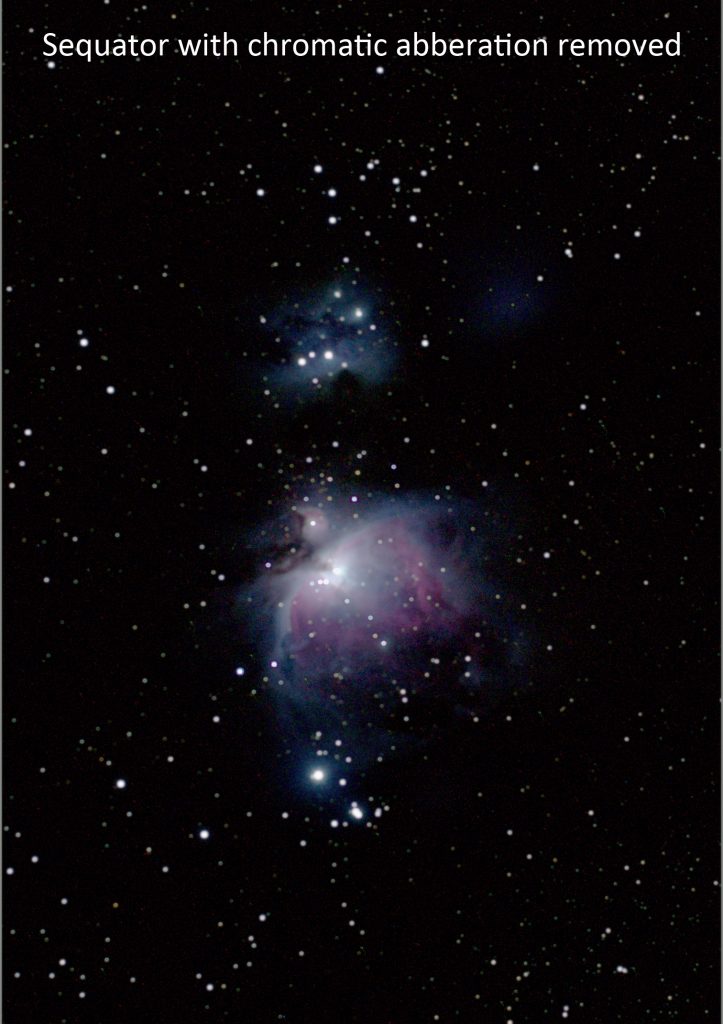
Sequator image having corrected for the purple/magenta fringing
The star halos wereremoved in Photoshop by using the‘Select Colour Range’ tool to select the white centre of the bright stars,expanding the selection to include their purple/magenta surrounds, reducing thehue saturation to zero and then smoothing the stellar images using the GaussianBlur filter.
DSS processing raw frames
The ‘classic’ program that I have been using for many years which was intermediate in execution speed. Prior to execution it is necessary to set the star detection threshold so that, say, 100 stars are being aligned in the frames. It produces a registration file along with each raw file but does not greatly increase the file storage required. Though hot pixel rejection had been selected, the effects of hot pixels were prominent which had resulted in small blotches of red, green and blue. These can be selected using the ‘Select Colour Range’ tool and painted over a black brush.
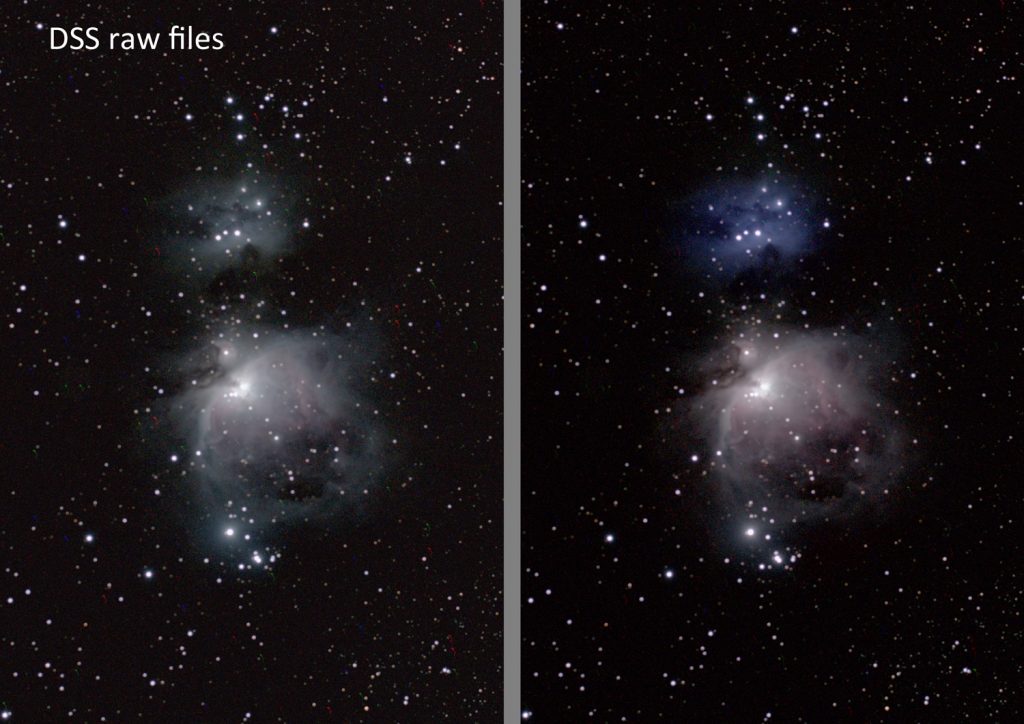
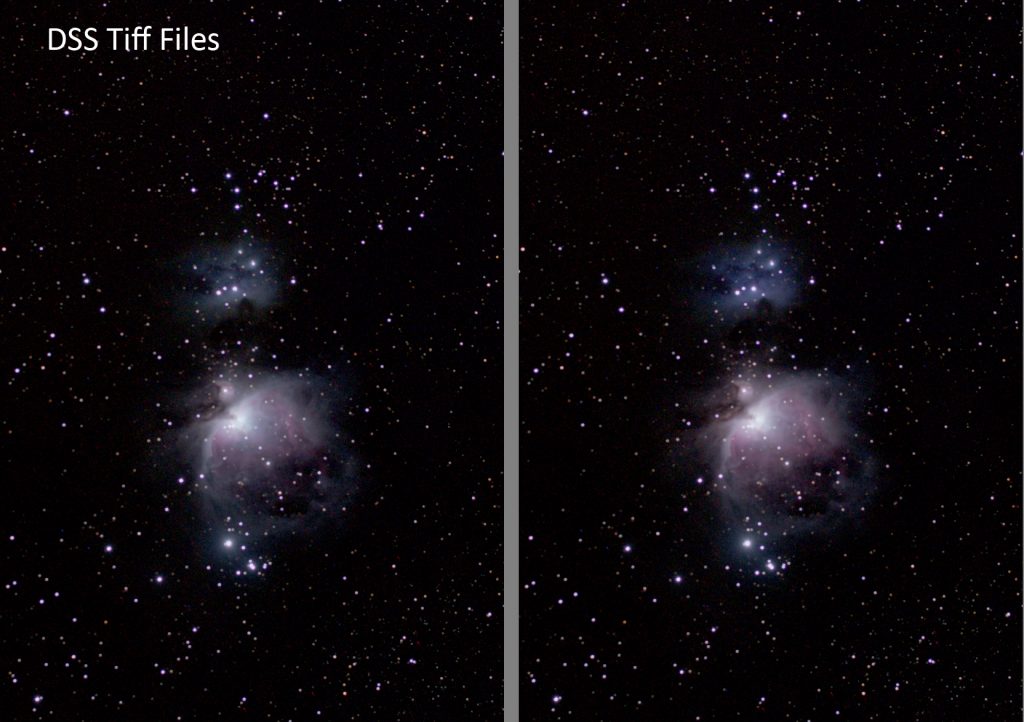
DSS processing Tiff files produced using Raw Therapee
The colour saturation was very low in the raw derived image, so I first converted the raw files into Tiff files and repeated the process. The stacked result, shown left does show higher saturation.
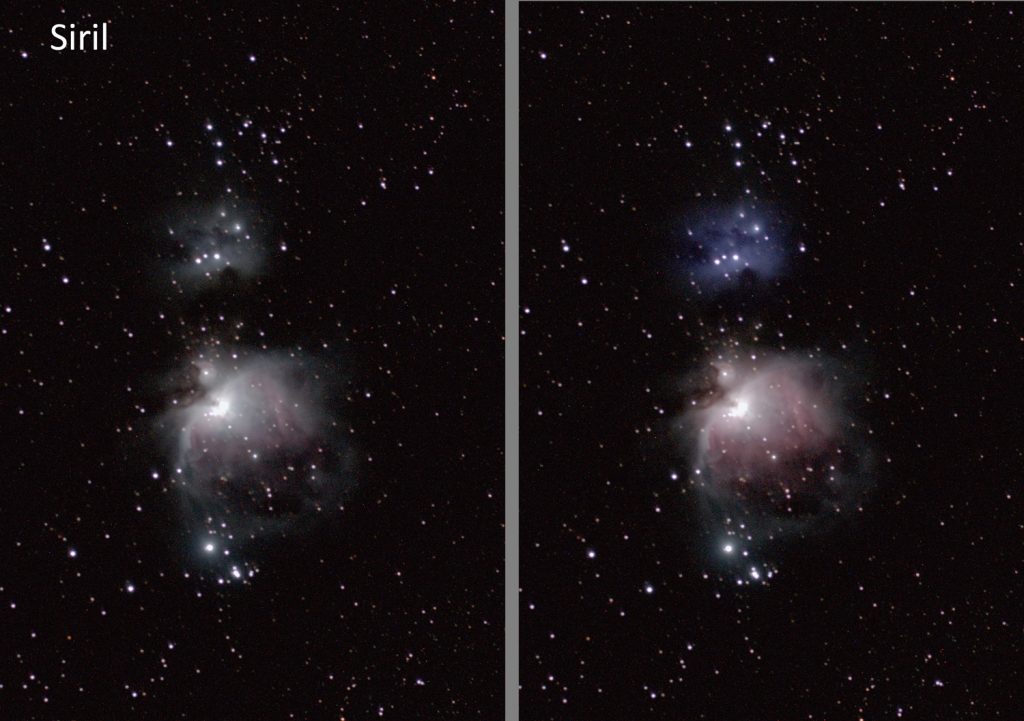
Siril
This program is now in a GUI (Graphical User Interface) format which, initially, I did not find particularly intuitive to use. As yet, there is little information on the web regarding this latest version. It does use a large amount of hard disk space as it first produces an equally sized set of FITS files and then a set of registered FITs files so increasing the required disk size by three. Relative to Sequator and DSS it is quite slow in execution. I have been using an external, SSD, hard drive to hold the initial raw files and subsequent FITS Files. The program had, pleasingly, removed the effects of the hot pixels.
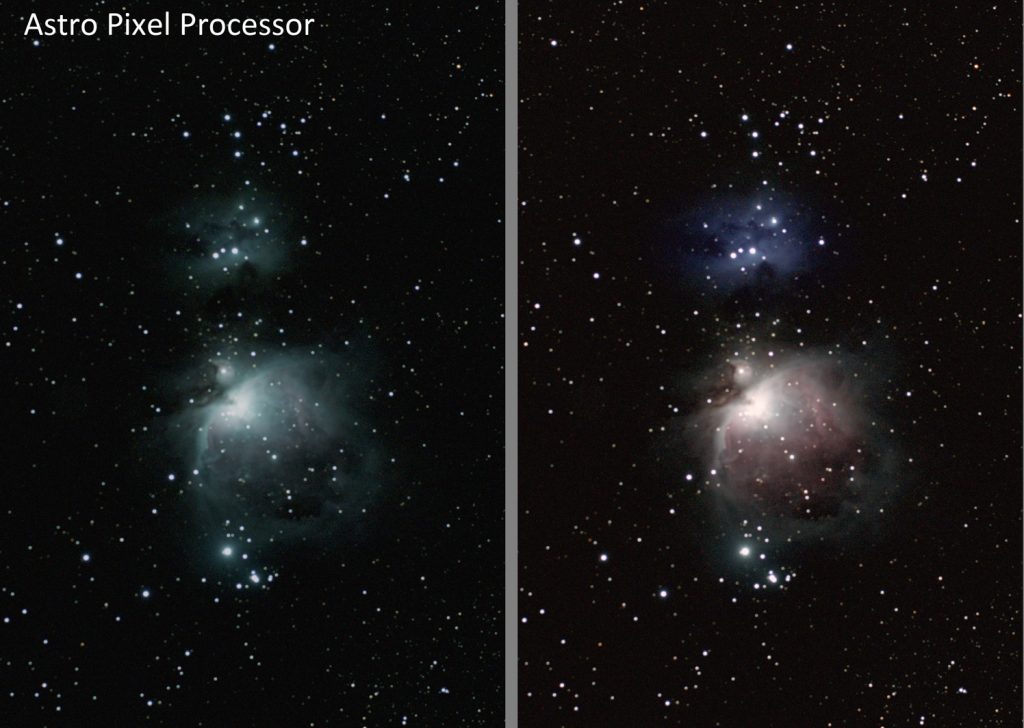
Astro Pixel Processor
I found this program quite intuitive to use for the first time as the required steps, from loading the raw files to integrating the aligned versions, are placed in a panel with the steps numbered in order. I did not require any further hard disk space but certainly used a large amount of RAM. It is also slow in execution – hopefully, as with Siril, producing a better result. It can provide both an unstretched and stretched result. I could see no difference between the two when I stretched the former to give the final, unadjusted image. A green colour cast was very obvious and was removed using the ‘Colour Balance’ tool in Photoshop.
Images Plus
The astrophotography processing package Images Plus is now free and includes an easy to use aligning and stacking program which gives good results.
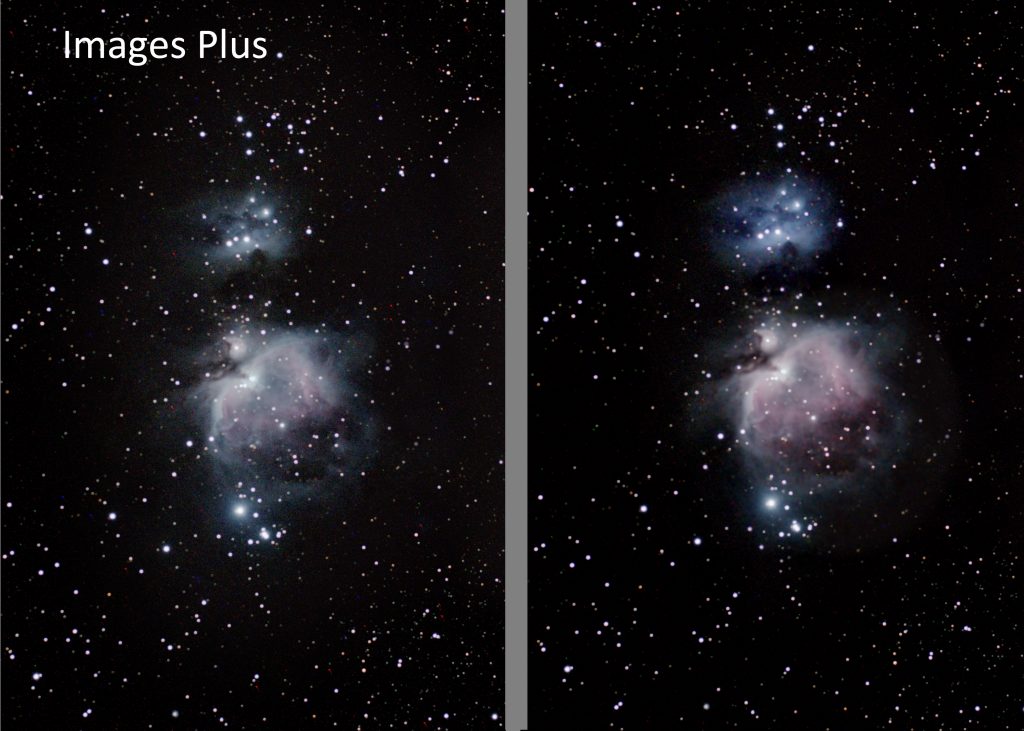
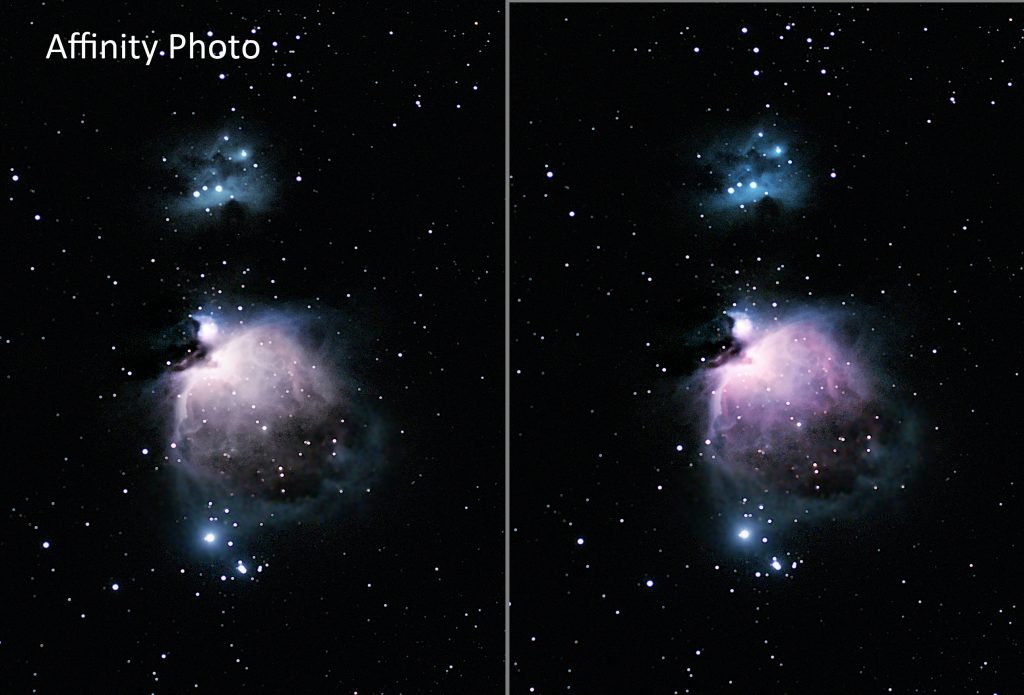
Affinity Photo
The latest version of Affinity Photo includes an alignment and stacking procedure which is again intuitive in use. It becomes slow in operation when large number of files need to be stacked, and the 45 raw files took ~45 minutes to process. [This may be due to the limited RAM in my computer as it was faster making substacks of 10 frames and then stacking these.] One minor problem is that the progress bar is not linear – it moves across the 1/3 -1/2 of the way and then essentially stops for a significant time until it rapidly moves across to the end. As can be seen, I was impressed with the result. The program had removed the hot pixels and chromatic aberration and gave a nicely saturated result with low background noise.
Conclusions
Sequator and DSS working on the Tiff files gave similar results and both retained the chromatic aberration that was visible around the brighter stars. Sequator produced the most highly saturated image followed by Affinity Photo.
As seen in their composite images and the comparison image of four programs below, the stacked results produced by both Siril and, more so, APP had largely eliminated the chromatic aberration around the stars which I find very interesting.
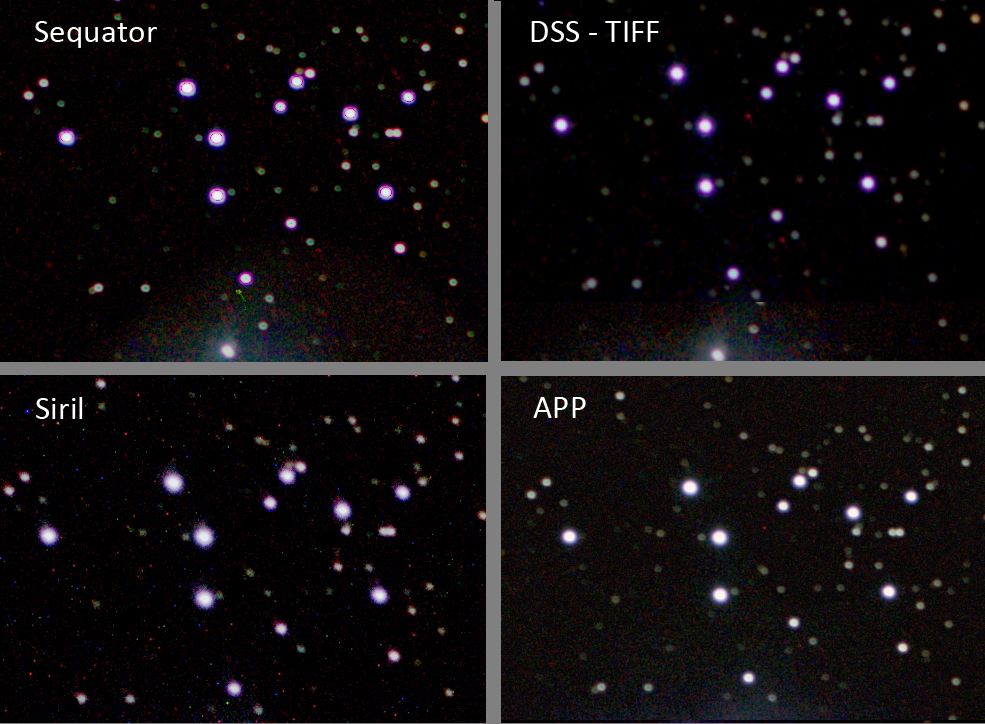
Sequator had done a good job of removing hot pixels but, though DSS had had hot pixel rejection removal included, they were very prominent – though easy to remove using the ‘Select Colour Range’ tool. Siril had largely removed the chromatic aberration and APP had completely done so.
APP had done by far the best job of removing noise in the image and showed the outer, faint parts of the Orion Nebula the best. It did, however, have a prominent green cast which required correction using the ‘Colour Balance’ tool’.
Images Plus and Affinity Photo both largely removed the chromatic aberration and hot pixels and Affinity Photo also gave a similar reduced background noise level as APP.
No program produced as good a result as could be achieved with further adjustment in Photoshop. I believe that APP (having corrected its prominent colour cast) and Affinity Photo gave the best, very comparable, results. As described below, I applied some further processing to the APP image to give a very creditable result given that it is a tight crop of a wide field image taken from an urban location with just over 11 minutes of total exposure.
A final Image of the Orion and Running Man Nebulae
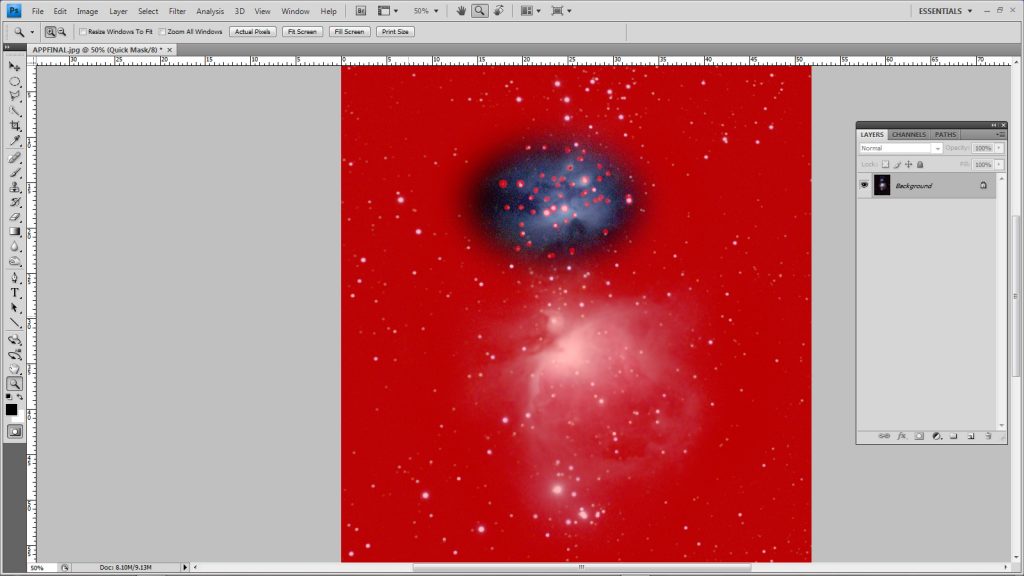
The final exercise was to produce the best possible image of the two nebula and I used as the base image that produced by Astro Pixel Processor and applied two further processes to it.
Smoothing the nebula
As the total exposure was only just over 11 minutes the Orion and Running Man nebula would be expected to be noisy and so could be improved if a little smoothing were applied to them with a Gaussian Blur of, say, 2 pixels. In Photoshop, one way to achieve this is to select each of the nebula, convert the selection to a quick mask and then deselect the stars using the paint brush as seen in the screen shot below. If the Gaussian Blur is then applied, the stars will remain sharp. A second method is to use the Starnett++ program to remove the stars from an image (as described in the digest article ‘Using Starnet++ to help enhance Nebulae images‘), blur the nebula and then add the stars back.
Reducing the star sizes
A crude method is to use the ‘Minimise’ filter in Photoshop (perhaps doubling the size of the image, applying the filter and halving the image size again to reduce the rather strong effects of the filter). A far better method is to use the, now free, program Images Plus. Within the ‘Special Functions’ drop down menu is a ‘Reduce Star Sizes’ function which works really well. To be honest, I was quite surprised as to how good an image finally resulted.
Addendum: Imaging the Pleaides Cluster
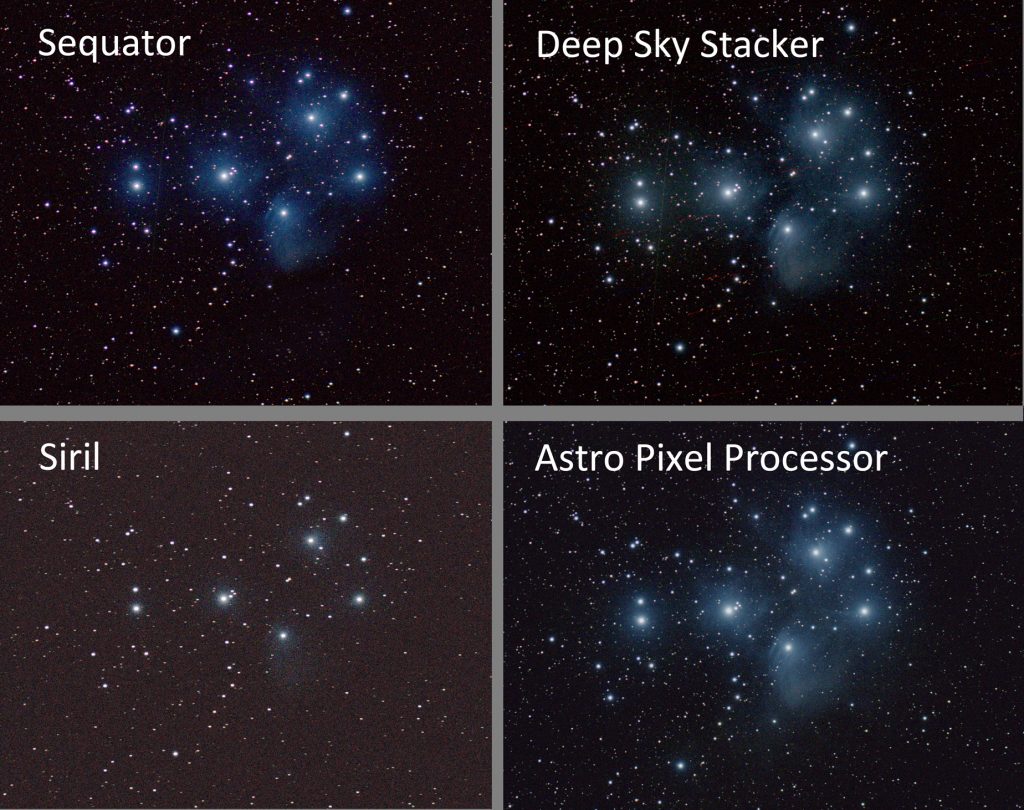
A further processing test was made using the same imaging system though the polar alignment was not that accurate giving some slight star trailing.
The results of four programs are shown above.
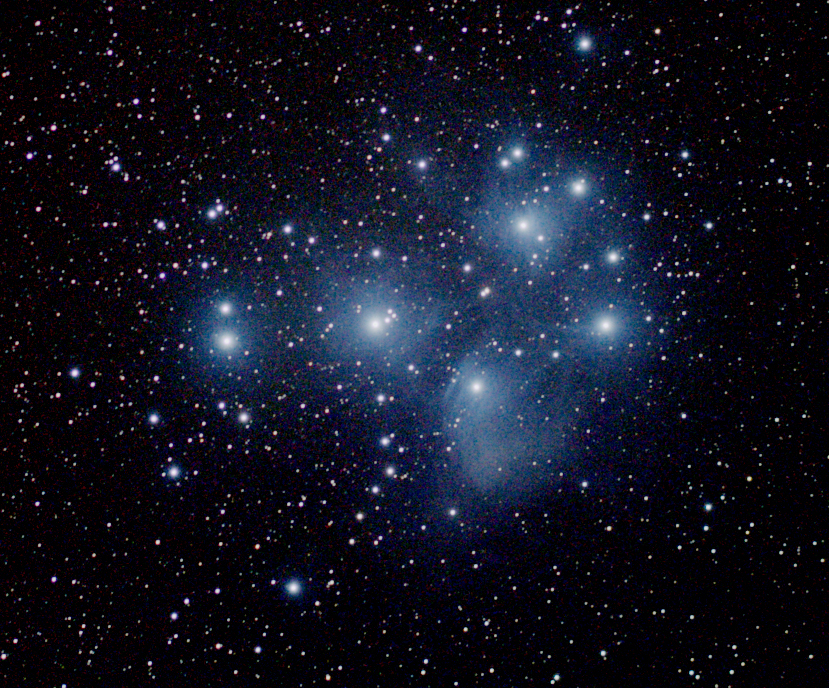
I was later able to use Images Plus to align and stack this data . Its result below is very similar to that produced by APP.
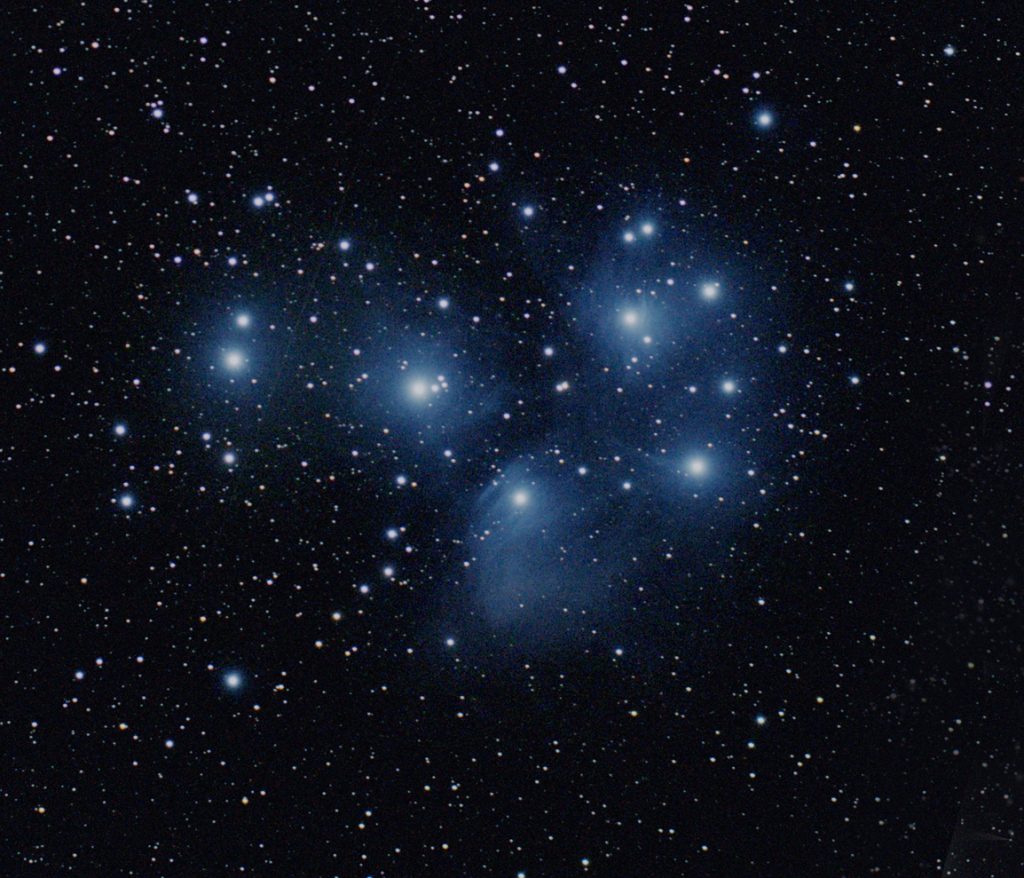
The new version of Affinity Photo, which includes aligning and stacking software, had become available after this article was completed. Here is its result of stacking the same data – which I found very impressive! I have not increased the saturation and this is simply the result of stretching the stacked result. The background noise level is very low.
Conclusions
As before, Sequator gave the most saturated image which showed up the colour fringing. As requested it had removed the effects of hot pixels. Some star trailing and one satellite trail was evident.
Deep Sky Stacker gave a very creditable result but, though hot pixel removal has been checked, their trails across the image were visible. A satellite trail was also visible.
The Siril result was very disappointing as seen in the composite image above. The nebulosity was barely evident. Star images showed the trailing but the hot pixels and satellite trail had been supressed.
Astro Pixel Processor gave the best results of the first four programs shown above; showing the nebula the best, very largely removing the colour fringing, removing the effects of hot pixels and the satellite trail and giving round stars.
However, the result of using Affinity Photo having higher, but not too high, saturation and very low noise was, I think, the best. It removed the hot pixels and chromatic aberration but did show the satellite trail.
Note: I have now used a further stacking program called ASTAP and included a full review in the digest. I believe that it gave one of the two best results stacking this data as described in the article.