JANUARY 2018
Astrophotography Tracking Mounts
[This is just one of many articles in the author’s Astronomy Digest.]
Taking wide field images of the heavens is now quite an important part of astrophotography with photographers travelling to dark sky sites with minimal equipment to capture what can be stunning images of the constellations and the Milky Way. Using small cameras and short focal length lenses, the equipment required can be quite light so one could easily travel off the beaten track, but systems are also available to mount DSLR cameras and lenses up to 500 mm in focal length. This article will look at the three star trackers that I have acquired over the years after covering some general points about tracking mounts.
Some important theoretical points
In star trackers the system to track at sidereal rate usually employs a worm drive on a circular gear ring to rotate the mount head at sidereal rate. (However, two of mine don’t!) The camera will then track the stars and so ‘star trailing’ will not be present in the resulting images. The more accurately the mount tracks the longer the exposures that can be made and/or the longer the focal length of the lens that can be employed.
The tracking accuracy is measured as the tracking deviation, measured in arc seconds, over some period of time, say, 5 minutes. [I have never been keen to use exposures longer than this as by stacking many short exposures one can obtain nearly the same result as stacking fewer longer exposures and if, for example, a gust of wind or other problem made one ‘frame’ unusable then less is lost.]
Two factors will determine the tracking accuracy; the diameter of the effective gear, the precision to which is has been made together with the precision of the worm that drives it. As an example, I could acquire a higher precision worm gear for my Losmandy GM8 equatorial mount to halve its tracking error. Larger diameter and higher precision gears and worms will, in principle, give better tracking performance.
I assume that with crystal controlled oscillators used to control the sidereal drive rate this will not affect the tracking precision.
However good the potential tracking performance of a mount, it will not be realized unless the mount is accurately aligned on the North (or South) Celestial Pole. The accuracy required is determined by a combination of the focal length of the lens and the length of the exposures so that, say, a 30 second exposures with a 24 mm focal length lens will require far less precision than a 3 minute exposure and a 200 mm focal length lens.
However, I really believe that it is better to have a slightly misaligned mount and use shorter exposures than have a perfectly aligned mount. Why? Tony Hallas has called the problem ‘Colour Mottling’. The sensitivity of the pixels under their red, green and blue filters is not uniform across the camera sensor and if the sensor is not moving with respect to the star field because the tracking is perfect, then the low level background noise will show ‘blotches’ of colour as seen in the image below.
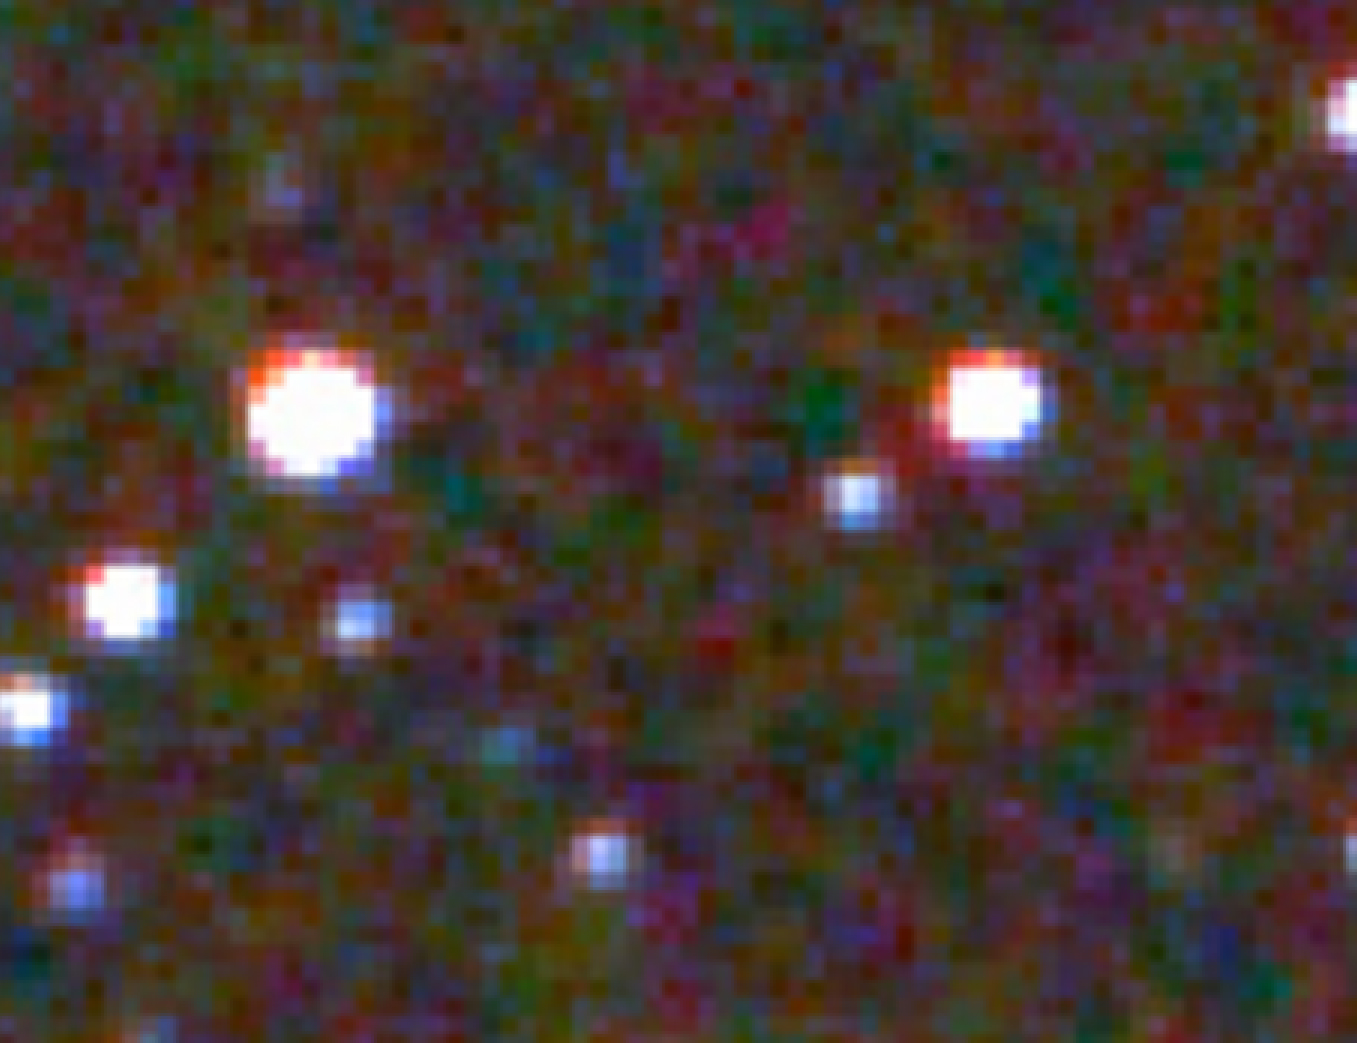
Colour Mottling
Tony Hallas suggests moving the sensor relative to the stars by a small amount over a set of short exposures. If the polar alignment is not perfect then this is exactly what will happen over a series of perhaps 20-40 frames taken of the star field. The free programs ‘Deep Sky Stacker’ or ‘Sequator’ will align all the frames before stacking them to give the result (not quite) of one long exposure. Hopefully, the colour mottling will then average out giving a grey background. A downside is that not all the resultant image will have used every frame in the sequence and so a little cropping will be required. If one has been using, say, a 4,000 pixel sensor, a drift of perhaps 50 pixels over the observing period to remove colour mottling will have almost no effect!
A further small advantage is that dust moats on the sensor will become less apparent.
One problem that may then ensue is that ‘walking noise’ may become apparent. Warm pixels, usually red, will appear to march linearly across the image, a little dot for each light frame in the image as seen in the picture below. The eye picks out linear features rather well!
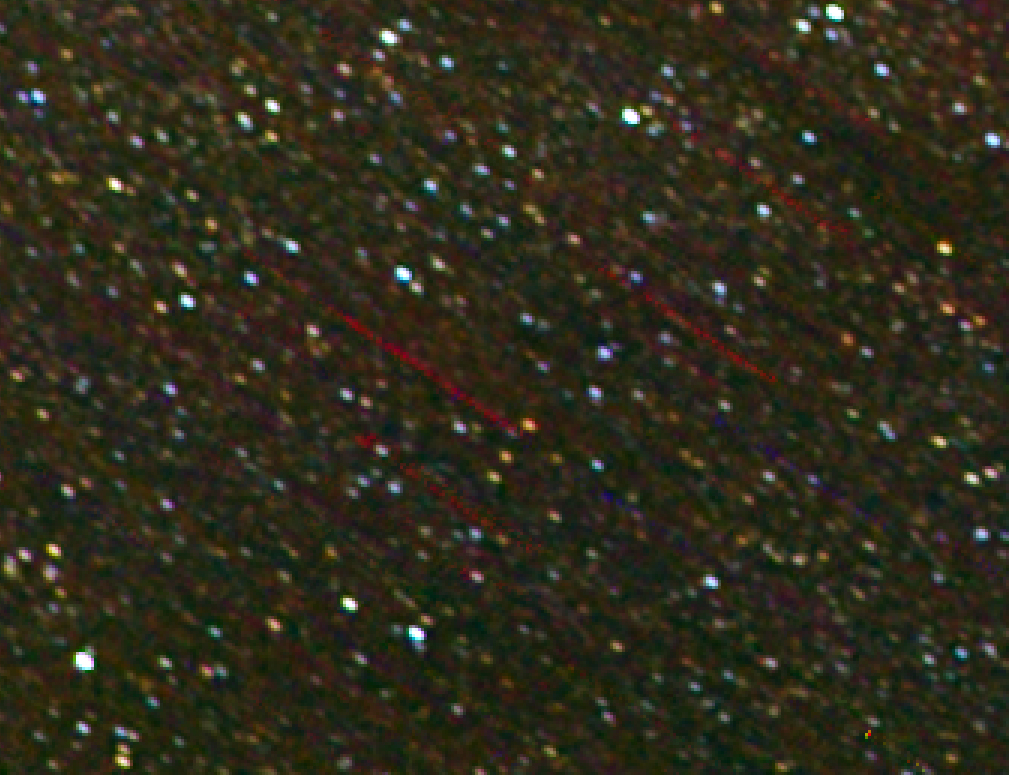
Walking Noise
A way to help mitigate this problem and also cure colour mottling is to slightly offset the polar alignment randomly during the taking of the exposures − a process called ‘dithering’. With the Manfrotto Junior Gear Head on which I now mount my Astrotrak, this is easily achieved by making very small adjustment to the fine control knobs for azimuth and elevation. Using Astronomy Photography Tools to control my modified Canon D1100 camera it is easy to pause the taking of ‘light’ frames whilst the head is moved and allowed to settle. Perhaps make fine adjustments every 5 or so ‘light’ frame exposures.
The only technique that will eliminate the ‘walking noise’ completely is to use ‘dark frames’ which will ‘map’ the warm pixels and remove them from the aligned and stacked image. The taking of dark frames when using a DSLR is quite tricky and I have posted an in depth review of this subject, ‘The use of Dark Frames when using a DSLR’, in the digest which I hope will be of interest. It includes quite a novel approach using a hair dryer so that the camera sensor can reach a stable temperature quickly.
So, do not perfectly align the tracking mount or perhaps use ‘dithering’ and then take shorter exposures to avoid star trails.
Star Trackers
There are three types of star tracker; RA gear driven, tangent (or radius) arm and barn door. Assuming all were perfectly manufactured, the tracking performance would depend on the effective diameter of the ‘rotating gear’. In the RA gear driven models these are typically of a few cm diameter. In contrast, the tangent arm and barn door trackers have effective gear diameters of up to 70 cm, so could theoretically be better. They are, however, heavier and obviously larger.
The RA gear driven trackers are the most common with, now, a very large number of models available to buy ranging from very small versions such as my ‘Nano Tracker’ described below which could only support relatively lightweight cameras and lenses to more substantial ones. There are fewer tangent (or radius) arm versions and only one that I know of (and own) barn door tracker which is described below.
It would be impossible to cover all the available star trackers in detail so, below are details of three that I have direct experience of using along with one other that, now of mine is no longer in production, would make an excellent alternative and also a very low cost clockwork driven tracker.
The article also covers, at its end, a new (and very expensive) star tracker that AstroTrac are now making available for pre-order. It will be the ‘Rolls Royce’ of star trackers and I am somewhat tempted to buy one.
Three tangent or radius arm trackers
The Fornax LighTrack II is definitely worth considering and one, if I did not have the AstroTrac described below, I would certainly purchase. Using a friction drive at the end of a ~26 cm arm (the effective radius of the equivalent RA gear) rather than a gear there is very small periodic error − Fornax quote an even lower periodic error than AstroTrak (see below) . As it uses a friction drive, a large, weighty, lens must be well balanced to avoid slipping.]
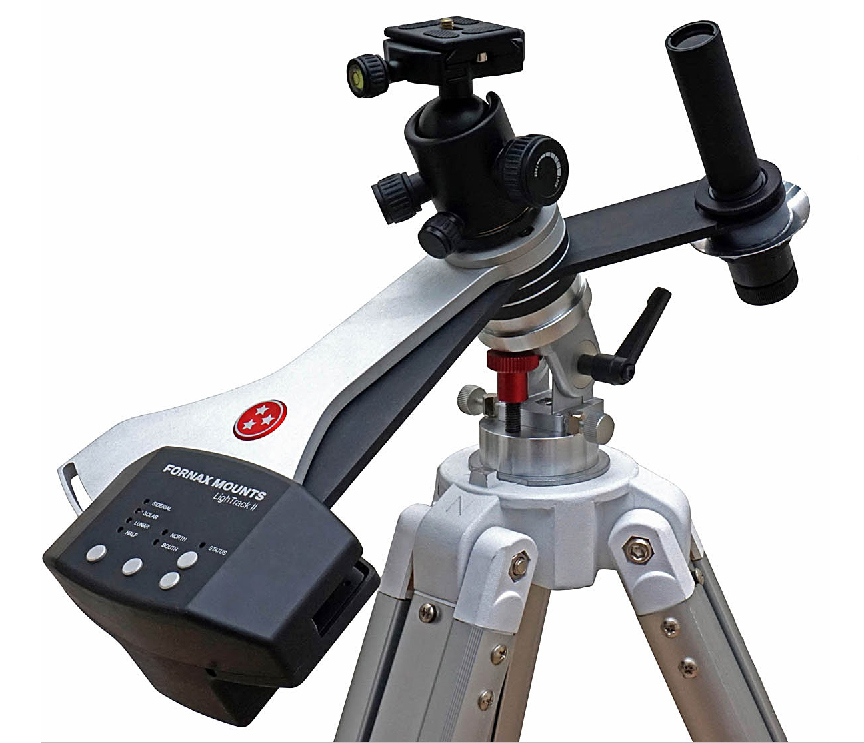
Fornax Lightrak II tracking mount
****************************
The AstroTrac TT320X-AG tracking mount and accessories
This innovative tracking mount was produced by the UK company, AstroTrac, and called the TT320X-AG. Sadly, it is no longer manufactured but they can still be found on the second hand market so I have still fully described it here. The ‘AG indicates that it is equipped with a ST4 auto-guiding port to allow guiding in Right Ascension though I suspect that this facility will not often be used. Once polar aligned, it can track accurately for nearly 2 hours. However, even without guiding it is capable of making exposures of up to 5 minutes with a typical tracking error of +/- 5 arc seconds (assuming accurate polar alignment). This accuracy is due to the fact that the drive, resulting from the rotation of a precision screw under the control of a small computer is at the base of a long arm which is ~35 cm long, so the effective gear diameter is ~70 cm! The screw assembly (effectively the worm) is precision manufactured in the US to AstroTrac’s rigorous specification and is an integral part of the motor. To track accurately, the rate at which the screw rotates must vary as the arm is extended and this is controlled by two microprocessors running at 16 and 20 million instructions per second.
The angular motion of the mounting head is far less than the motion of the screw and the result is that any periodic error in the screw thread drive is greatly reduced. To achieve equivalent tracking accuracy a very expensive equatorial mount would be required. Though the mount weighs just 1 kg (2.2 pounds), given a suitably solid tripod or pillar, it can support up to 15 kg (33 pounds) so even 80mm refractors or a Celestron C6 Schmidt-Cassegarain could be used. AstroTrac provide a TH3010 counter-balanced head to allow such telescopes to be mounted on it. A sturdy tripod is required with a pan and tilt or geared head (using the tripod manufacturer’s accessories) or an equatorial wedge to mount the AstroTrac so that it can be polar aligned. An extendible bracket is provided in which the illuminated polar mount (or alternative alignment system as described below) is mounted as seen in the figure below. A sturdy ball and socket head is required to hold the camera. They also provide a very neat and compact equatorial wedge and an ultra light pier which, for transporting by car or air, can contain and protect the AstroTrac itself.
I mount my AstroTrac on a Manfrotto 190XPROB professional tripod, initially using a solid pan and tilt head but, more recently, the Manfrotto 410 Junior Geared Head which is being used by quite a number of AstroTrac users. This makes it very easy to finely adjust both azimuth and elevation and there is even a ‘dial’ to help set the approximate elevation by setting it to 90 – latitude. However, the configuration of the geared head does mean that the weight of the mount and camera is offset to one side of the tripods vertical axis and so I align the mount along one of the legs which are well splayed for stability. This is fine for cameras and reasonable sized lenses but not, I suspect for use with a telescope and counterweight when a pan and tilt head or AstroTrac’s own equatorial wedge will be needed. As an alternative to AstroTrac’s wedge, Skywatcher provide an equatorial wedge that some AstroTrac users are employing.
AstroTrac provided an optional illuminated polar scope to carry out the polar alignment which fits into and is then held magnetically in the socket of an extending arm. It is fairly easy to knock it out of its position and users have been known to clamp the scope with a small section of water pipe insulation around the ‘sky’ side of the polar scope to securely hold it in place. As one alternative, I have an adapted laser pointer that fits into the arm’s socket for polar alignment. The use of laser pointers is becoming somewhat of a problem, particularly at star parties. For use with my equatorial mounts I have recently acquired the QHY PoleMaster polar alignment camera system and have been able to simply adapt its mount so that it can be used in place of the polar scope or laser on the AstroTrak. [There is an article about the use of the QHY PoleMaster in the Astronomy Digest and an adapter is now available for mounting it on the AstroTrac polar scope arm.] When it is not a problem, I do an initial alignment using the laser pointer and then use the PoleMaster. The precision achieved when mounting the Polemaster in the polar scope arm depends on the accuracy of its pointing relative to the mount as it is rotated round to its three positions. When the counter balanced camera/telescope system is employed, some users have made adapters to mount it on the polar axis to achieve higher precision. The use of a PoleMaster does, of course, require that a laptop be adjacent to the imaging setup. This might also be used to control the imaging camera. [I use ‘Astronomy Photography Tool’ when using my H-alpha modified Canon 1100D and the ‘DSLR Dashboard’ App running on a tablet to control my Nikon D610.]
Omegon MiniTrack LX2
This, clockwork driven, tracker is the least expensive of all star trackers but can only be used in the northern hemisphere. It can track for ~60 minutes and has a spring system to balance the weight of camera and lens – which could up to ~300mm in focal length. Quite a fun device!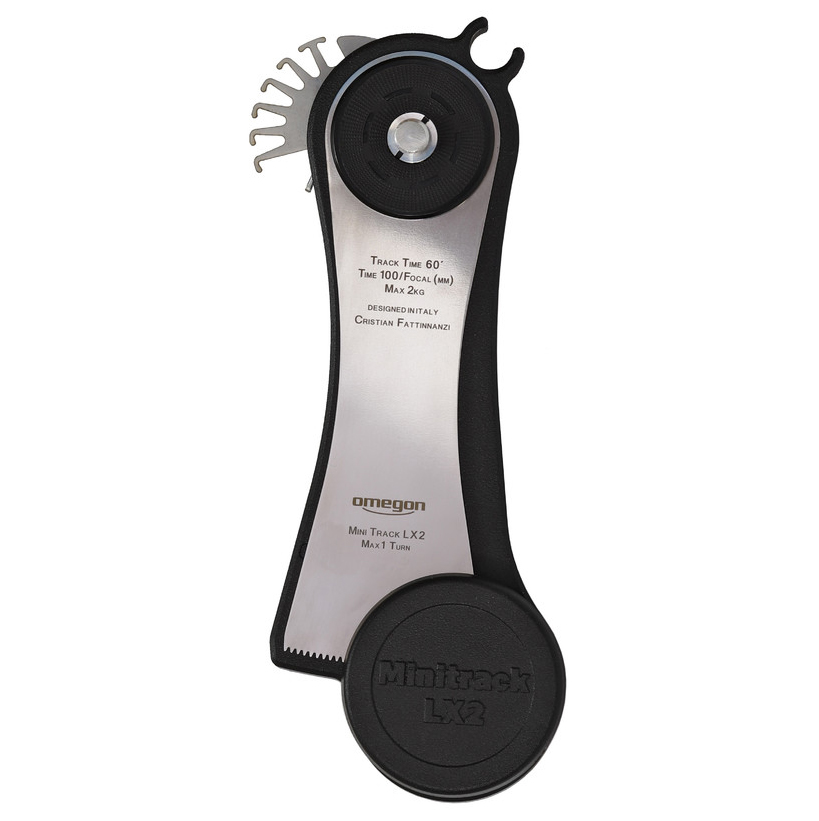
A Barn Door Tracker – StarSync tracker
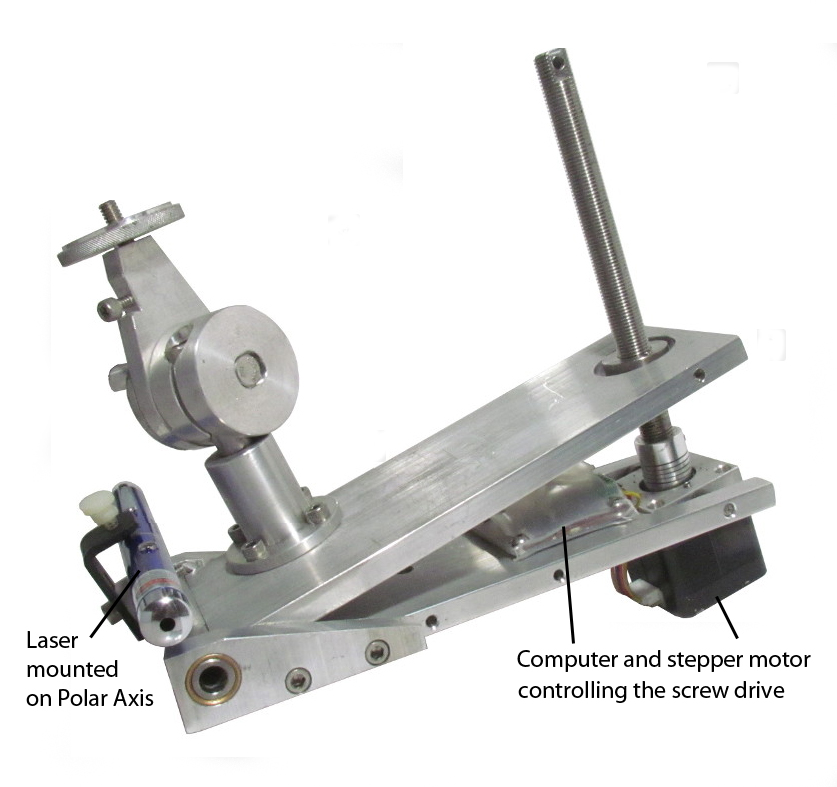
Though currently only available in the USA, a recent addition to the range of star trackers is the StarSync tracker which (in a way I rather like) puts ‘function-over-form’. It is a stainless steel and aluminium development of the simple ‘Barn Door’ tracking mount that many astrophotographers constructed and used before the current sophisticated star trackers were available. As seen in the figure below, the upper plate is driven by a stepper motor rotating a solid metal screw. To compensate for the fact that the screw is straight, not curved, the screw needs to turn at a variable rate which is controlled by a small microcomputer. It can track for over 2 hours before it resets automatically. [My early, prototype, version did not, in fact, do this and, very pleasingly, I was able to suggest a very simple software addition to the computer’s code to achieve this.] The camera mounting head is built in, so a ball and socket joint is not required and there is a channel in which to lay a laser pointer with which to align onto the North Celestial Pole. The StarSync has a greater effective gear radius (19 cm) than the gears used in the compact star trackers and so should allow for more accurate tracking giving the ability to take longer exposures.
This is a very solidly made mount and thus could be easily used with longer focal length lenses than the smaller tracking mounts. I particularly like the tall camera mounting head which allowed the camera to be aligned on the sky somewhat more easily that when using a ball and socket joint. I took it to the Kerry dark sky reserve in Ireland to image the Milky Way and the results are discussed in detail in the digest article − ‘Imaging the Milky Way from the Kerry Dark Sky Reserve’. There can sometimes be a problem with the use of a laser pointer to align the mount, and now an adapter can be bought so that the QHY PoleMaster could be used instead.
An RA Gear tracker – the Nano Tracker
One of the smallest and lightest tracking mounts (but still weighing 360 grams) is the Baader Planetarium (or Sightron) Nano Tracker which is also the least expensive at around £200. It is supplied with a small battery/control unit. With a Right Ascension gear of just ~2-inches diameter it will have a somewhat lower tracking accuracy than those described above. One weakness is that only a small, and not very practical, sight hole is provided for polar alignment. I have acquired one for use when travelling by air with a very limited luggage allowance and have made a simple aluminium plate on which I can mount a laser pointer for polar alignment as seen in the figure below.
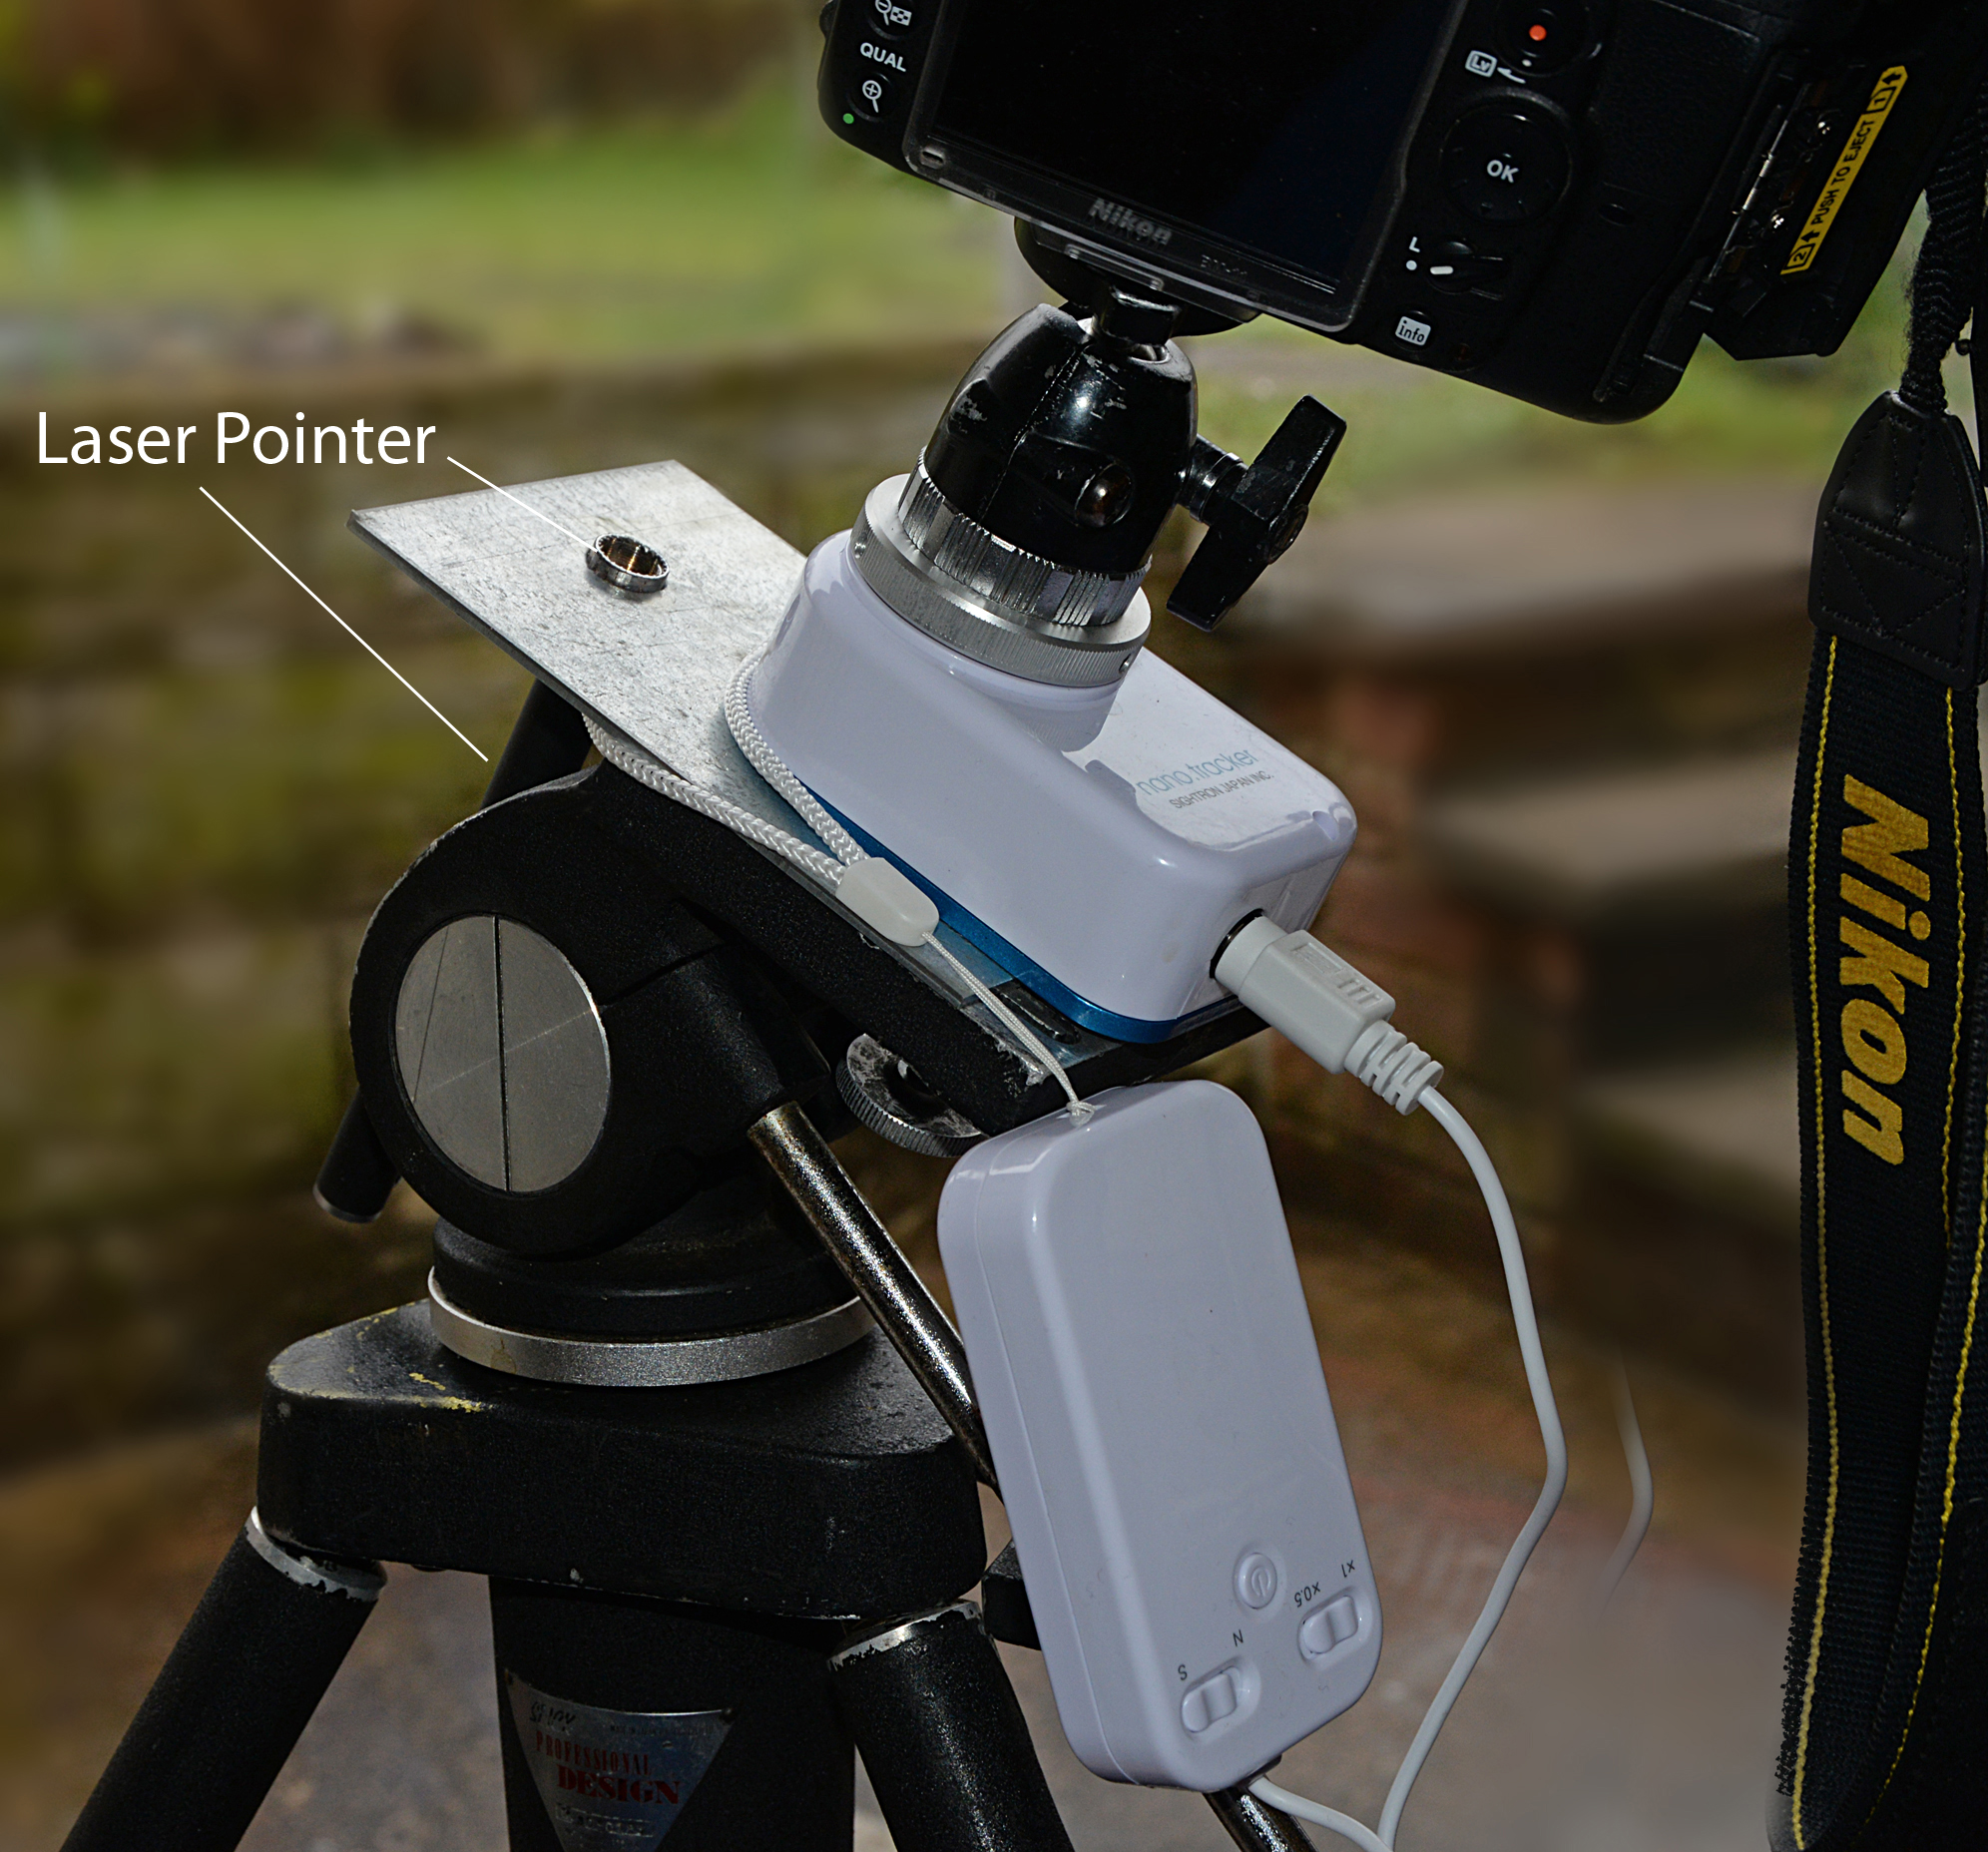
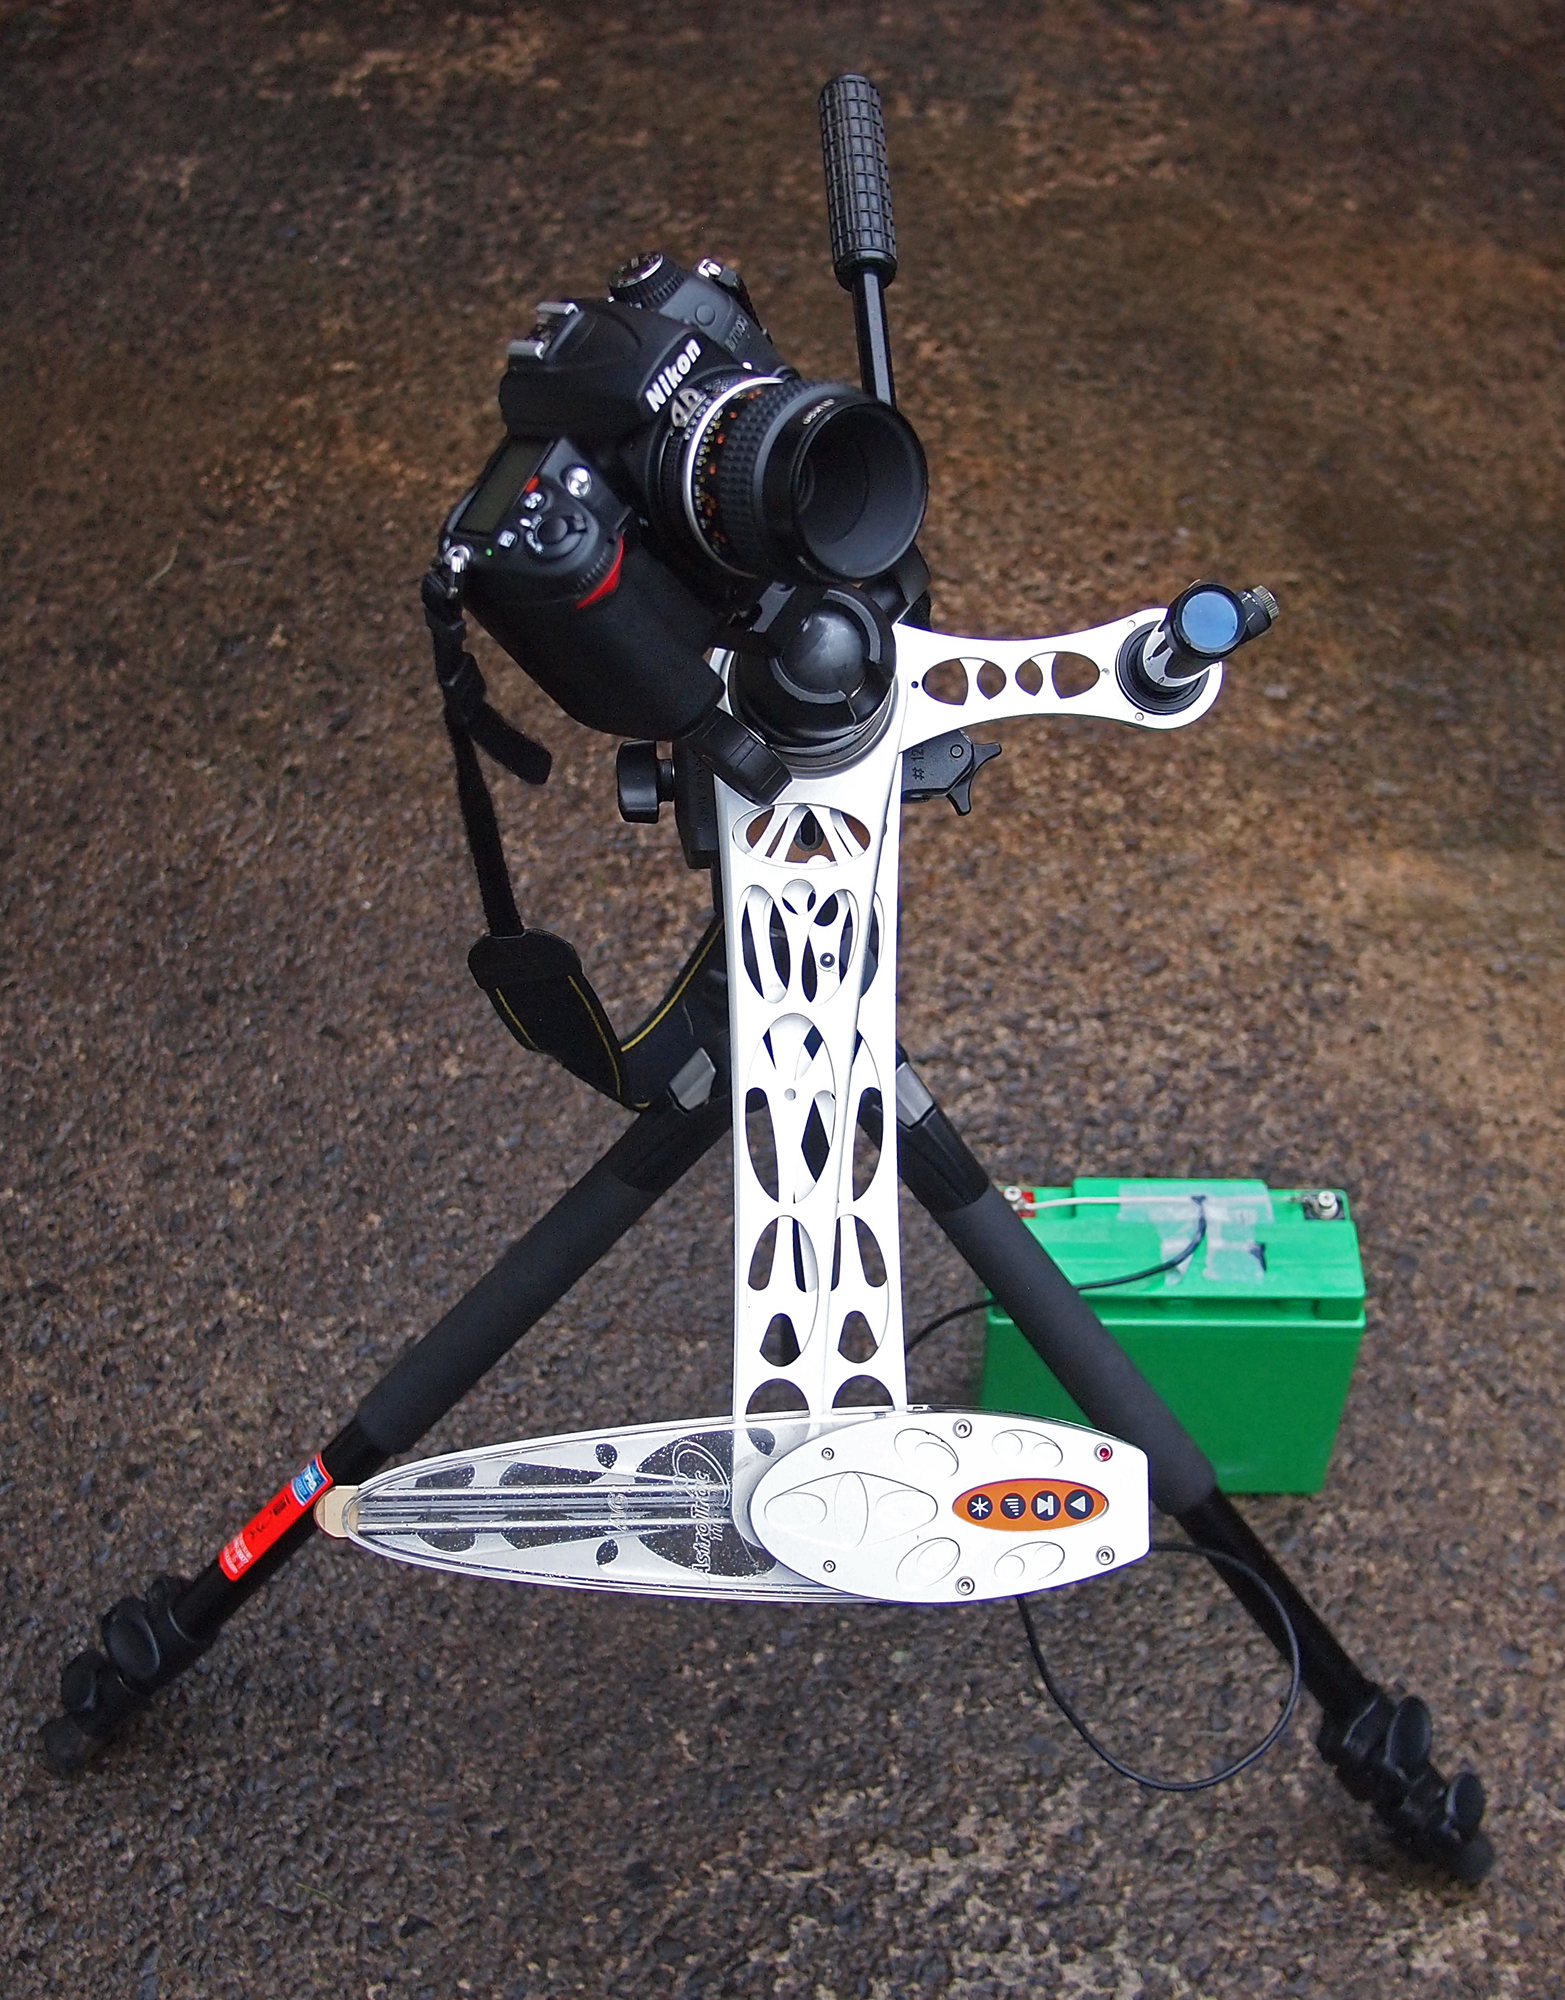
The laser beam must be offset from the Pole Star by 0.7 degrees (43 arc minutes to be precise and about the width of a little finger at arm’s length) towards the star Kochab in Ursa Minor. This would not have been much use in the southern hemisphere and so I simply used a compass and protractor to determine the required azimuth and elevation. Happily, the region of the Milky Way that I was imaging was not that far from the South Celestial Pole. The result of this imaging exercise is described in detail in the article ‘A Beautiful Southern Hemisphere Skyscape’ in this digest.
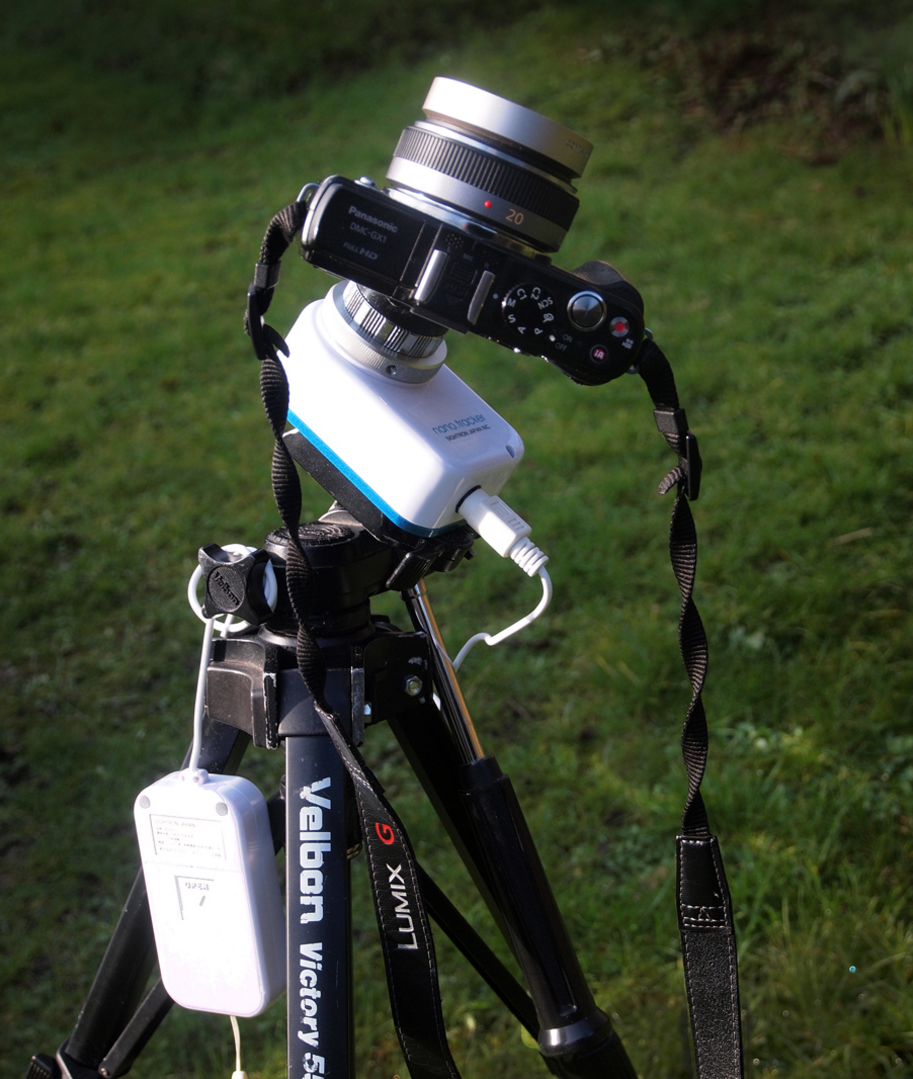
Lightweight system used for imaging the Milky Way in New Zealand
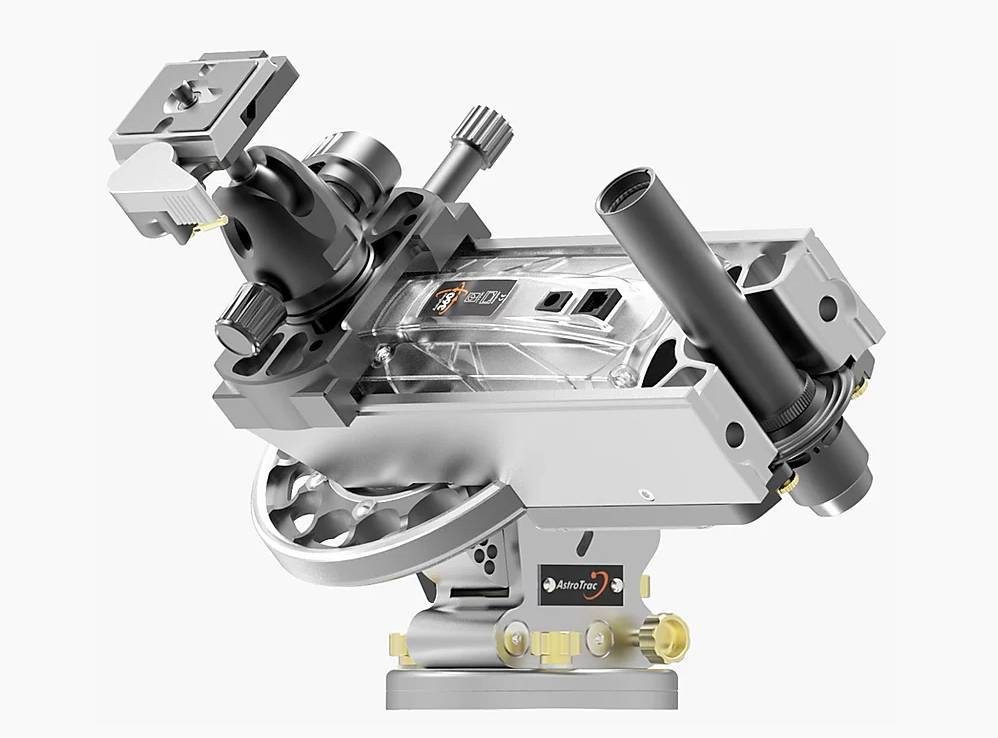
The AstroTrac 360 Single Arm star tracker
Costing £1,300 and now available for pre-order, this is likely to be the highest precision star tracker available. Its ‘advanced friction drive and optical encoder system’ is stated to give even better unguided tracking performance than the AstroTrac tangent arm model described above. As indicated in its name, it has no time limitation as did their earlier model.
Imaging with longer focal length lenses or small telescopes
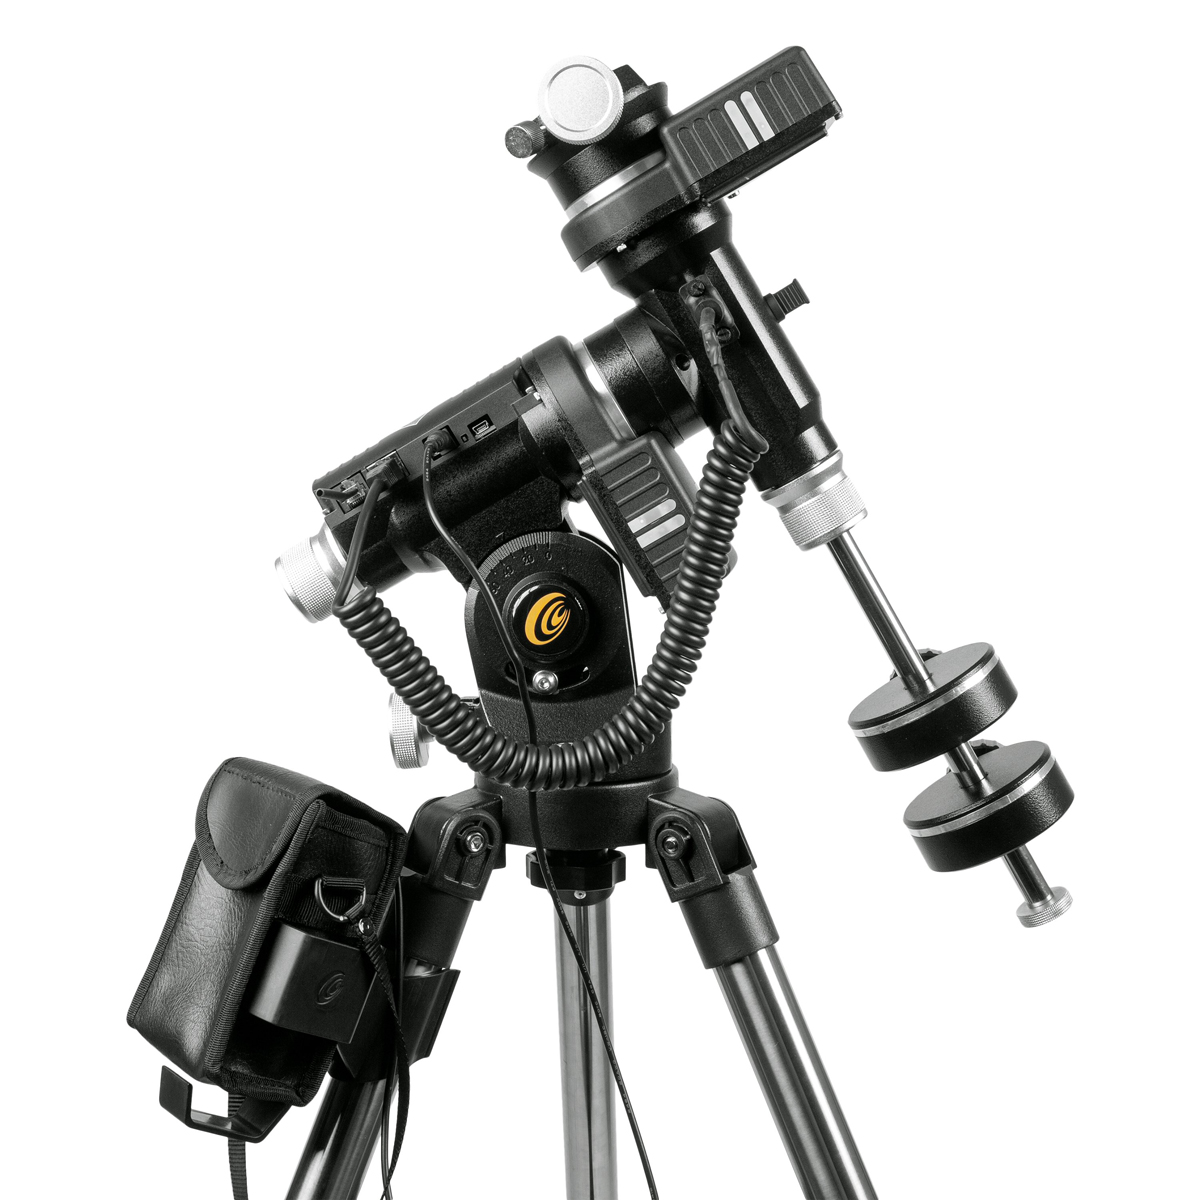
A typical star tracker will support a camera with a lens having a focal length of up to ~200 mm though I would not expect my Baader Nanotracker to cope with such a lens. If one wishes to use longer focal length lenses or even small telescopes, there are essentially two options: the first is to add a counter weight system, should the particular mount support one, to the star tracker and the second is to use a small equatorial mount.
An excellent example of the former is the ‘Skywatcher Star Adventurer Pro Pack astroimaging mount bundle’ at a cost of around £300. One will also need a sturdy tripod to mount the assembly.
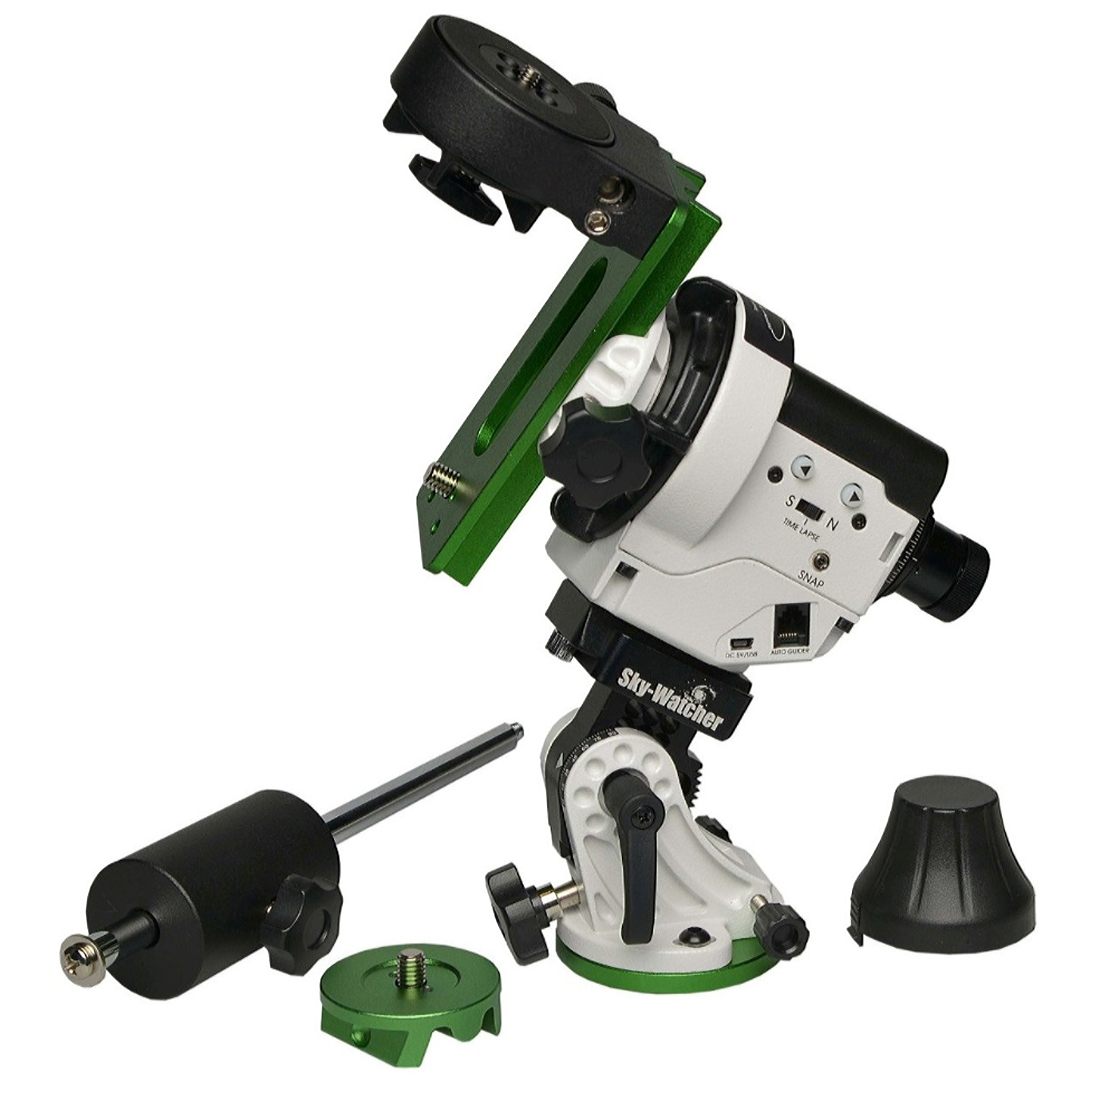
iOptron SkyTracker Pro and SkyGuider Pro
iOptron, whose alt/az and equatorial mounts I admire, also produce two tracking mounts, the lesser expensive SkyTracker Pro at ~£295 for the basic tracking head and the SkyGuider Pro at £429 for a head and counterweight system. Usefully, both have built in rechargeable batteries that can run the mount for up to 24 hours. The SkyTracker Pro’s removable alt-azimuth base features a precision bubble level, degree markings for the altitude and a built in post for the azimuth control. As well as sidereal, solar and lunar tracking rates, it has a half-sidereal rate for sky/landscape imaging. An illuminated polar scope is included. There is a fast slew rate (180x) for aligning the camera and an optional counterweight balance kit can be provided for use with heavier weight lenses.![]()
The SkyGuider Pro has the same features but also includes a DEC mounting bracket package, which includes DEC mounting bracket, counterweight shaft, counterweight and Vixen-type dovetail saddle, which makes the SkyGuider Pro mount suitable for a heavier camera/lens system, even a lightweight telescope. It also includes a ST4 guiding port for use with a small guide scope and a program such as PHD2 Guiding to guide in Right Ascension.
Instead of the polar scope, an iOpton iPolar scope could be used for polar alignment. (I find the polar alignment tool in SharpCap is easier to use than the iPolar software if a windows laptop is being used.)
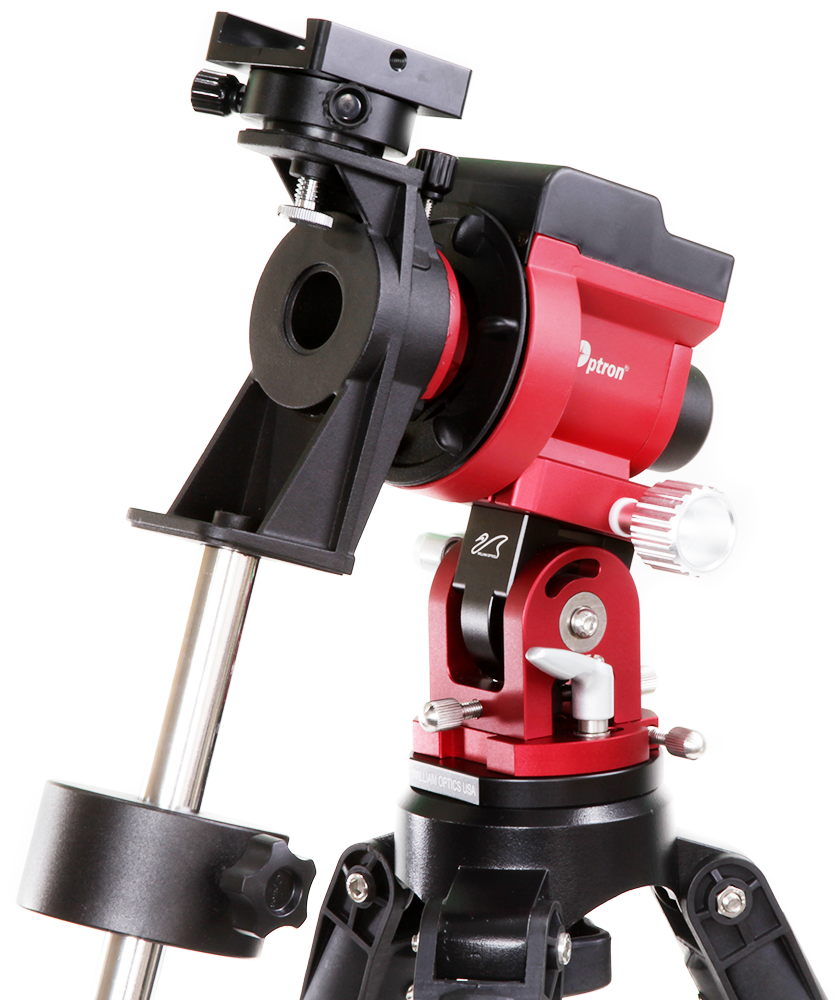
The Explore Scientific ‘iEXOS-100 PMC-Eight Equatorial Tracker System
A very interesting alternative, and one which also has ‘star gazing’ abilities is the ‘goto’ Explore Scientific ‘iEXOS-100 PMC-Eight Equatorial Tracker System’ available for around £400. This is well worth tracking down (sic).
There is now a review of this mount in the digest (The Explore Stars …..) but here are a few details. Its cost is low as it does not have a hand controller but instead communicates by WiFi to the users recent Android tablet, Apple tablets or Windows 10 laptops having first downloaded the ‘Explore Stars’ software and 70,000 object database. The worms in the RA and Dec drives are ‘belt driven’ (as is now a common upgrade to a Sky-Watcher HEQ5-Pro mount) to give smoother tracking and the RA and Dec worm driven gears are ~6-7 cm in diameter – greater than those in most gear driven (rather than tangent arm driven) mounts which should also improve the mount’s tracking ability. The RA and Dec axes have very nice ‘clutches’ (as in my £3,000 Losmandy mount) to allow smooth manual movement of the pointing so making it very easy to use when selecting imaging areas manually. I have been able to use it very successfully handing a (heavy) Teleskop Service 66mm astrograph and Sony full frame camera.