JUNE 2018
What ISO to use for astrophotography?
[This is just one of many articles in the author’s Astronomy Digest.]
Sadly, there is no one answer as it is dependent on the camera to be used but there are some useful considerations to keep in mind and a website link is given that covers a wide range of cameras and which should help is deciding what ISO to use.
Let’s first say something about ISO. Contrary to some stories, it does not alter the sensitivity of the camera sensor. The data that is read out of the sensor is normally amplified before being digitised usually with 12 or 14 bits. Up to some ISO value – which varies from camera to camera – the gain of the amplifiers is increased by powers of two as the ISO is increased from say ISO 100 to ISOs 200, 400, 800 and possibly 1600. This will increase the noise somewhat but, more importantly, reduce the dynamic range of the resulting images. Beyond this ISO value, the amplified gain is set to maximum (at, for example, ISO 800) and the digitised results are multiplied by 2 for ISO 1600, 4 for ISO 3200, 8 for ISO 6400 and so on. By reducing the number of bits in the data the noise is bound to increase.
For astrophotography use, there is absolutely no point in using an ISO beyond that when the amplifier gain is a maximum.
Using a higher ISO that this will simply increase the brightness of all parts of the image equally as, for example, the stars. It is far better to do a non-linear stretch of an image increasing the brightness of the fainter stars (and perhaps nebula) more than the brighter stars or parts of the image.
One may however, initially use a higher ISO so that the image can be easily seen in ‘live view’ so that the star field can be suitably framed.
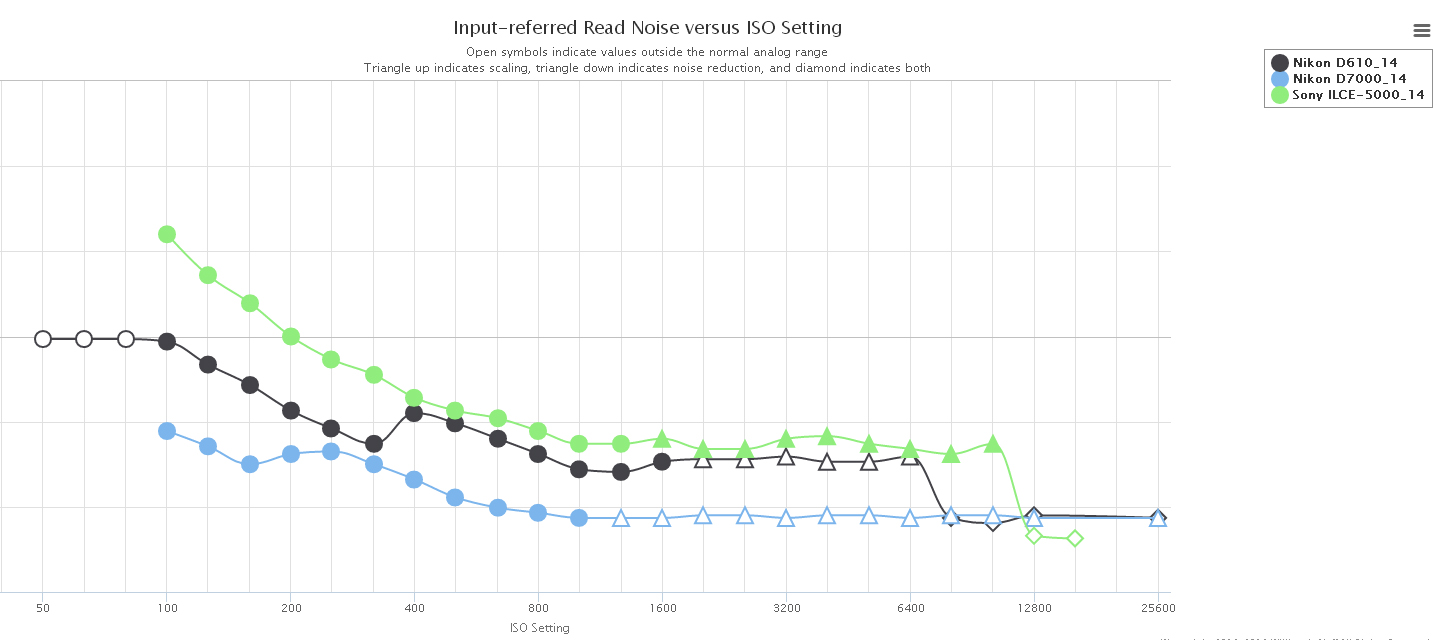
A very useful website, https://www.photonstophotos.net/Charts/RN_e.htm, shows for many cameras the point where digital amplification starts. (This is the ISO where the circles turn into triangles, so keep to the left of this point.)
For example, for my Nikon D7000 this is ISO 1000
Nikon D610 this is ISO 1600
Sony A 5000 this is ISO 1600
ISO invariance
This is a very ‘in’ topic at the moment provided that one is shooting in raw. Suppose we want to image a low light scene and, for various reasons, the aperture and exposure are fixed. (One may need to use the maximum aperture of the lens and a sufficiently fast shutter speed to capture some motion.) The obvious thing to do is to set the ISO so that the scene is properly exposed but, with many cameras, there is an alternative and that is to use an ISO which gives an under exposure of 2, 3 or even 4 stops. It would be difficult to frame the scene with ‘live view’ and the resulting image will be very dark! However if, in an image processing program such as Lightroom, one increases the exposure by the number of stops that one has under exposed it turns out that, if the camera is ISO invariant, the result will be almost identical – and possibly even better as the use of a lower ISO gives a higher dynamic range.
There may be further benefits, as suppose this is a sunset image with an interesting foreground. Using an ISO so that the foreground is suitable exposed will almost certainly ‘blow out’ the highlights in the sky. Dropping the ISO so that the sky is correctly exposed will probably make the foreground be very dark or even black. However one can then in post processing select the foreground (probably it is easiest to select the sky area with a ‘magic wand’ and invert the selection) and then selectively increase the brightness of the foreground.
The fundamental reason why this approach is now possible is that many of the latest cameras have very low noise sensors and associated electronics. Fuji, Sony and Nikon (which uses Sony sensors) are said to be particularly ISO invariant with, perhaps, Canon somewhat less so.
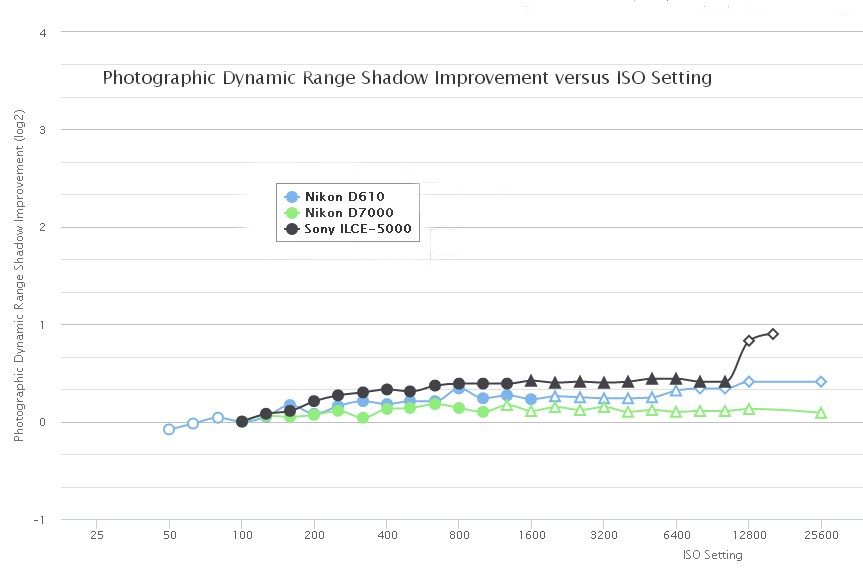
The chart shown in the website ‘https://www.photonstophotos.net/Charts/PDR_Shadow.htm’ can be used to select many cameras and those with a flatter curve are more ISO invariant.
A test for ISO Invariance
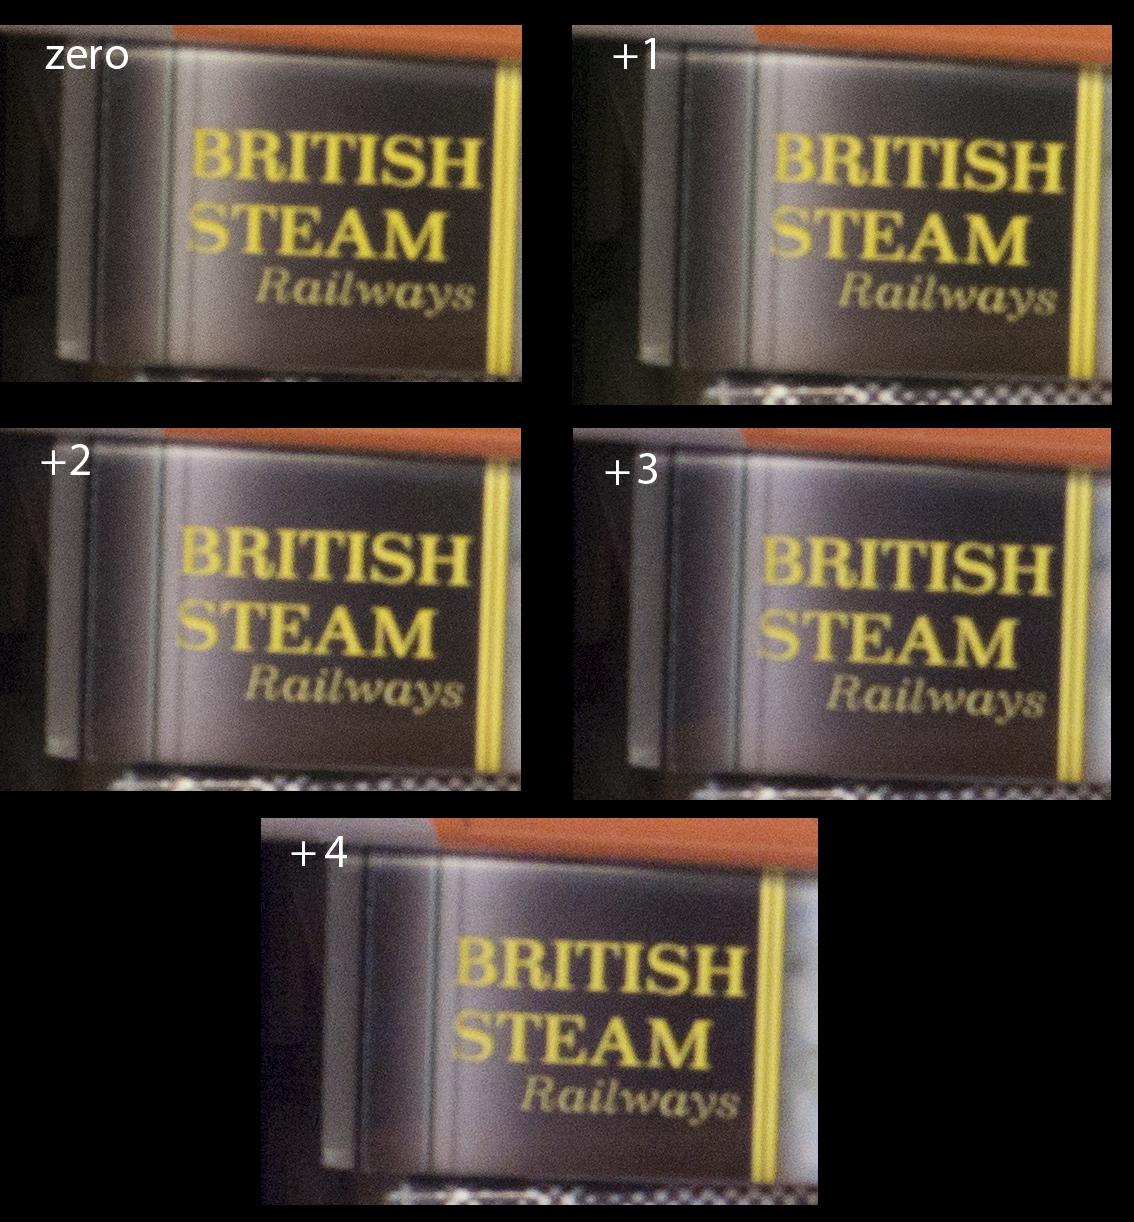
Using my Sony A5000, I took a series of images with, initially, the ‘correct’ ISO of 1600. I then reduced the ISO to 800, 400, 200 and 100 – this final one being 4 stops under exposed as seen in the set of images below.

In Lightroom the exposures were equalised (increasing, for example, the exposure by 4 stops for the ISO 100 image). Small crops are shown below. There is virtually no difference between them showing that the camera is essentially ISO invariant.
How does this relate to astrophotography?
Let us assume that Deep Sky Stacker (DSS) is to be used to align and stack a number of images. There is an obvious problem in that, if the images are significantly under exposed, it may not be able to find sufficient stars in the field to align on. I have had, once in the past, to ‘stretch’ each frame of my set of images first before importing them into DSS. But if this stretch is non-linear so that the bright stars are hardly affected, then this can be a good thing effectively increasing the dynamic range of the image. [There is an article in the digest which suggests converting the captured raw frames into Tiffs before importing into DSS.]
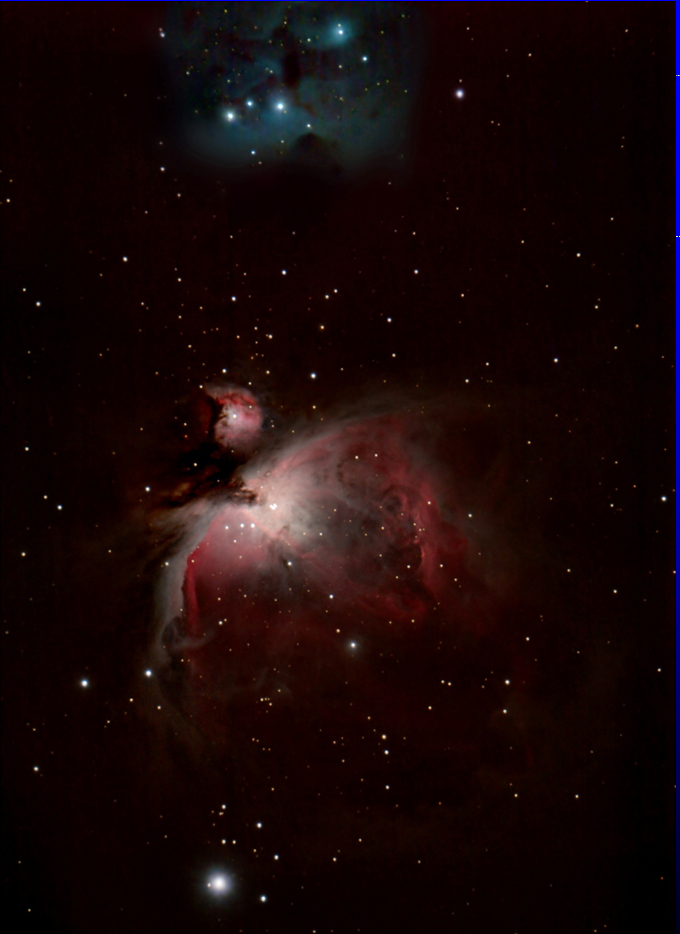
I can think of one example where, given an ISO invariant camera, this idea could be very useful. That is imaging the ‘Sword of Orion’. The nebular regions are far fainter than the central region around the trapezium stars. Using an ISO of 800 I had to reduce the exposure to 12 seconds to avoid over exposing this region (as seen below) requiring many individual frames to be taken to give an overall image with low enough noise to be able to bring out the fainter regions of the nebulosity.
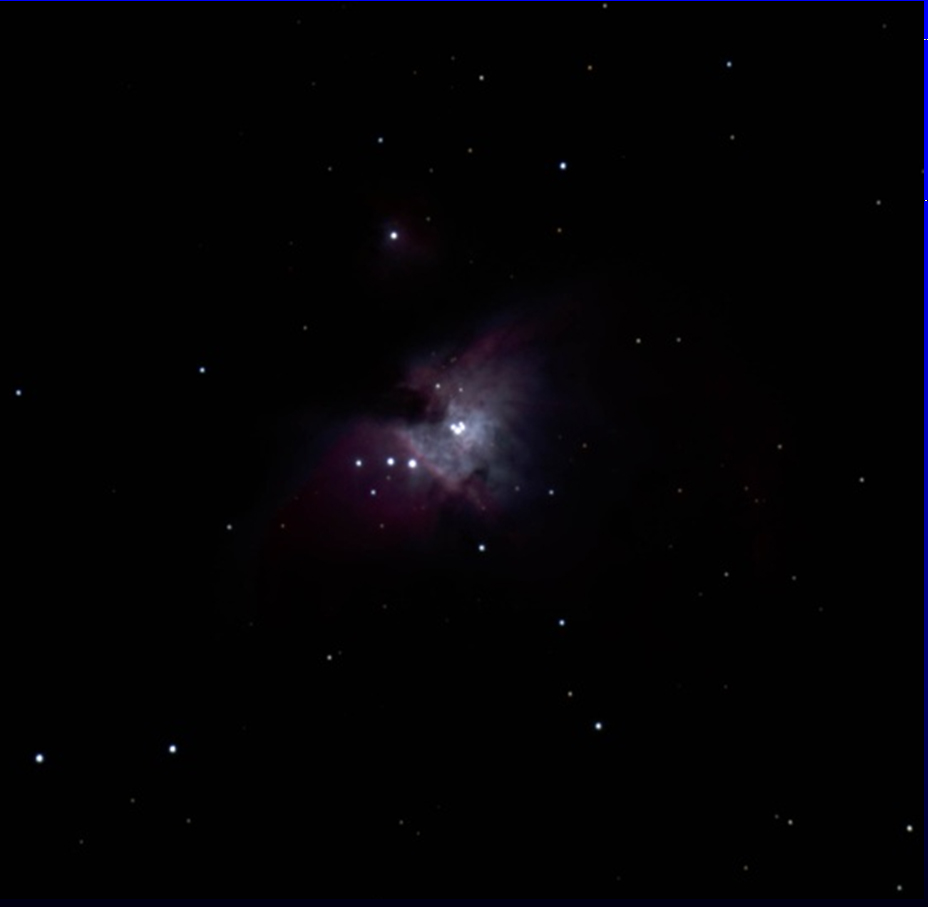
By reducing the ISO to say 200, I could have used exposures of 48 seconds so reducing the number of frames by 4 and, I suspect, a better final result would have been obtained. In the image below I had to undertake a significant amount of smoothing using a Gaussian Blur to reduce the noise in the outer regions of the nebula – having (with some effort) deselected the stars in these regions so these would not be blurred.
One example
Two sets of frames were taken as an imaging example during an astrophotography workshop for the Costa Blanca Astronomical Society. The sky was partially cloudy limiting the area of sky that could be imaged and the region around Jupiter in Libra was chosen. The camera used was a Sony Alpha 5000 which is thought (and the test above confirms) to be ISO invariant. [Note: this range of Sony mirror-less cameras have a lifting rear screen which allows a thin ice pack to be held with elastic bands against the rear wall of the camera just behind the sensor and so help to keep it cool. It will hence have a lower ‘dark current’ and so reduced noise.] Eleven frames were taken with an exposure of 30 seconds using ISO’s of both 100 and 800 and with the ‘in-camera dark subtraction’ mode employed. [This is usually enabled when exposures of more than ~10 seconds are taken. The camera takes a second identical exposure with the shutter closed and then differences the two to remove hot (or warm) pixels that show up in long exposures.] A 2 second delay was employed to eliminate the effects of camera shake as the shutter was depressed. The camera was mounted on a tracking mount to eliminate any star trailing. A very detailed description of processing the frames taken at ISO 100 is given in the digest article ‘An example of using Deep Sky Stacker and IRIS to produce a wide field image’.
In this case, DSS was able to find sufficient stars (~160) in both sets of frames, but the star threshold had to be set to 20% rather than 58% when stacking the 100 ISO frames. I should have considered that Jupiter, at magnitude -2.4, was just over 5 magnitudes (or 100 times) brighter than the brightest star in the field, Alpha Libri (just below Jupiter) at a magnitude +2.75. Without any stretching of the output from DSS, it was obvious that, at ISO 800, Jupiter was heavily over exposed and that its moon Europa was hidden. In contrast the ISO 100 image did show Europa as seen in the two images below.
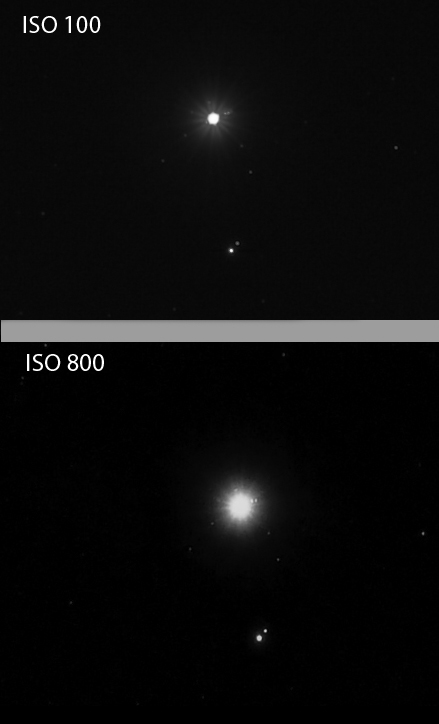
Unstretched outputs from Deep Sky Stacker at ISOs 100 and 800. (Alpha Libri below Jupiter is a double star.)
I then selected an area away from Jupiter and stretched both outputs from DSS using a ‘curves’ function in Adobe Photoshop. The curve, as seen in the screenshot below, was set to brighten the fainter stars more than the brighter ones.
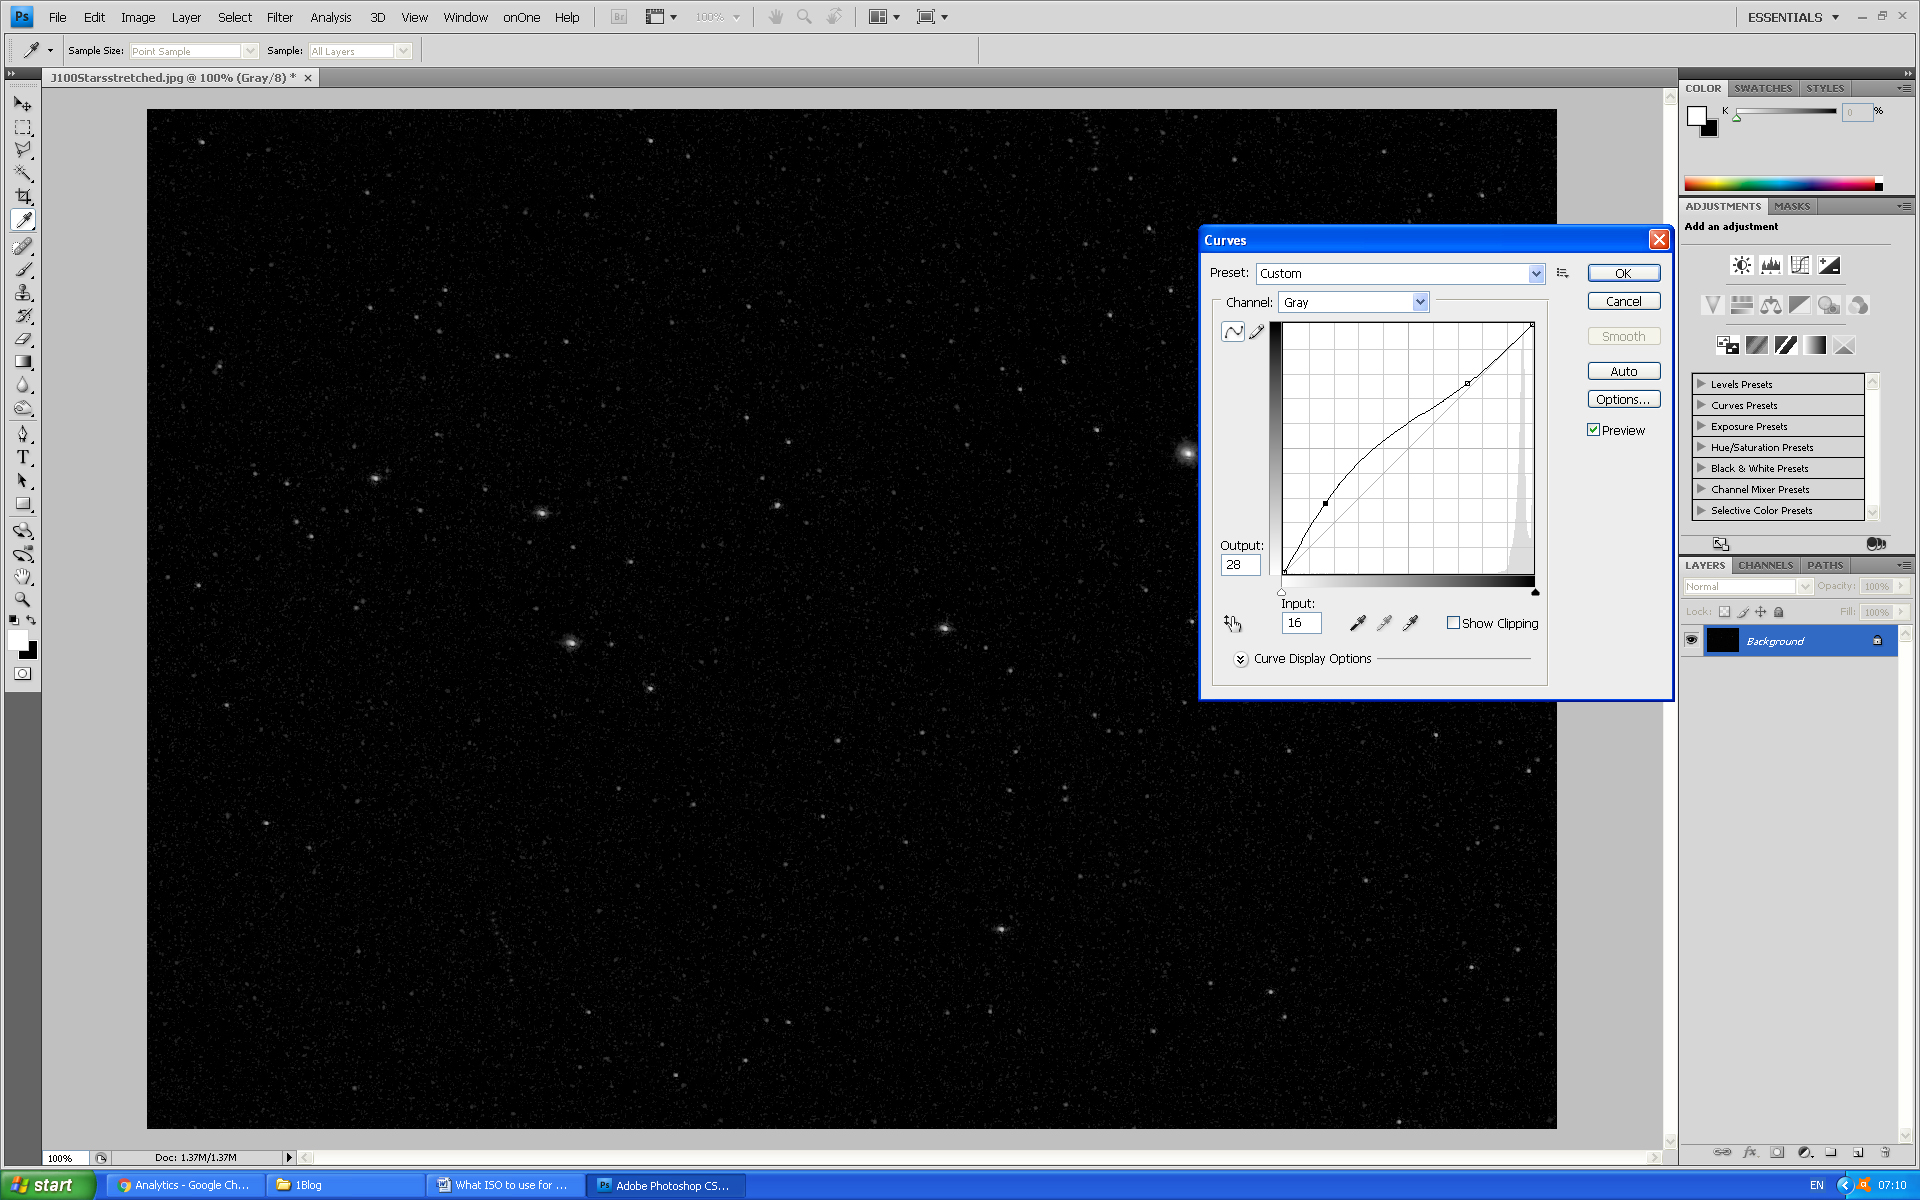
A curves function that can be used in Adobe Photoshop or GIMP to stretch an image. [GIMP can now (from April 2018) accept and handle the 16-bit Tiffs output from DSS.]
I repeated the application of the curve function until noise was apparent in the image then backtracked by one. These two images are seen below. One can see that the two are nearly identical so showing that the camera is ISO invariant – the ISO 800 image needed less stretching than the ISO 100 image as would be expected, but the lower initial noise in the ISO 100 image allowed more stretching to be applied before the background noise became apparent.
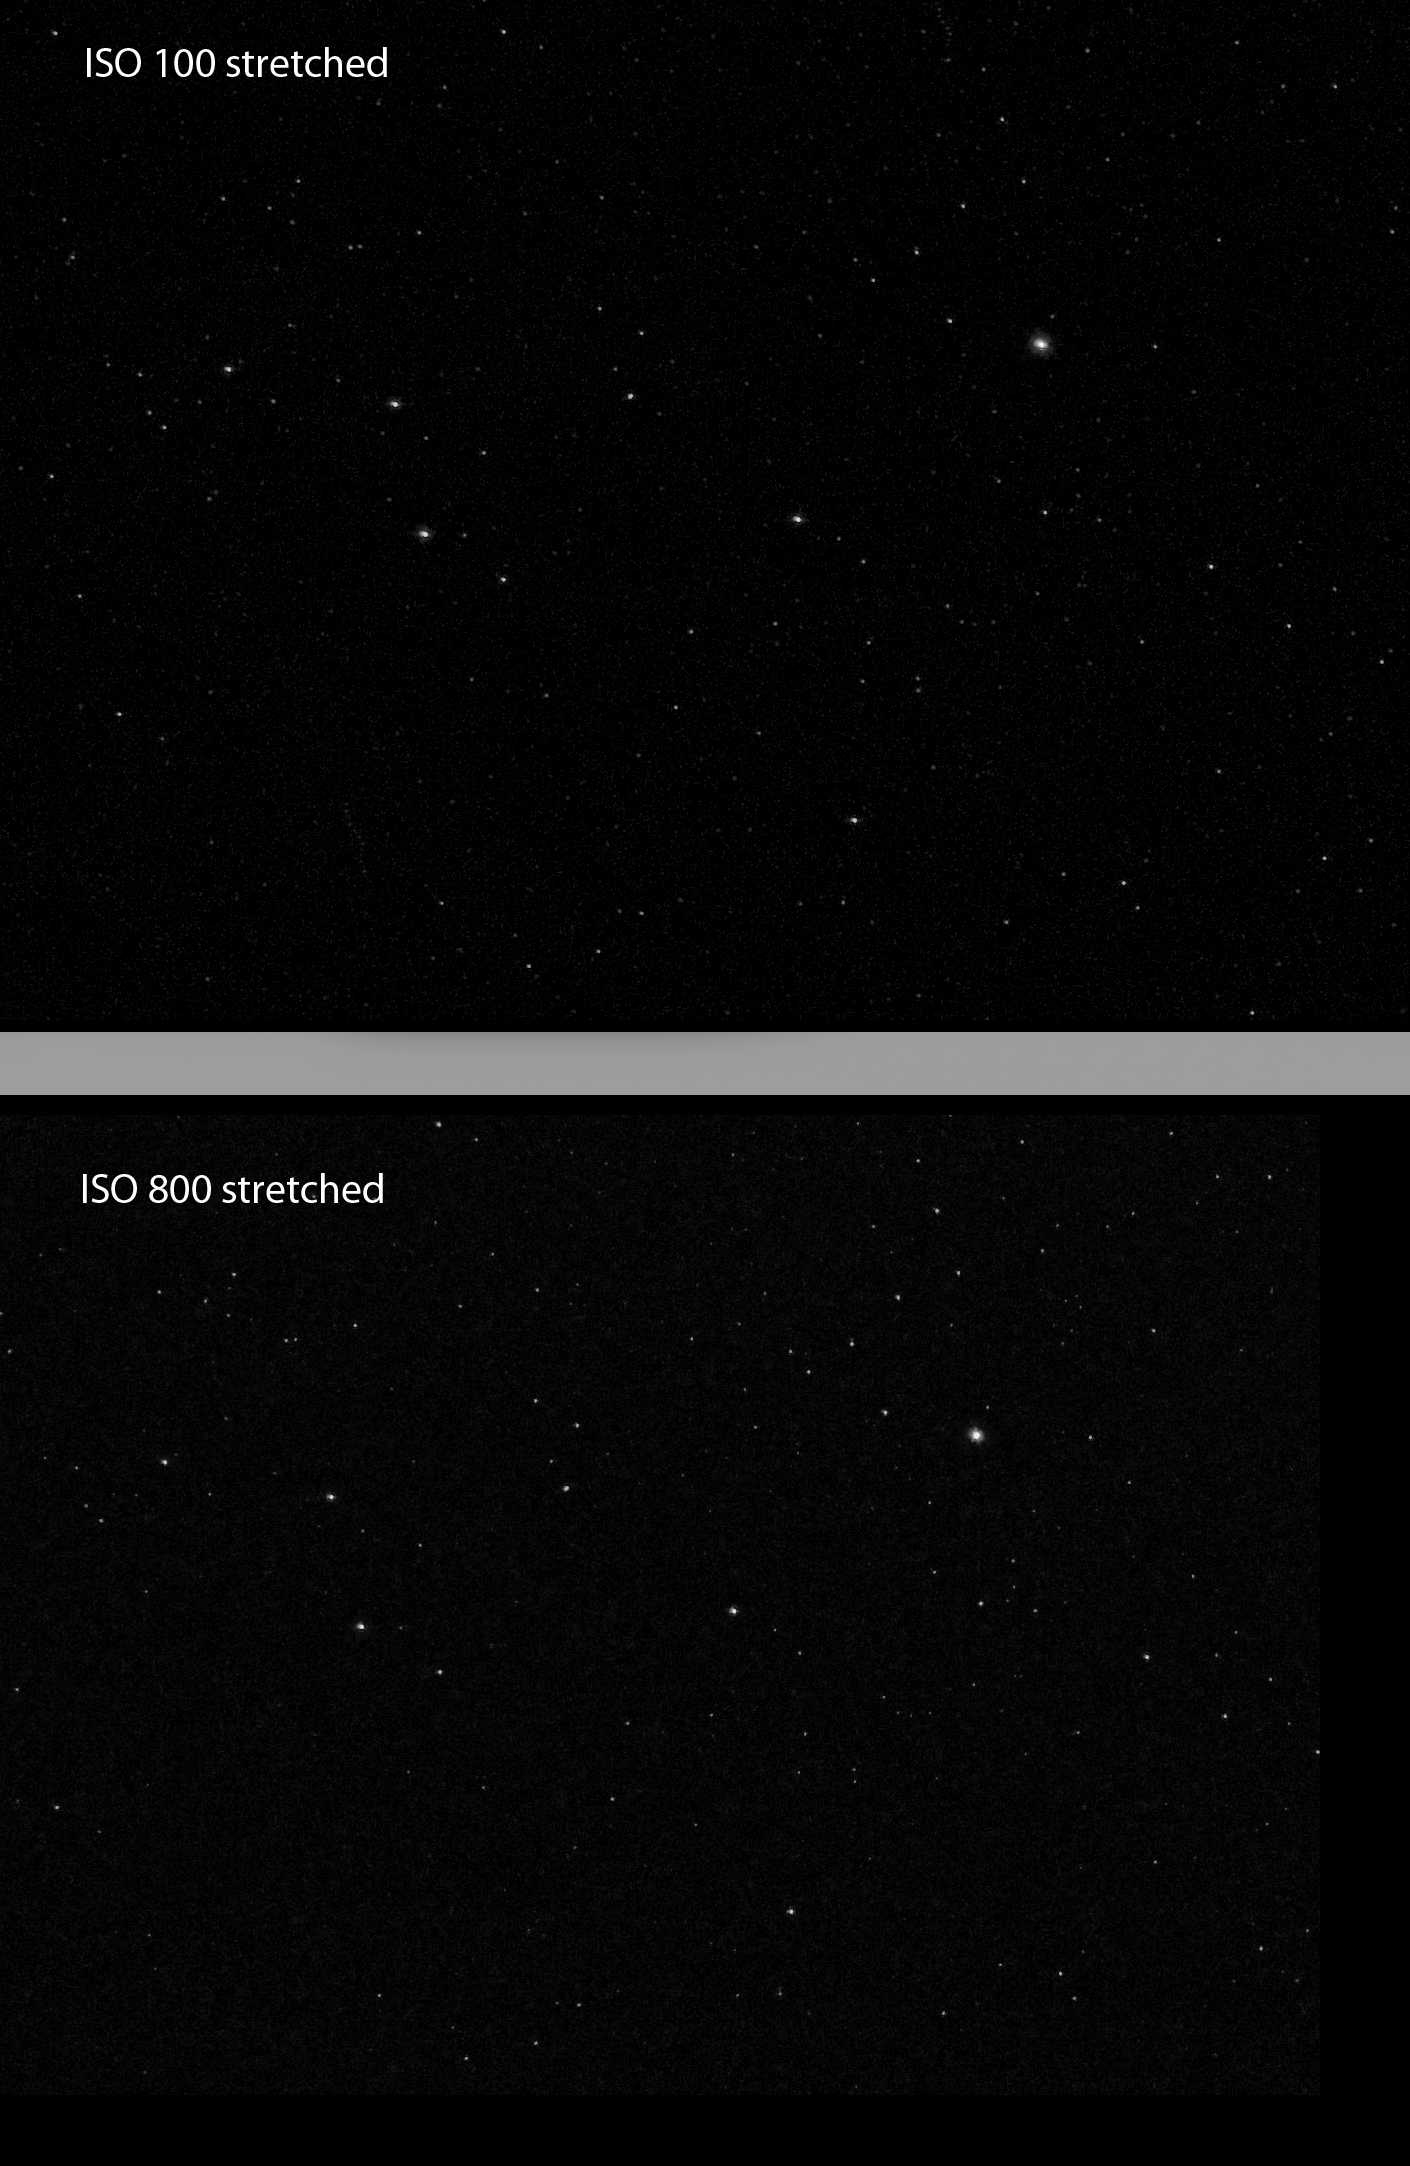
In this case, due to the very high dynamic range in the image with Jupiter so much brighter than the other stars, I think that, overall, the ISO 100 set of frames gave a better result.
Lying in Libra, the star field around Jupiter is not particularly exciting with the only star of note being the double star Alpha Libri – also known as Zubenelgenubi − which implies that it was once thought to be part of Scorpius.
Return to Astronomy Digest home page