MAY 2022
Sensor Resolution and Image Sampling.
[This is just one of many articles in the author’s Astronomy Digest.]
Sensor Resolution
When imaging, theresolution of the sensor will affect the quality of the image. There is a common misconception that if onedoubles the number of pixels in a sensor the resolution of the image will bedoubled. This is not the case. Theoretically, the resolution will increase by the squareroot of the increase in the number of pixels – so by 1.414 if the number ofpixels is doubled. A sensor’s resolutionis determined by the size of its pixels – the smaller the pixels the higher theresolution. There is thus an inverserelationship between pixel size and resolution – if one halves the pixel sizeone doubles the resolution (assuming that the image captured by the lens ortelescope is of sufficient quality).
Let’s take a couple of examples.
Fugi GFX 50 and GFX100 – these being the number of megapixels in each, equal sized, mediumformat sensor.
Pixel Size:
GFX 50 = 5.3microns
GFX 100 = 3.76 microns
The increase in resolution is simply 5.3 / 3.76 = 1.409.
Very close to the theoretical value of 1.414.
Sony A7S (12megapixels) and Sony A7 II (24 megapixels) – equal size full frame sensors.
Pixel size:
A7 S = 8.32 microns
A7 II = 5.93 microns
Increase in resolution is 8.32 / 5.93 = 1.403. Again very close to 1.414.
The result is that one does not gain as much as one mightexpect going from a 12 megapixel to a 24 megapixel sensor (assuming that theyare the same size).
In order to double the resolution, one needs to increase the number of pixels by a factor of 4 – the square root of 4 being 2 – so that one would need a 48 megapixel sensor to double the resolution of a 12 megapixel sensor.
Sampling of an image
An obvious objective when astroimaging is to capture all the detail in an image thatthe lens or telescope provides. Eachpixel gives one sample of the image, capturing an area having an angular size whichis determined by the pixel size and the focal length of the lens ortelescope.
An example: Sony A7 II with an 200 mm f/4 telescope sohaving a focal length of 800 mm.
The angular size subtended by each pixel is 5.93 microns / (800 x 1,000 microns) = 0.0000074125 Radians. (Converting mm to microns)
To convert this into arc seconds one multiplies by 57.3 togive degrees and then 3,600 to give arc seconds.
0.0000074125 x 57.3 x 3,600 = 1.53 arc seconds.
This is actually pretty good as the atmospheric seeing willusually limit the resolution to ~4 arc seconds. The fundamental resolution of an 200 mmaperture telescope is ~0.6 arc seconds so this should not be the limitingfactor and can be ignored.
The Nyquist Theorum –often applied to audio signals
This states that to extract all the information in thewaveform one has to sample it at twice the highest frequency in the waveform. The samples will then allow the waveform tobe recreated accurately.
It can also be applied to sampling an image – which is twodimensional. But then, for best results,it should be sampled with a resolution of one third the hoped for resolution. (As has been shown by experiment.) So our telescope/camera combination of 1.53arc seconds works quite well as one third of 4 arc seconds is 1.33 arc secondsso the two are comparable. The image canthus be said to be well sampled. However,under excellent seeing conditions of 2 arc seconds, the image would be undersampled.
If the Sony A7 S were to be used, the angular resolution per pixel is then 2.15 arc seconds so the image is said to be under sampled unless the seeing is poor.
The Sony A7 II withan 8 inch Schmidt-Cassegrain, f/10, telescope having a 2,030 mm focal length.
Here the angular resolution per pixel is 0.6 arc seconds so the image is said to beover sampled under typical conditions, but ideal if the seeing is very good at~2 arc seconds.
The Sony A7 II with an80 mm aperture, f/6, telescope having a 480 mm focal length.
Here the angular resolution per pixel is 2.55 arc seconds sothe image is said to be under sampled.
In this case, a camera with smaller pixels will be anadvantage. For example, a 20 megapixel SonyA5000 mirrorless camera has a pixel size of 4.27 microns and so each pixel subtends 1.1 arc seconds and so this camera will be fine for typical seeingconditions.
What if an image isover or under sampled?
Let’s say the image is over sampled by a factor of 2. The pixels will be smaller than they need to be and so less sensitive than if the image were well sampled with larger pixels. To achieve the same signal to noise ratio the exposure time will need to be increased. Some astro-photographers state that this is a bad thing. But I do not believe that this a real problem. It does not matter if the pixels are too small or too large for optimum sampling, the total light collected by the sensor in a given time will be the same. If one downsizes the resulting oversampled image in post processing to effectively increase the size of the pixels by factor of 2, adjacent pixels will be averaged and the noise reduced to give just the same result as if the image was optimally sampled. [Note: a subtlety here related to the section on sensor resolution – to give the result of twice as big pixels, the image scale will need to be reduced by a factor of 4. Downsizing an image really does reduce the noise level.] An alternative is simply to apply a Gaussian blur of, perhaps, 2 pixels to the image which will have a similar effect.
Now let’s assume that the image is under sampled. This was the problem with the first camera used on the Hubble Space Telescope and so it employed the method of ‘dithering’ the captured images so that individual images are slightly displaced on the sensor. If, when these images are stacked, ‘drizzle’ is employed, the effective resolution can be increased so giving the effect of having smaller pixels – and so better sampling the image. This is discussed in the digest article ‘Binning, Dithering and Drizzling’. https://www.ianmorison.com/binning-dithering-and-drizzling/
Theory and Practice
On the night of the 11th May 2022, I imaged the Moon using a micro 4/3 sensor astro camera (used as a ‘webcam’) having 4.63 micron sized pixels coupled to a Richey-Chretien telescope having a focal length of 1,625mm. As described above, the theoretical angle subtended by each pixel is thus 0.58 arc seconds.
The Lunar image
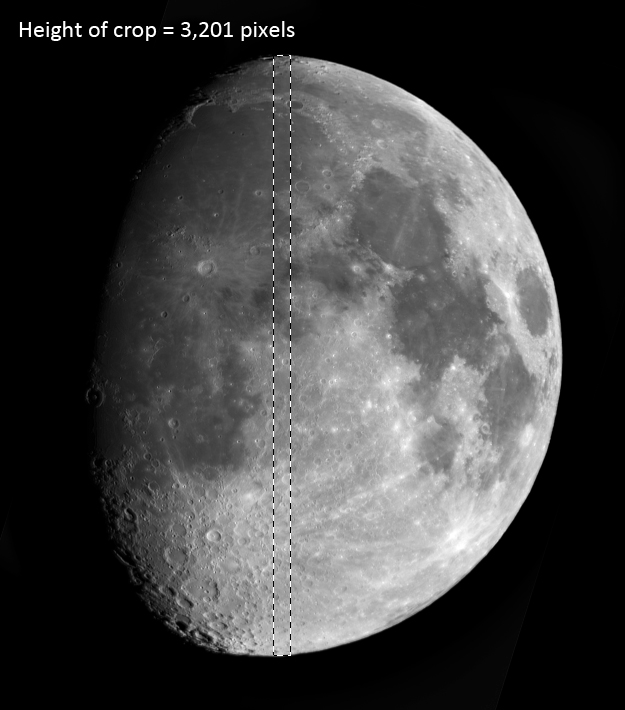
When the image was cropped to just cover the height of thelunar disk, the lunar diameter in pixels was found to be 3,201 pixels.
Using Stellarium set to the time of the observation, it was found that the angular size of the lunar disk was 31 arc minutes and 31 arc seconds giving a total of 1,891 arc seconds. Dividing this by the number of pixels across the lunar disk gives a value of 0.6 arc seconds – the actual angle subtended by each pixel – so theory and practice agree.